
How to Safely Upgrade to Windows 11 Without Losing Data
Upgrading your operating system can feel risky, especially when important files are stored on your PC. However, you can upgrade to Windows 11 without losing data when you use the correct installation method. An in-place upgrade is designed to migrate your files, apps, and settings to Windows 11.
Windows 11 also offers a modern interface, updated security features, and continued support for compatible hardware. Windows 10 support ended on October 14, 2025, so moving to a supported operating system is now more important.
Before starting, check your device compatibility and create a reliable backup. You should also review your available storage and confirm that essential apps support Windows 11. Microsoft recommends using official installation methods and checking eligibility before upgrading.
According to Microsoft Support, preparing your system properly ensures a seamless transition. Whether you are a casual user or a tech enthusiast, taking the right precautions prevents frustrating data loss and hardware bottlenecks.
This guide explains how to upgrade safely, what happens to your files, and what drawbacks to consider. It also answers common questions about storage, software compatibility, rollback options, and activation.
Can I Upgrade to Windows 11 Without Losing Everything?
Yes, you can usually upgrade to Windows 11 without losing your personal files. The key is choosing an in-place upgrade instead of a clean installation. Microsoft states that the default setup option keeps personal files, installed apps, and Windows settings.
During setup, Windows gives you options for what to keep. Select Keep personal files and apps when you want the closest transition from Windows 10. This option migrates your existing data and applications into the new Windows 11 installation.
Your documents, pictures, music, desktop files, and many settings should remain available after the upgrade. However, some incompatible applications may be removed during the process. Microsoft may also place compatibility holds on devices with known software or driver problems.
For extra protection, back up important files before starting. Store critical documents on an external drive or trusted cloud service. This precaution protects your data if an unexpected installation problem occurs.
Using Official Microsoft Installation Tools
Using official installation tools is one of the safest ways to upgrade Windows. Microsoft provides several installation methods, including Windows Update, the Windows 11 Installation Assistant, and installation media. The right choice depends on your device and upgrade requirements.
For a standard upgrade, Windows Update or the Installation Assistant is usually the simplest approach. These methods allow Windows to check compatibility before completing the installation. They also support an in-place upgrade that can preserve your files and applications.
If you create installation media, avoid automatically booting from the USB drive. Booting from installation media can lead to a clean installation, which removes existing files and applications. Instead, when appropriate, open the USB drive in Windows and run setup.exe from the current Windows environment.
Before downloading anything, verify that you are using Microsoft’s official software. Avoid unofficial installers or modified Windows images. Official tools reduce the risk of corrupted installation files and unwanted software.
Is 128 GB Enough to Install Windows 11?
Yes, 128 GB is technically enough to meet Windows 11’s minimum storage requirement. Microsoft currently lists 64 GB or greater storage as the minimum requirement. However, the minimum does not mean that 128 GB provides plenty of usable space.
Windows also needs free space for updates, temporary files, recovery data, applications, and personal content. A 128 GB drive can become crowded quickly if you store large games, videos, photos, or other media locally.
Before upgrading, check how much free space remains on your system drive. A nearly full drive can make the upgrade less convenient and leave limited room for future updates. Microsoft also notes that storage requirements can increase over time as Windows receives updates and features.
If your drive is nearly full, remove unnecessary files before starting. Consider moving large media libraries to external storage or a trusted cloud service.
For long-term use, a larger SSD is preferable. More available space gives Windows room for updates and helps you manage applications without constantly deleting files.
Managing Limited Storage Effectively
Managing limited storage before an upgrade can prevent unnecessary problems. Start by checking which files and applications use the most space. Windows provides built-in storage management tools that can help identify temporary and unnecessary files.
Storage Sense can automatically remove certain temporary files and manage items such as the Recycle Bin. You can also uninstall applications that you no longer use. Removing old installers and unnecessary downloads can recover additional space.
Large personal files often consume the most storage. Move videos, photos, backups, and other large files to an external drive or suitable cloud storage. Do not delete important files simply to create space unless you have another copy.
Before upgrading, also check the amount of free space on the system drive. PC Health Check can show storage information alongside other device details.
If your PC has only 128 GB of storage, regular maintenance becomes more important. Keep enough free space for Windows updates, applications, and temporary system operations. A larger SSD may be the better long-term solution if storage remains consistently low.
Do I Lose Any Data When Upgrading to Windows 11?
A standard in-place upgrade is designed to preserve your personal files, applications, and Windows settings. Microsoft confirms that the default Windows 11 upgrade experience moves files and data into the new installation.
However, no major operating system upgrade is completely risk-free. Unexpected power loss, hardware problems, corrupted system files, or software conflicts can interfere with installation. If your computer is already behaving strangely, check for common malware warning signs before beginning the upgrade.
That is why a complete backup should be part of your upgrade plan. Back up important documents, photos, work files, browser data, and other irreplaceable content before beginning.
You should also check critical software and hardware for Windows 11 compatibility. Microsoft recommends checking with software publishers and accessory manufacturers when compatibility is uncertain.
The biggest risk usually comes from choosing the wrong installation option. A clean installation can remove personal files and applications. Always review the setup screen before continuing and confirm that Keep personal files and apps is selected.
Creating Reliable System Backups
A reliable backup gives you protection if something goes wrong during the upgrade. Before installing Windows 11, copy your most important files to an external drive or a trusted cloud storage service.
Focus first on files that would be difficult or impossible to replace. These may include work documents, family photos, financial records, project files, and personal media. Do not assume that files stored on your desktop are automatically backed up. Before backing up and upgrading, it is also worth checking your PC for malware or other security issues, especially if you have noticed unusual behavior.
If you use OneDrive or another cloud service, confirm that important folders have finished syncing. Microsoft recommends backing up files before installing a new version of Windows.
For additional protection, keep a separate copy of critical files. Ideally, that copy should remain disconnected from the computer during the upgrade.
You can also review your Windows recovery options before starting. A backup is different from a restore point, so do not rely on System Restore as your only protection.
Taking a few minutes to secure your files can prevent major frustration later. Once the backup is verified, you can begin the Windows 11 upgrade with greater confidence.
How Do I Install Windows 11 on My PC Without Losing Data?
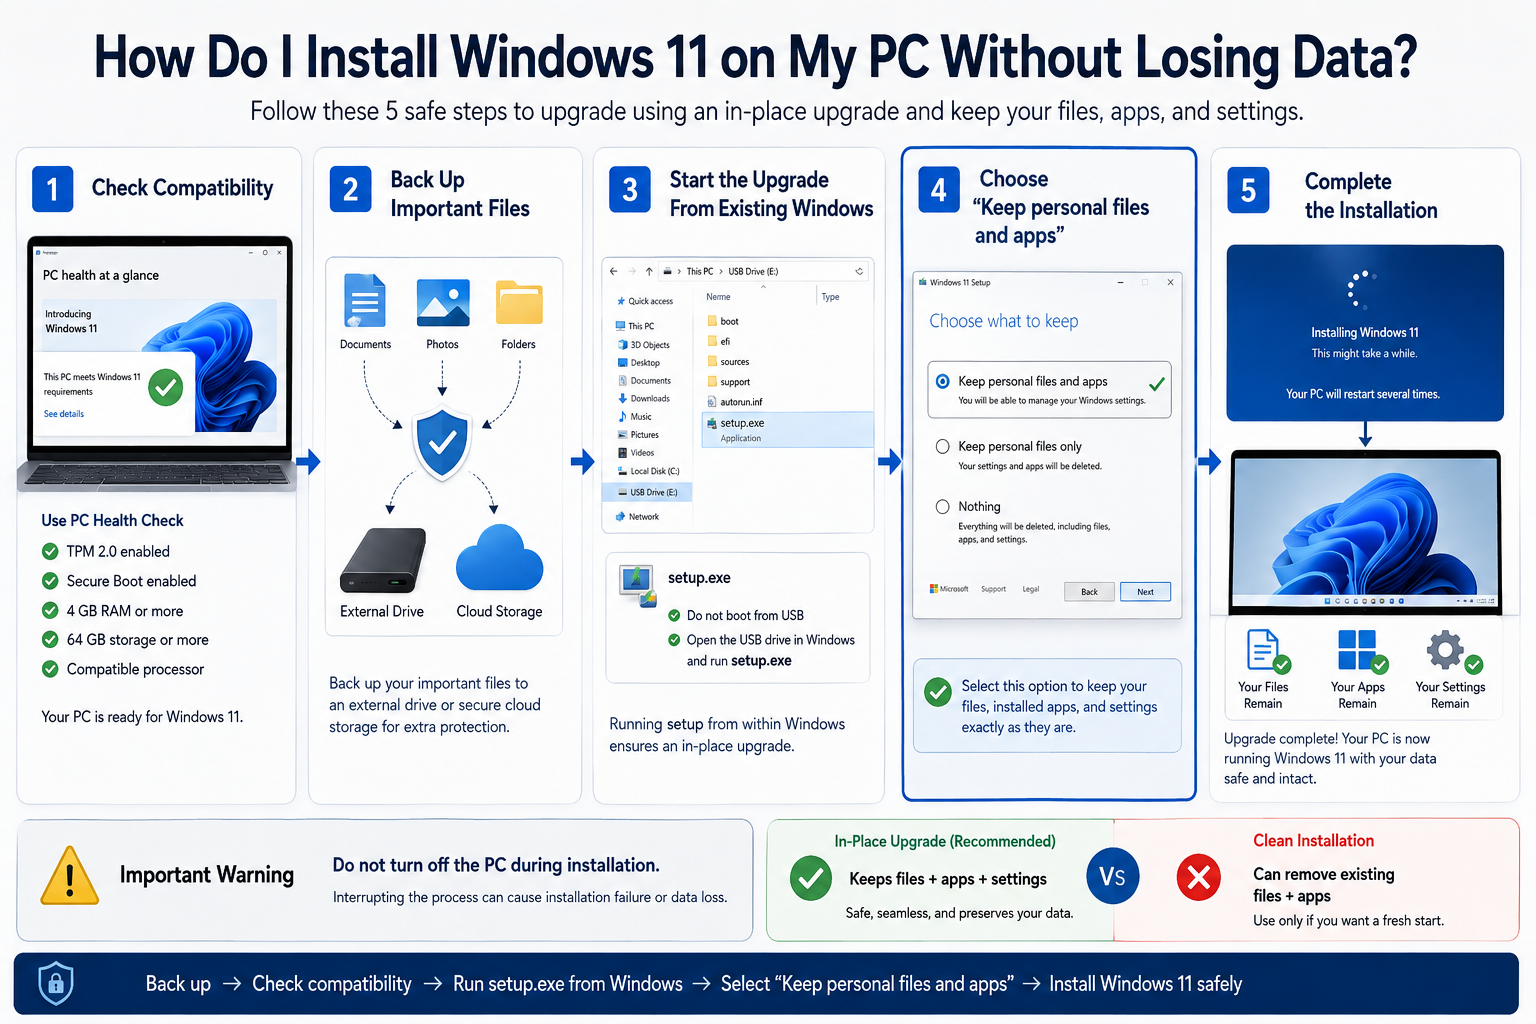

The safest approach is to perform an in-place upgrade from your existing Windows installation. First, confirm that your PC meets Windows 11 requirements. Microsoft recommends using the PC Health Check app to verify compatibility.
Next, back up important files and connect your computer to reliable power. Install Windows 11 through Windows Update or use an official Microsoft installation method.
If you use installation media, open the USB drive from your current Windows desktop. Run setup.exe instead of booting directly from the USB when your goal is to preserve your existing installation.
When Windows Setup reaches the retention options, choose Keep personal files and apps. This is the default option and preserves your personal data, applications, and Windows settings.
After confirming the selection, begin the installation. Your PC will restart several times while Windows migrates the existing installation.
Do not turn off the computer during this process. Once installation finishes, sign in and check your files, applications, settings, and device drivers.
Running the In-Place Upgrade Assistant
The Windows 11 Installation Assistant can simplify the upgrade process for compatible PCs. It is designed for users who want to move from their current Windows installation to Windows 11 without performing a clean installation.
Before running the assistant, complete a backup and confirm that your device meets Windows 11 requirements. PC Health Check can help identify compatibility issues before you begin.
Close unnecessary applications and save any open work. Keep the PC connected to power throughout the installation. You should also maintain a stable internet connection while Windows downloads the required installation files.
Follow the prompts shown by Windows Setup. When the installer presents the Keep personal files and apps option, confirm that it remains selected. Microsoft identifies this option as the default choice for an in-place upgrade.
The computer will restart several times during the process. Do not interrupt these restarts or disconnect the power.
After Windows 11 loads, verify that your important files are present. Open several essential applications and check your key hardware devices. This quick review can identify compatibility problems before they affect your normal workflow.
What Are the Negatives of Upgrading to Windows 11?
Windows 11 provides newer security features and a modern interface, but the upgrade can have drawbacks. The biggest issue for some users is hardware compatibility. Windows 11 has stricter requirements than older Windows versions, including TPM 2.0, Secure Boot capability, supported processors, and at least 64 GB of storage.
The interface may also require adjustment. The taskbar, Start menu, Settings layout, and context menus differ from Windows 10. Users who rely on older workflows may need time to become comfortable with the changes.
Software and accessory compatibility can also vary. Most compatible Windows 10 software and accessories are expected to work, but Microsoft recommends checking with developers and manufacturers for specific products.
Performance can depend heavily on your hardware. Older or lower-powered systems may not provide the same experience as newer PCs.
Before upgrading, weigh these factors against the benefits of moving to a supported operating system. A compatibility check and backup can reduce many common upgrade problems.
Addressing Hardware Compatibility Hurdles
Hardware compatibility is one of the most important checks before upgrading. Windows 11 requires supported hardware, including a compatible 64-bit processor, at least 4 GB of RAM, 64 GB of storage, UEFI firmware, Secure Boot capability, and TPM 2.0.
The easiest way to check eligibility is through Microsoft’s PC Health Check app. It provides an overall assessment and can identify why a device does not qualify.
Avoid relying on unofficial workarounds simply to bypass Windows 11 requirements. Unsupported installations may create compatibility, update, or stability concerns. Staying within Microsoft’s supported hardware requirements is the safer long-term choice.
You should also check your printer, scanner, graphics hardware, and other accessories. Visit the manufacturer’s support page when you need current Windows 11 drivers.
If your PC fails the compatibility check, consider whether upgrading the hardware is practical. You should also look for signs that the laptop itself may be reaching the end of its useful life, such as overheating, frequent crashes, battery problems, or unusually slow performance. In some cases, replacing an older PC may make more sense than forcing an unsupported installation.
A compatibility check should happen before you begin the upgrade. It can prevent installation failures and help you identify potential hardware problems early.
FREQUENTLY ASKED QUESTIONS
Can I downgrade back to Windows 10 if I do not like Windows 11?
Yes, you can easily downgrade back to your previous operating system within ten days of the upgrade without losing your data. Microsoft provides a built-in rollback feature located within the recovery settings menu. This option reverts your system files, apps, and preferences back to the exact state they were in before the transition. After the ten-day window expires, the system automatically deletes the old installation files to free up disk space, meaning a clean reinstall would be required to go back.
Will my installed software and games stop working after the upgrade?
Most modern applications and video games will continue to function normally without requiring reinstallations or configuration changes. However, older legacy software, specialized utility tools, and outdated hardware drivers may encounter compatibility issues on the new architecture. It is wise to check developer websites for updates before starting the transition. If an app fails to launch after the upgrade, running it in compatibility mode or reinstalling the latest patch usually resolves the problem quickly.
How long does the upgrade process typically take to complete?
The duration of the installation process varies depending on your internet connection speed and your computer’s hardware specifications. On a modern machine with a solid-state drive and a fast broadband connection, the entire procedure usually takes between thirty minutes to an hour. Older mechanical hard drives or slower internet speeds can stretch this timeline significantly. During the process, your computer will restart multiple times, and you should ensure the device remains plugged into a reliable power source to prevent disruptions.
Do I need a new product key to move from Windows 10 to Windows 11?
You do not need to purchase a new product key if your current installation is already genuinely activated. Windows 11 uses a digital license tied directly to your computer’s hardware components and your Microsoft account. Once the upgrade process finishes, the operating system will recognize your digital entitlement and activate automatically. If your current system lacks proper activation, you will need to resolve that status or enter a valid product key during or after the installation setup.
Conclusion
Navigating the shift to a modern operating system does not have to be a stressful or destructive experience. By verifying your system compatibility, backing up your essential files, and using official installation tools, you can successfully upgrade to Windows 11 without losing data. Weighing the potential hardware drawbacks against the modern security benefits helps you make an informed decision about your device’s future. Remember to take your time, follow the recommended steps carefully, and keep your critical documents secured in a secondary location before starting. Embrace the enhanced features and improved performance of your updated machine with complete peace of mind today.
If your computer does not meet Windows 11 requirements or is becoming outdated, upgrading the hardware may be a better option than continuing with an older system. Before buying a replacement, compare the advantages of different operating systems and devices to find the option that best matches your needs and budget.