Category Archives: Technology

Posts are related to technology.

Perplexity vs Google Search: Which Is Better?

Perplexity vs Google Search: Which Is Better?

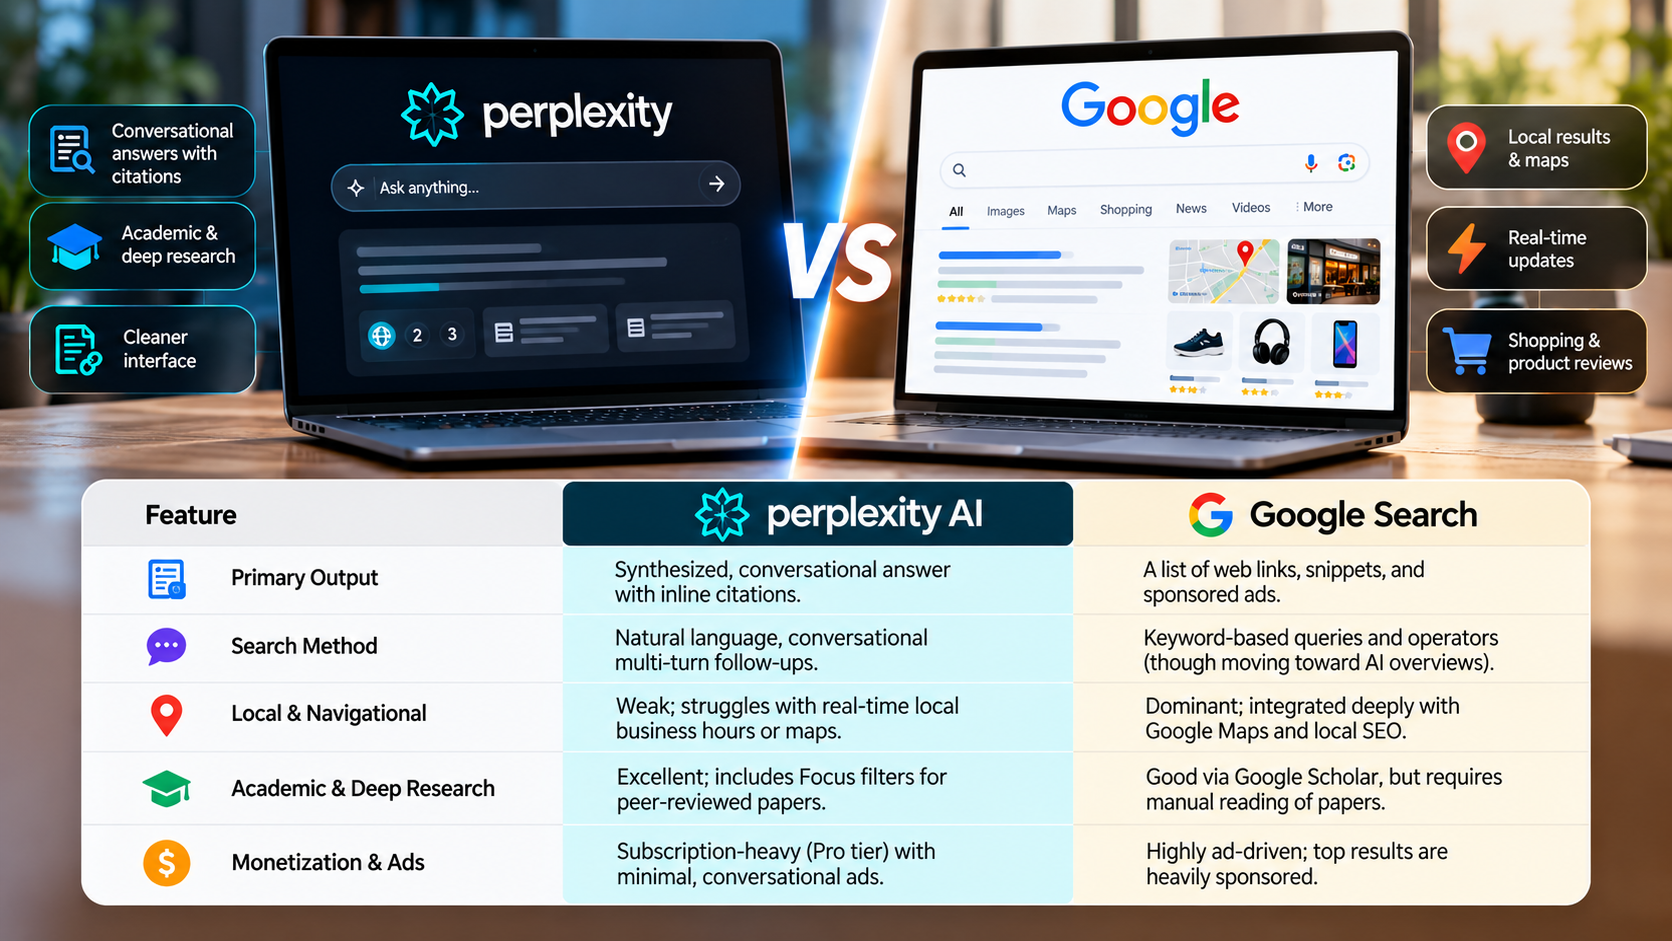
Finding reliable information online is easier when you use the right search tool. The comparison between Perplexity vs Google Search has become increasingly relevant as AI-powered search changes how people discover information. Google helps users find websites, products, maps, videos, and other online resources. Perplexity takes a different approach by using artificial intelligence to organize information into conversational answers with citations.

Both platforms can help you research topics, but they serve different purposes. Google is particularly useful for finding specific websites and exploring multiple sources. Perplexity can save time when you need an overview of a complicated subject.

However, neither platform guarantees completely accurate results. AI-generated answers can miss context, and conventional search results can contain outdated or unreliable information. For guidance on creating useful content and improving search visibility, explore Google Search Central, Google’s official resource for website owners and SEO professionals.

In this guide, we compare Perplexity and Google Search across speed, accuracy, research capabilities, and search engine optimization. You will also discover when to use each platform and how combining them can improve your research workflow.

Is Perplexity Better Than Google Search?

Whether Perplexity is better than Google Search depends on your goals. Google excels at helping users find specific websites, local businesses, shopping pages, maps, and multimedia content. Its search results provide multiple sources, allowing users to compare information and decide which pages deserve further attention.

Perplexity focuses on answering questions directly. It retrieves relevant information from online sources and combines findings into a conversational response. Its citations help users investigate the original material without searching for every source manually.

For example, Google is useful when you need an official website, a nearby restaurant, or a particular product listing. Perplexity can be more convenient when comparing several products or learning about an unfamiliar subject. Students comparing these approaches can also explore AI vs Google for Studying: Which Is Best? to understand how each tool supports learning and research.

The main difference is how each platform presents information. Google primarily helps you discover sources, while Perplexity emphasizes synthesized answers.

However, Perplexity’s summaries can omit important details or misinterpret evidence. Google’s results can also include unreliable pages. For important decisions, verify claims using trustworthy sources rather than relying on either platform alone.

The Impact of AI-Driven Citations on Research Speed

AI-driven citations can make online research more efficient by bringing relevant findings together in one response. Instead of opening several pages immediately, users can review a summary and identify the sources most relevant to their questions.

Perplexity displays citations alongside its answers, helping readers trace information back to its original sources. This approach can be useful for academic research, technical questions, product comparisons, and general learning.

For example, someone researching a software feature might use Perplexity to identify relevant documentation and understand the basic steps. They can then open the cited documentation to confirm the instructions.

However, citations do not automatically make an answer accurate. A source may support only part of a claim, and a summary can overlook conflicting evidence. Multiple websites may also repeat information from the same original source.

To improve reliability, check publication dates and prioritize official documentation or primary research. Understanding the difference between primary and secondary sources  can also help you determine whether a citation provides original evidence or summarizes existing findings. Google can help locate additional sources and independent perspectives.

The best approach is to use AI-generated summaries to guide your research, not replace verification. This balances convenience with a more careful evaluation of the available evidence.

Is Perplexity a Good AI Search Engine?

Perplexity is a useful AI search engine for people who want direct answers supported by online sources. Instead of displaying only a traditional list of links, it retrieves relevant information and organizes it into a conversational response.

This format can simplify research on unfamiliar subjects. Users can explore historical events, investigate technical questions, compare products, or learn about developing industry trends. Follow-up questions also make it easier to examine specific details without repeating the entire search process.

Another advantage is its use of citations. Readers can investigate the underlying sources and determine whether the evidence supports the generated explanation. However, the quality of the response depends on the sources retrieved and how accurately the AI interprets them.

Perplexity may overlook important information, misunderstand a webpage, or present incomplete conclusions. Live web retrieval can help surface recent information, but it does not guarantee that every answer reflects the latest developments.

For these reasons, Perplexity works best as a research assistant rather than an unquestionable authority. It can help you understand a topic faster, but important claims still require independent verification.

Real-Time Web Retrieval and Accuracy Benefits

Live web retrieval allows Perplexity to gather information from online sources instead of relying entirely on knowledge acquired during model training. This can help when researching software updates, recent announcements, business developments, or breaking news.

The platform can combine information from several webpages into one response. Users can then review the citations to investigate specific claims or explore related details.

However, accessing current webpages does not guarantee accurate conclusions. A recently published article may contain errors, while an older official document may provide more reliable information. Several websites may also repeat the same unsupported claim. When evaluating research findings, look for the 10 signs of a reliable study to assess the quality of the evidence before accepting its conclusions.

Another limitation is source coverage. If relevant information is unavailable, inaccessible, or overlooked during retrieval, the resulting answer may be incomplete. AI systems can also misunderstand technical language or miss important qualifications.

For better results, check publication dates, compare independent sources, and consult official documentation whenever possible. Use Google to find additional reports or original documents when necessary.

Perplexity can reduce the effort involved in gathering information, but accuracy still depends on careful source evaluation. This is particularly important when researching health, financial, legal, or other high-stakes subjects.

Which Is Better Than Perplexity?

Perplexity is not the only AI tool available for research and productivity. Several alternatives offer different capabilities, so the right choice depends on your intended task rather than a universal ranking.

ChatGPT can assist with writing, brainstorming, coding, data analysis, and interactive problem-solving. Available capabilities depend on the model, plan, and enabled tools.

Claude offers writing assistance, document analysis, and coding support. Its suitability depends on the task, model, and available context.

Microsoft Copilot integrates with supported Microsoft products and services. This can help users who regularly work with Microsoft 365 applications.

Google Gemini supports research, writing, and other tasks, with integrations available through supported Google services and account configurations.

Perplexity remains useful when you want web-based research presented as a conversational answer with citations. However, another tool may suit your workflow better if you primarily create content, analyze uploaded documents, or work within a particular software ecosystem.

Before choosing an alternative, consider source verification, document support, integrations, privacy requirements, and cost. Testing tools against your actual tasks is more useful than relying on broad claims about which AI assistant performs best.

Choosing Specialized AI Tools for Document Analysis

Specialized AI tools can help professionals analyze lengthy documents without searching the public web for every answer. Depending on the platform and plan, users may upload supported PDFs, reports, spreadsheets, and other files to investigate specific questions.

For example, a financial analyst might use an AI assistant to locate figures in a lengthy report. A student could ask questions about a research paper, while a developer might examine technical documentation.

These workflows can save time, but results depend on document quality, file limits, context capacity, and the model’s ability to interpret tables or complex layouts. An AI assistant may overlook footnotes, misread figures, or combine details incorrectly.

For sensitive business information, review the platform’s data-handling policies before uploading proprietary files. It is also worth understanding AI prompt injection, a technique that can manipulate AI systems into following malicious instructions or exposing information they should not reveal. Always verify important calculations and quotations against the original document.

Perplexity may also support document-based workflows, depending on the features available to your account. The important distinction is whether your task requires public web research, analysis of supplied documents, or both.

Choose a tool based on how reliably it handles your actual materials. For complex work, use AI to locate relevant information and organize your analysis, then verify the conclusions independently.

Is Perplexity Good for SEO?

Perplexity introduces another consideration for search engine optimization: visibility within AI-generated answers. Traditional SEO focuses on helping relevant webpages appear in search results and attract visitors. AI-powered search creates another discovery channel through summarized information and citations.

For website owners, appearing in a Perplexity citation may increase brand exposure and potentially generate referral traffic. However, a citation does not guarantee a click. Some users may find the answer they need without visiting the original website.

This shift makes it important to understand how people discover and consume online information. Traditional search visibility remains valuable because users still need websites, original research, product pages, and official documentation.

Website owners should continue publishing useful, accurate content that answers genuine user questions. Clear headings, descriptive titles, logical organization, and credible evidence help readers understand the material.

Structured data can help search engines interpret eligible page elements, but it does not guarantee AI citations or prominent search placement.

The practical strategy is to build trustworthy content rather than optimize exclusively for AI mentions. Monitor organic search performance, referral traffic, and conversions where suitable analytics are available. These measurements provide a more meaningful picture of whether your content reaches the right audience.

Should I Use Perplexity or Google?

Choosing between Perplexity vs Google Search depends on what you want to accomplish. Google is particularly useful for finding specific websites, local business information, maps, shopping listings, images, and other online resources.

Perplexity is useful when you want a synthesized explanation instead of a list of pages. It can help you explore unfamiliar subjects, compare competing ideas, and organize findings from multiple sources. Its conversational format also makes follow-up research convenient.

For many users, the best approach to Perplexity vs Google Search is to use both platforms. Start with Perplexity when you need an overview or want to investigate a complicated question. Then use Google to locate official sources, verify details, and discover additional perspectives.

Your choice should also reflect the importance of the information. For health-related questions, getting health advice from AI chatbots requires particular care because generated answers may be incomplete or inaccurate. Consult authoritative sources and qualified professionals for high-stakes decisions. Neither search engine should replace careful verification.

Consider your typical tasks, research habits, and preferred way of evaluating information. If you regularly need direct explanations, Perplexity may suit your workflow. If you frequently visit specific websites or search for local services, Google may be more convenient.

Ultimately, Perplexity vs Google Search is not about choosing one platform permanently. Use the tool that helps you find relevant, reliable information efficiently for each task.

Final Verdict: Perplexity vs Google Search

The comparison between Perplexity vs Google Search does not produce one winner for every situation. Each platform approaches information discovery differently, and your needs should determine which one you use.

Google is useful for finding websites, local businesses, products, maps, and original sources. Perplexity can simplify research by combining information into conversational answers with citations.

Both platforms have limitations. Google results require careful evaluation, while AI-generated summaries can contain errors or omit important context. Neither tool should be treated as automatically reliable.

For everyday research, consider using Perplexity to explore a subject and Google to verify the findings. This combination can help you save time while maintaining control over the sources you trust.

The best choice is the one that supports your specific goals without sacrificing accuracy. By understanding the strengths and limitations of each platform, you can build a more effective search and research workflow.

Is Your Cloud Storage Actually Secure? Complete Guide

Is Cloud Storage Actually Secure?

Cloud storage makes it easy to save photos, documents, videos, and other important files online. However, many people wonder whether cloud storage is actually secure. Understanding how these services protect information can help you make better decisions about digital safety.

Major providers use encryption, secure data centers, and account protection tools to safeguard stored files. These measures reduce common security risks, but they cannot eliminate every threat. Weak passwords, phishing attacks, and incorrect sharing settings can still expose private information. The Cybersecurity and Infrastructure Security Agency’s online safety guidance explains practical steps for protecting accounts, recognizing phishing, and using stronger passwords.

Knowing whether cloud storage is actually secure requires looking beyond a provider’s reputation. You should also understand its encryption methods, privacy policies, and recovery options.

This guide explains cloud storage security, compares iCloud and Google Drive, and explores common hacking risks. You will also learn what happens when you cancel an iCloud subscription and whether paying for additional storage is worthwhile.

Is Cloud Storage Actually Secure?

Yes, cloud storage can be secure when you choose a reputable provider and protect your account properly. Major services use encryption, security monitoring, access controls, and reliable infrastructure. These safeguards help protect files against unauthorized access and certain technical failures.

However, whether cloud storage is actually secure depends on more than the provider’s technology. Weak passwords, phishing attacks, compromised devices, and careless sharing settings can expose private information. Even a well-protected platform cannot prevent every security incident.

Cloud storage also offers advantages over keeping files on a single computer. If your device breaks, gets stolen, or becomes unusable, your online files may remain accessible from another device. To understand the technology behind these services, explore how cloud computing works.

Before choosing a service, consider these essential factors:

  • Encryption: Check how the provider protects files during transfers and storage.
  • Account security: Look for two-factor authentication and secure recovery options.
  • Privacy controls: Understand who can access your stored information.
  • Backup reliability: Keep another copy of important files in a separate location.

No provider can eliminate every risk. Combining a trustworthy service with good security habits offers stronger protection than relying on either approach alone.

Understanding Cloud Storage Encryption

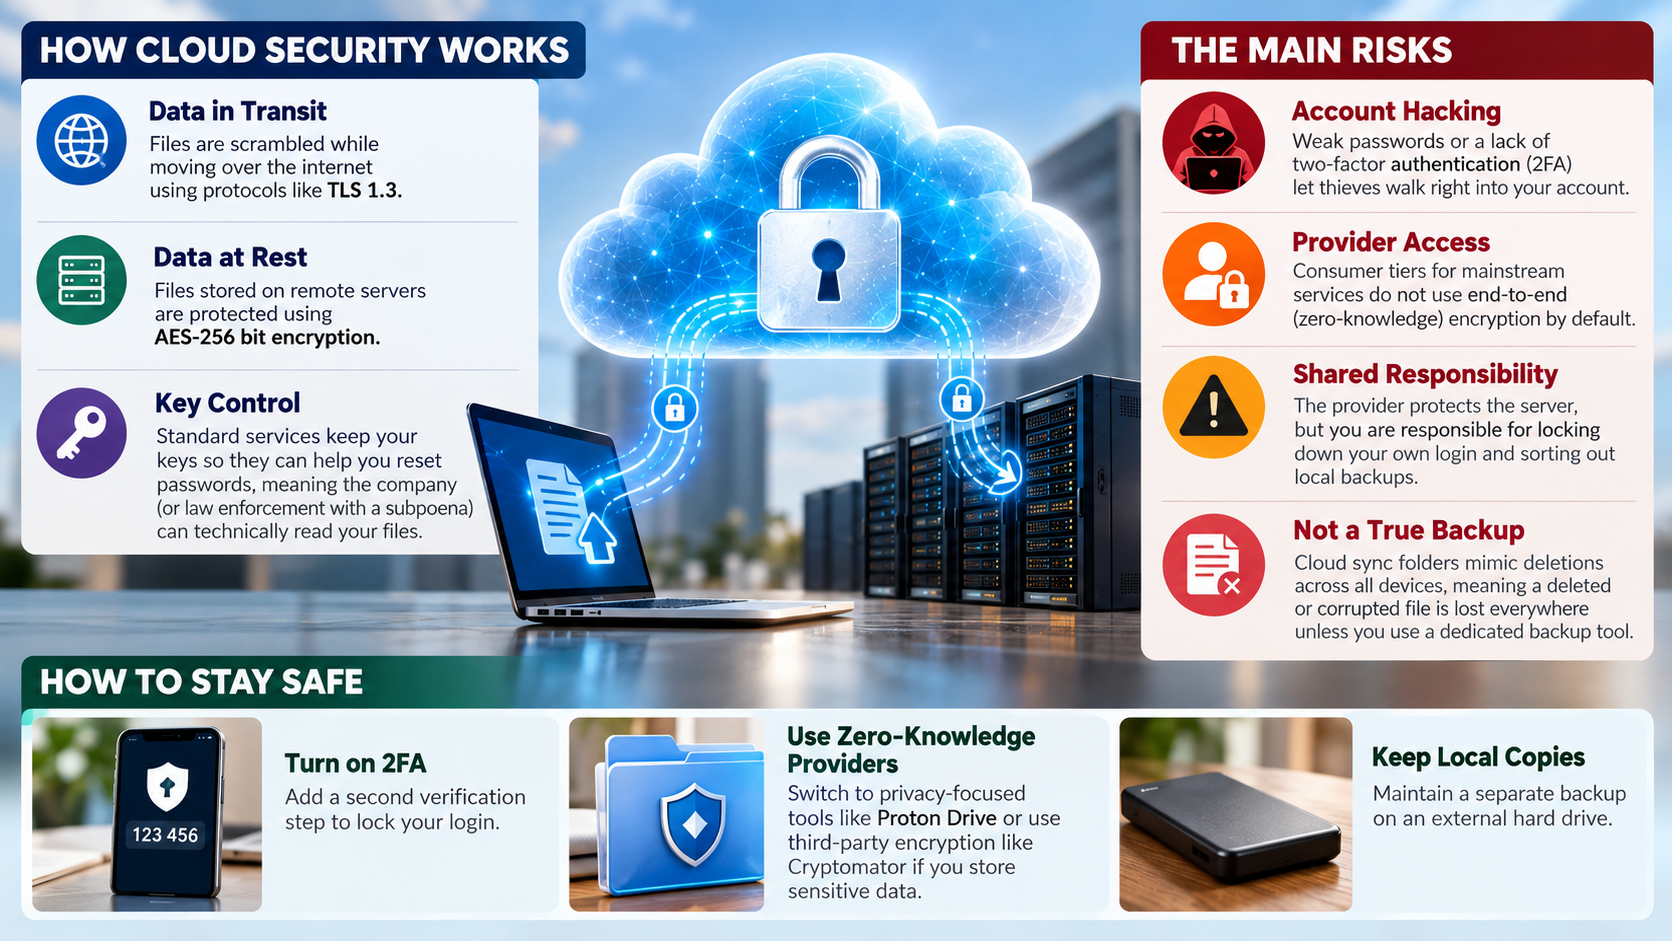
Encryption protects cloud storage by converting readable information into a format that requires the appropriate key to access. Most established providers encrypt files during transmission and while storing them on their servers. These protections reduce the risk of unauthorized access.

However, encryption methods differ between services. Standard encryption at rest does not necessarily prevent the provider from accessing file contents. In some systems, the provider manages the encryption keys and can decrypt information when required.

End-to-end encryption offers stronger privacy for supported data because only authorized users or devices hold the necessary decryption keys. Some providers also offer zero-knowledge encryption, which prevents the provider from reading protected file contents under the service’s encryption design.

If you want to know whether cloud storage is actually secure for sensitive documents, examine the encryption features before uploading files.

Check whether your chosen service offers:

  • End-to-end encryption for your files.
  • User-controlled encryption keys.
  • Secure account recovery methods.
  • Clear policies covering file access and sharing.

Remember that encryption cannot prevent every type of attack. Someone who gains access to an authorized device or an unlocked account may still view your files.

Is iCloud or Google Drive Safer for Cloud Storage?

Both iCloud and Google Drive use established security measures to protect stored information. However, neither service is automatically safer for every user. The better option depends on your privacy requirements, device preferences, and account settings.

Apple offers standard data protection for iCloud, including encryption and end-to-end encryption for certain categories. Users can enable Advanced Data Protection for iCloud to extend end-to-end encryption to additional categories, including iCloud Photos, iCloud Drive, and iCloud Backup.

Google Drive encrypts files during transmission and at rest. However, standard Google Drive storage does not provide user-controlled end-to-end encryption for every file by default.

Your choice should reflect how you work and which features matter most. iCloud may suit people who use several Apple devices and want integrated backups. Google Drive may be more convenient for users who regularly collaborate through Google’s productivity tools. If photo backup is your main priority, compare iCloud Photos and Google Photos before choosing a service.

To determine whether cloud storage is actually secure enough for your needs, compare each provider’s encryption options, account protections, and privacy controls. Both services require strong account security and careful management of sharing permissions.

Comparing Cloud Storage Privacy Features

Cloud storage security and privacy are closely related, but they address different concerns. Security focuses on protecting information against unauthorized access. Privacy concerns how a provider collects, processes, shares, and uses information.

Apple and Google publish privacy policies explaining their practices. Reviewing these policies can help you understand how each company handles account information, stored files, and connected services.

Google provides security controls and privacy settings across its services. However, it is inaccurate to assume that every file uploaded to Google Drive is routinely scanned for advertising purposes. Different services process information for different reasons.

Apple also offers different levels of iCloud encryption. Advanced Data Protection extends end-to-end encryption to more categories, but users must maintain suitable recovery methods. Losing access to those methods can make protected information difficult or impossible to recover.

When comparing providers, consider these questions:

  • Can the provider access your files under its standard encryption settings?
  • Does the service offer end-to-end encryption?
  • What information does the provider collect?
  • Can you manage file-sharing permissions?
  • What happens if you lose access to your account?

These details provide a more useful comparison than brand reputation alone. The safest choice depends on the information you store and the protections you need.

Can Cloud Storage Actually Be Hacked?

Yes, cloud storage accounts can be compromised. However, a compromised account does not necessarily mean hackers have breached the provider’s central servers. Attackers often target individual users because stealing login credentials can be easier than defeating a company’s security infrastructure.

Phishing emails, fake login pages, reused passwords, and malware can expose account credentials. Attackers may also exploit weak recovery methods or devices that already contain active login sessions.

Once someone gains access to your account, they might download private documents, change sharing permissions, or delete stored information. The damage depends on the attacker’s access and the provider’s security controls.

Even when cloud storage is actually secure at the infrastructure level, stolen credentials can expose files. This is why protecting your login details matters as much as choosing a reputable provider.

To reduce these risks, enable two-factor authentication and use a unique password. Review connected devices regularly and remove unfamiliar sessions. Check shared folders, and avoid opening suspicious links.

For particularly sensitive documents, consider a service offering end-to-end encryption. You can also encrypt files yourself before uploading them. Maintaining independent backups helps protect your information if someone compromises your account.

How to Improve Your Cloud Storage Security

Protecting your cloud storage account starts with a few practical habits. You do not need advanced technical knowledge to reduce common security risks. Consistent account maintenance can make unauthorized access considerably harder. If you struggle to remember strong passwords, try these simple tricks to create a password you will remember.

If you want to keep cloud storage actually secure for everyday use, focus on protecting your login credentials, devices, and shared files.

Follow these steps:

  1. Create a strong password. Use a unique password that you never reuse on other websites.
  2. Enable two-factor authentication. Add another verification step to protect your account if someone steals your password.
  3. Use a password manager. Generate and store strong passwords without memorizing every credential.
  4. Review account activity. Check signed-in devices, recent security alerts, and unfamiliar sessions.
  5. Limit file sharing. Remove public links and permissions you no longer need.
  6. Update your devices. Install security updates for your operating system, browser, and storage applications.
  7. Maintain separate backups. Keep important files in another secure location.

Be cautious with unexpected emails requesting account verification. Instead of clicking suspicious links, open the provider’s official website or application directly.

If you store confidential business documents or financial records, consider encrypting them before uploading them. These precautions reduce the consequences of a stolen password or accidental file sharing.

What Happens If You Stop Paying for iCloud Storage?

Canceling a paid iCloud+ subscription does not automatically mean Apple immediately deletes all your stored files. However, you should not assume that every file will remain available indefinitely without restrictions.

When your paid plan ends, your account generally returns to the free storage tier. Apple’s free iCloud plan includes 5 GB of storage. If your existing data exceeds that limit, your account may stop syncing new information and completing new iCloud backups.

Some services may also stop updating properly until you free up space or purchase additional storage. Existing files and photos may remain stored, but continued access and synchronization should not be treated as guaranteed in every circumstance.

Before canceling, check your current storage usage and Apple’s latest subscription terms. Download important photos, documents, and backups wherever possible. Save those copies to a computer or external drive, and verify that the files open correctly.

Understanding these policies is another part of knowing whether cloud storage is actually secure for long-term file preservation. Keeping an independent backup is safer than relying on an assumed grace period.

How to Manage iCloud Storage Before Canceling

Managing your storage before canceling an iCloud+ subscription can help prevent unexpected disruptions. Start by checking how much space your account currently uses. On an iPhone or iPad, open Settings, tap your name, and select iCloud.

Review which categories consume the most storage. Photos, device backups, and large files often account for a substantial portion of your available space.

Before downgrading, consider these steps and decide where to keep a separate copy of your important files. Comparing cloud storage and external hard drives can help you choose a suitable backup method before canceling your subscription.

  • Download important files: Save documents and photos to a computer or external drive.
  • Verify your backups: Open copied files and confirm that the transfer completed successfully.
  • Review old backups: Remove obsolete device backups only after confirming that you no longer need them.
  • Reduce unnecessary storage use: Delete unwanted files and duplicate content.
  • Check synchronization settings: Understand which services may stop updating when your account exceeds its storage limit.

Avoid deleting files before confirming that another copy exists. Some cloud services synchronize deletions across connected devices, meaning a file removed from one location may disappear elsewhere.

For important personal or business information, maintain at least one independent backup before changing your subscription. This approach reduces your dependence on a single provider and helps protect against accidental loss.

Is Paying for iCloud Storage Necessary?

Paying for iCloud storage is not necessary for everyone. Whether an upgrade makes sense depends on your storage needs, device usage, and preferred backup method.

Apple’s free plan provides 5 GB of storage. This may be sufficient for users who store relatively little information online, manage their files regularly, or maintain alternative backups. However, available space can fill quickly when you back up multiple devices or store large photo libraries.

A paid iCloud+ plan provides additional capacity and can simplify backups and synchronization across Apple devices. This may be useful if you regularly take high-resolution photos, record videos, or want your documents available across multiple devices.

Consider the practical benefits before subscribing. A paid plan offers convenience, but it does not replace independent backups or eliminate every security risk.

Compare your current storage usage with your expected needs. Also consider whether another cloud provider or a local storage solution would better suit your workflow.

Cloud storage can be actually secure without requiring the most expensive subscription. The important factors are choosing appropriate security features, protecting your account, and maintaining reliable backups.

How to Decide How Much Cloud Storage You Need

Your storage habits provide the clearest indication of whether you need a paid iCloud plan. Instead of upgrading automatically, review your current usage and determine which files genuinely need online storage.

Start by checking the storage breakdown on your iPhone, iPad, or Mac. Identify whether photos, device backups, documents, or application data consume most of your available space. If your phone frequently runs out of room, learn why phones are running out of storage faster than ever and consider which files belong on your device versus in the cloud.

Next, consider how you use your devices. If you frequently switch between an iPhone, iPad, and Mac, additional iCloud storage may make synchronization easier. If you mainly use one device and already maintain reliable local backups, a free plan may be sufficient.

Use these questions to guide your decision:

  • Do you regularly receive warnings about insufficient iCloud storage?
  • Do you need automatic backups for multiple Apple devices?
  • Do you want your photos and documents synchronized across devices?
  • Can you safely store some files locally instead?
  • Would another storage provider better suit your needs?

Review your storage every few months, especially if your photo and video collection grows quickly.

Choose a plan based on actual usage rather than fear of losing files. Regardless of your subscription, keep separate copies of important information and protect your account with strong security settings.

How Often Should You Restart Apple Watch? Expert Guide

How Often Should You Restart Apple Watch? A Complete Guide

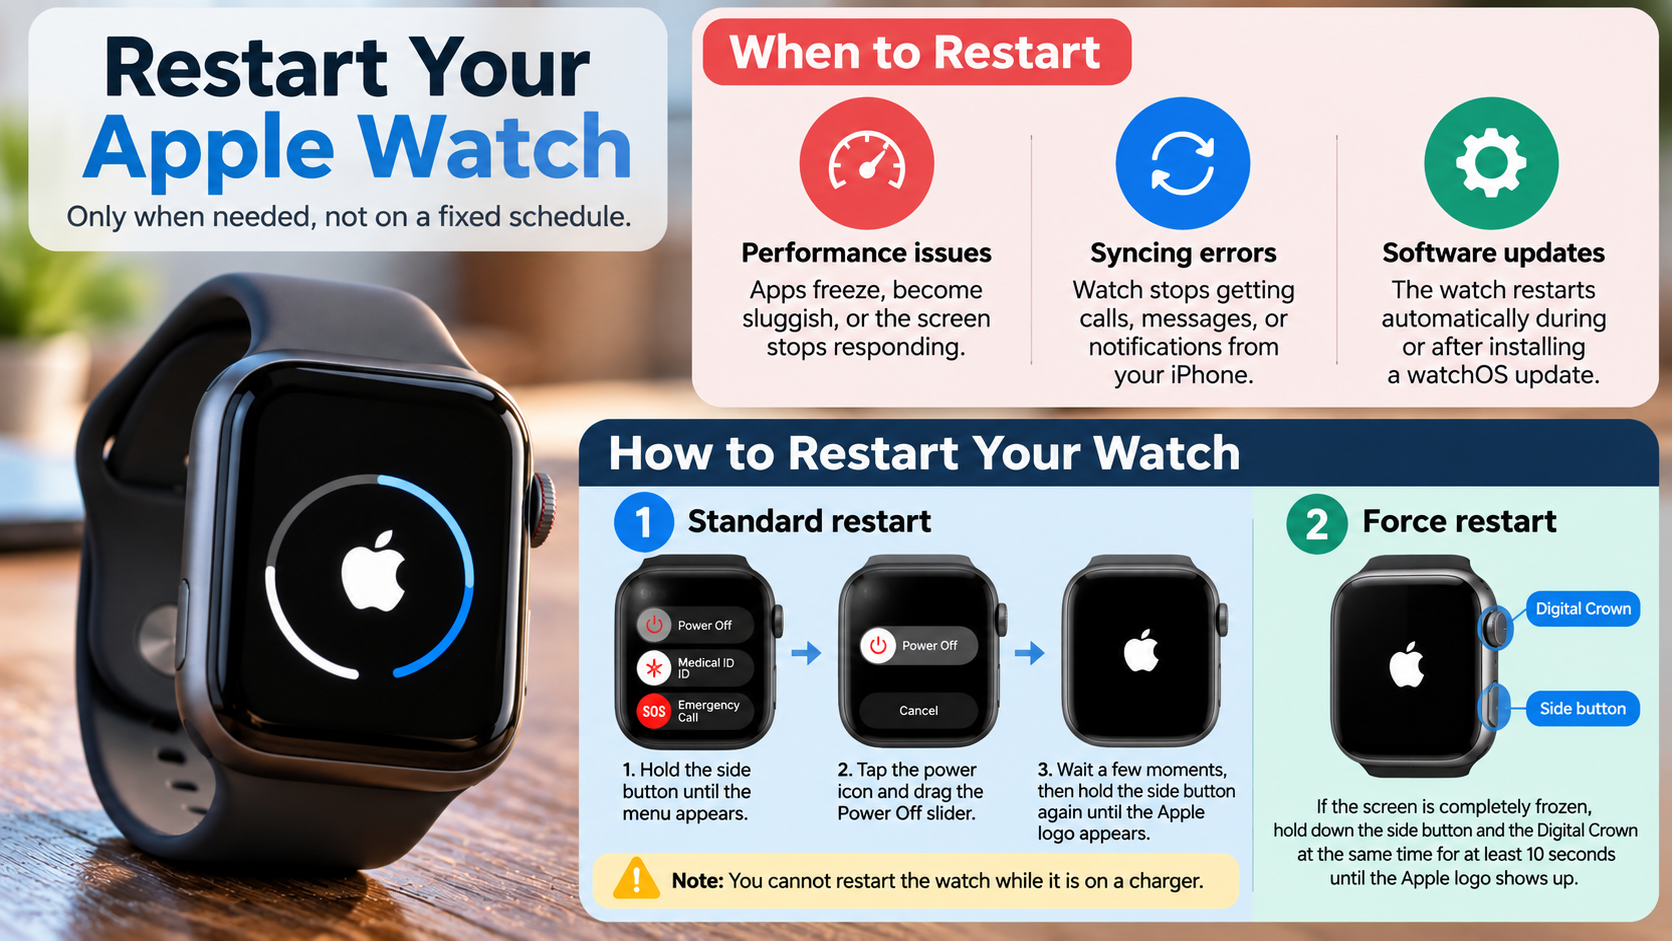
Knowing how often to restart Apple Watch can help you troubleshoot minor software problems and maintain reliable performance. Many users wear their smartwatches throughout the day and night for fitness tracking, sleep monitoring, and notifications. As a result, they rarely think about restarting their devices.

A restart can resolve temporary glitches, unresponsive apps, and certain syncing problems. However, Apple does not require users to restart their watches on a fixed weekly schedule. You can restart your device when you notice performance issues or need to troubleshoot a specific problem. For step-by-step instructions, follow Apple’s official guide to restarting your Apple Watch.

In this guide, we will explore Apple Watch lifespan, restart times, battery-draining features, and everyday maintenance habits. You will also learn when restarting makes sense and how to keep your smartwatch working smoothly.

What Is the Typical Lifespan of an Apple Watch?

An Apple Watch can remain useful for several years, depending on its model, battery condition, software support, and daily usage. Many users consider upgrading after three to five years. However, this is a general estimate rather than a fixed lifespan for every device.

Battery capacity gradually decreases with repeated charging and normal use. Older watches may also experience slower performance or lose access to newer software features. These changes do not necessarily mean you need to replace your device immediately.

You can help maintain your watch by avoiding extreme temperatures, installing available software updates, and keeping its storage manageable. Using compatible charging equipment also supports safe, reliable charging. However, these habits cannot prevent normal battery aging or guarantee a longer hardware lifespan.

Before replacing an older watch, check its battery health and performance. A battery service may be more practical than buying a new device, depending on the model and repair cost. If you are considering an older model, explore whether old Apple Watches are worth buying in 2026 before deciding to upgrade.

Battery Degradation and Hardware Longevity

Apple Watch models use rechargeable lithium-ion batteries. These batteries gradually lose capacity as they age and complete charging cycles. Consequently, an older watch may need charging more frequently, even when you use the same settings.

You can check your battery condition through Settings on your watch. Open Battery, select Battery Health, and review the Maximum Capacity percentage. The available information may vary by watchOS version.

A maximum capacity near or below 80% can indicate substantial battery wear. However, the percentage alone does not determine whether replacement is necessary. Consider battery performance, service recommendations, and your device’s overall condition.

Protecting the screen, avoiding excessive heat, and installing compatible updates can help maintain your watch. Restarting may resolve software problems, but it cannot reverse physical battery degradation or repair damaged hardware.

How Long Should an Apple Watch Take to Restart?

An Apple Watch usually takes around a minute or two to restart, although the exact time depends on its model and software condition. The process may take longer after an update or when the device experiences temporary software problems.

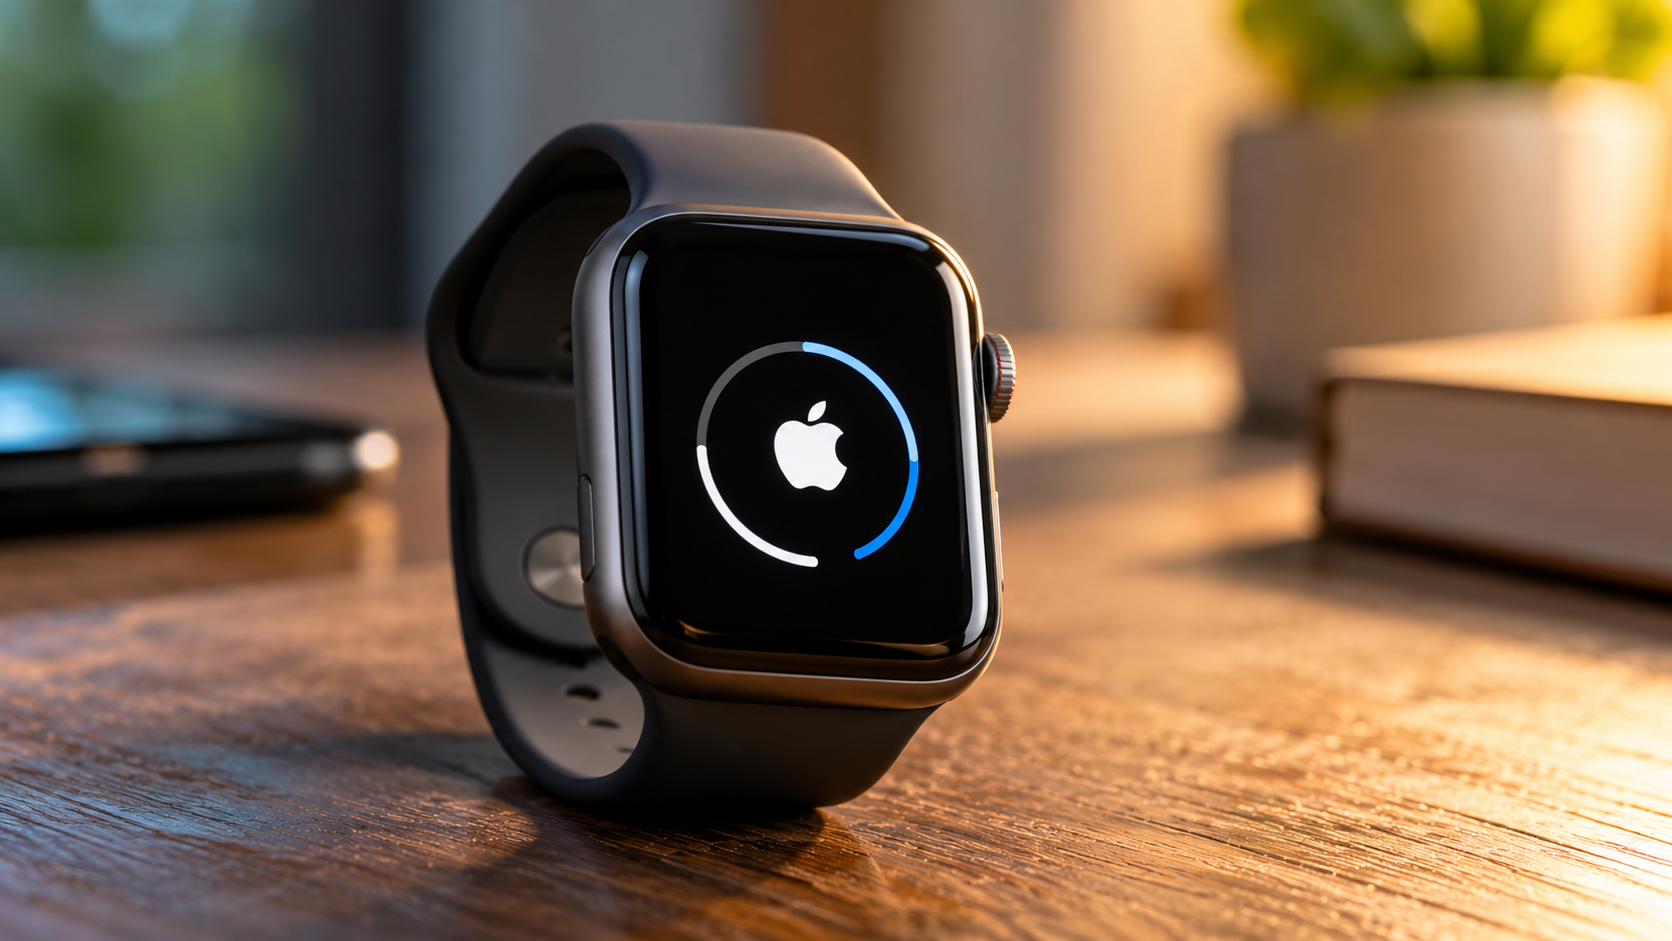
To restart normally, press and hold the side button until the power controls appear. Tap the power button, move the Power Off slider, and wait for the screen to turn off. After the watch shuts down, press and hold the side button again until the Apple logo appears.

If your watch remains on the Apple logo for an unusually long time, avoid repeatedly interrupting the startup process. An update or other background operation may still be running. Give the device time to finish before attempting additional troubleshooting.

If the watch becomes completely unresponsive, a force restart may help. However, avoid forcing a restart during a watchOS update because interrupting installation can create additional problems.

What Causes Slow Startup Times?

Several factors can make an Apple Watch take longer to restart. Temporary software glitches, an interrupted update, and unusually heavy background activity can affect startup performance. Older hardware may also respond more slowly than newer models.

Limited available storage can contribute to general performance problems, although it does not automatically explain every slow restart. Storage issues are also becoming a concern on other devices; read about why phones are running out of storage faster than ever for a broader look at this problem. Similarly, outdated software may contain bugs that affect reliability.

If your watch starts slowly, try these steps:

  • Wait for startup: Allow the watch enough time to complete its startup process.
  • Check for updates: Install compatible watchOS updates when available.
  • Review installed apps: Remove applications you no longer use.
  • Restart normally: Use a standard restart when the device responds.
  • Check for recurring problems: Note whether slow startup follows an update or happens repeatedly.

If the watch remains stuck on the Apple logo, consult Apple Support for model-specific troubleshooting instructions.

What Kills the Apple Watch Battery Fast?

Several features can increase Apple Watch battery consumption throughout the day. GPS workouts, cellular connections, frequent notifications, and extended screen activity can all contribute to faster battery drain.

Screen brightness and how often the display wakes also affect energy use. Streaming audio or making calls over cellular connections may consume additional power. Weak cellular reception can increase power consumption because the watch needs to maintain its connection.

Battery drain is not always caused by a single setting. A recently installed update, an app behaving unexpectedly, or an aging battery may also explain a sudden reduction in battery life.

Start by reviewing your recent usage and identifying changes. If the battery suddenly drains faster than usual, restart the watch and check whether the problem continues. You can also review battery information in Settings to understand its condition.

Adjusting a few settings may improve everyday battery life without disabling features you rely on regularly.

Managing Power-Hungry Features for Longevity

You do not need to disable every health or fitness feature to preserve Apple Watch battery life. Instead, focus on settings that provide limited value for your daily routine.

Consider these adjustments:

  • Reduce screen brightness: Choose a comfortable brightness level that avoids unnecessary power use.
  • Limit background activity: Disable Background App Refresh for apps that do not need frequent updates.
  • Manage notifications: Turn off alerts from applications you rarely check.
  • Review workout settings: GPS workouts and extended exercise tracking can use additional energy.
  • Adjust display behavior: Review wake settings and reduce unnecessary screen activations.
  • Check cellular usage: Use your iPhone connection when convenient, if your model and circumstances allow it.

Low Power Mode can also reduce energy consumption when you need your battery to last longer. Some features may operate differently while it is enabled.

If battery life remains poor after these adjustments, check Battery Health. An aging battery may need service, and restarting alone will not restore its original capacity.

Do You Need to Restart Your Apple Watch?

You do not need to restart your Apple Watch every day. Under normal conditions, the device can remain powered on continuously without requiring a scheduled reboot. Restarting is mainly useful when you encounter software issues or need to troubleshoot unexpected behavior.

A restart may help when apps freeze, notifications stop arriving, or your watch struggles to communicate with your iPhone. It can also resolve certain temporary performance problems. However, it will not fix every issue, particularly when the cause involves damaged hardware, network settings, or a faulty application.

If your watch works normally, there is no need to interrupt your routine just to restart it. Some users prefer an occasional restart, such as once a week, because it provides a simple troubleshooting opportunity. However, Apple does not prescribe this frequency as a maintenance requirement.

Before restarting, make sure you are not interrupting a software update. If the same problem returns repeatedly, investigate its cause instead of relying on frequent restarts.

When a Reboot Is Absolutely Necessary

A restart is not always necessary, even when your Apple Watch behaves unexpectedly. However, it is a useful first troubleshooting step for several common problems.

Consider restarting your watch when:

  • An app repeatedly freezes or becomes unresponsive.
  • Notifications stop syncing correctly with your iPhone.
  • Certain features become temporarily sluggish.
  • A connection problem persists despite basic troubleshooting.
  • The watch behaves unusually after normal use.

If the watch responds to your commands, use the standard shutdown procedure first. A force restart should be reserved for situations where normal controls do not work.

If a problem continues after restarting, check your Bluetooth connection, available updates, and relevant app settings. You may also need to restart your paired iPhone or reinstall a problematic application.

For persistent problems involving health tracking, charging, or startup, consult Apple Support. Repeatedly restarting the device without investigating the underlying cause may only provide temporary relief.

Should I Leave My Apple Watch On All the Time?

Yes. Apple Watch is designed for regular, continuous operation, so you generally do not need to turn it off every night. Keeping it powered on allows features such as notifications, activity tracking, alarms, and supported health functions to operate as intended.

Your watch can also support sleep tracking when configured correctly. However, overnight monitoring depends on your model, settings, battery level, and the features you use.

Leaving the device powered on does not automatically damage its hardware. Likewise, turning it off occasionally does not guarantee better battery health or prevent normal battery aging.

Instead of following a strict shutdown schedule, focus on charging, software updates, and resolving problems when they occur. If you notice unusual heating, repeated shutdowns, or persistent performance issues, investigate those symptoms rather than assuming continuous operation is responsible.

You can remove the watch temporarily for charging, cleaning, or comfort. If you wear it throughout the day and night, choose a convenient charging period that leaves enough battery for the activities you care about.

Charging Habits for 24/7 Wearers

A consistent charging routine can make continuous Apple Watch use easier. Many users charge their watches while showering, getting ready in the morning, or winding down at night. The best schedule depends on your model, battery condition, and daily usage.

Rather than relying on a fixed charging duration, check how quickly your watch charges and how much battery you need for the next part of your day. Some models support faster charging than others, so charging times can vary.

Follow these practical habits:

  • Use a compatible charger: Choose charging equipment designed for your Apple Watch model.
  • Avoid excessive heat: Keep the watch and charger in a well-ventilated location.
  • Plan around sleep tracking: Charge before bedtime if you want to monitor your sleep overnight.
  • Check battery health: Review Maximum Capacity if your watch needs charging much more frequently.
  • Use Low Power Mode when needed: Extend usable battery life when charging is not convenient.

You do not need to wait until the battery reaches zero before charging. If battery performance deteriorates significantly, consider checking service options rather than changing your restart routine.

How to Stop Fake Virus Pop-Ups on Your Windows PC

How to Stop Fake Virus Pop-Ups on Your Windows PC

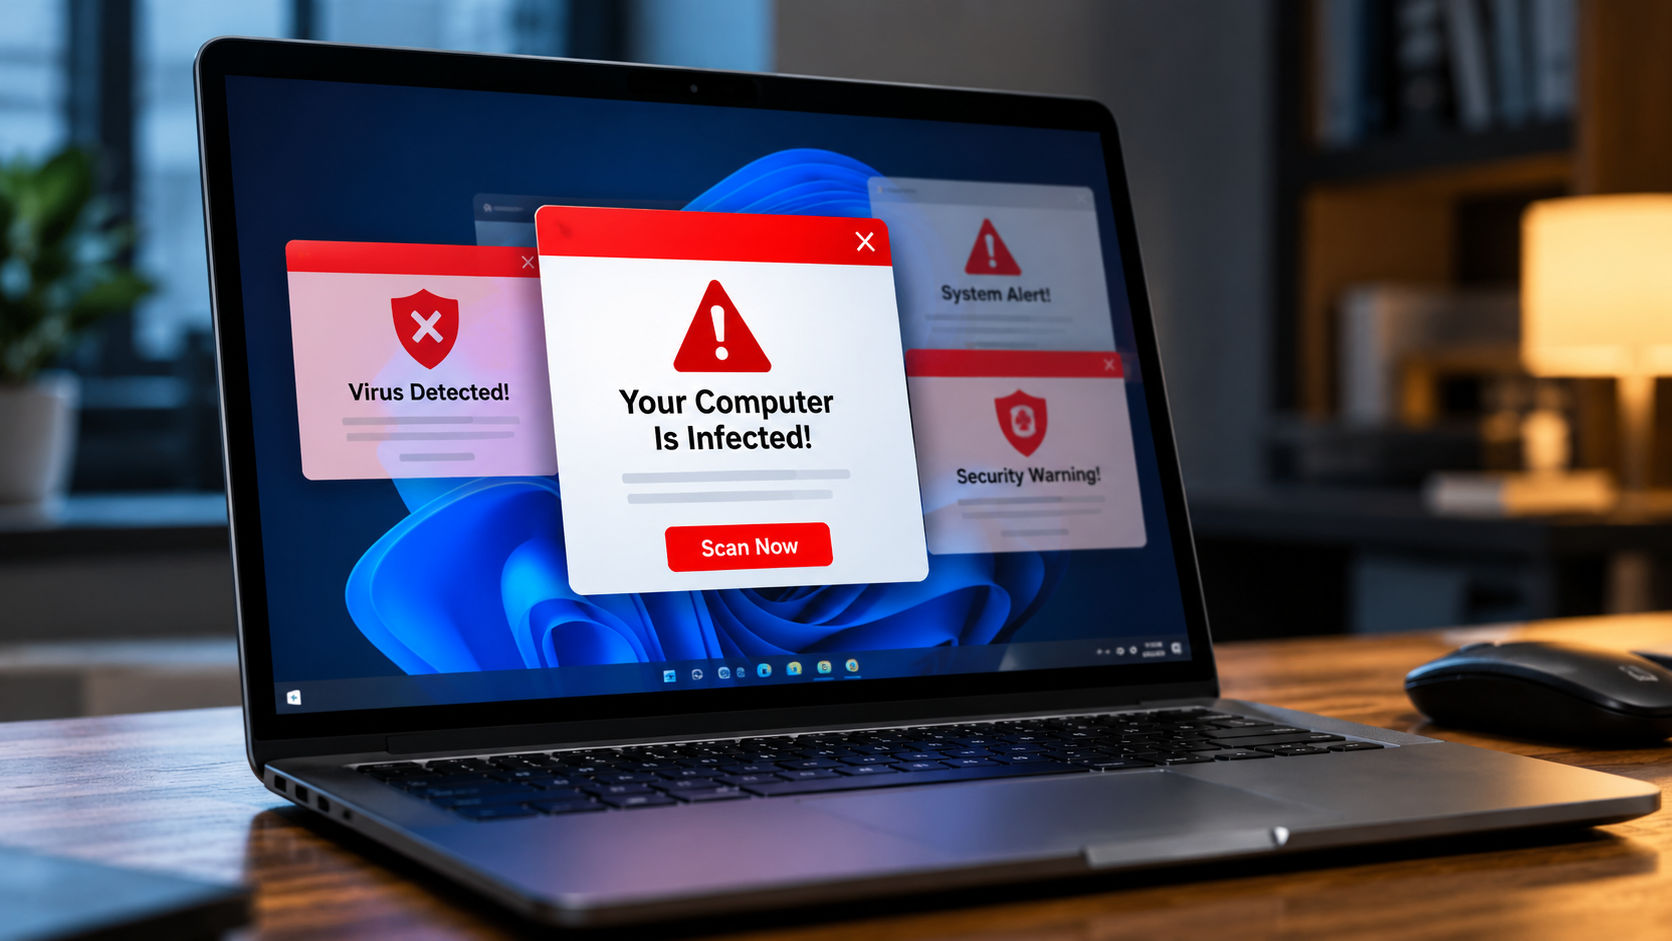
Unexpected security alerts can be alarming, especially when they claim your computer is infected. Learning how to stop fake virus pop-ups on your Windows PC can help you regain control and avoid scams.

These deceptive alerts often urge you to call fake support numbers, download suspicious software, or purchase unnecessary services. They may originate from malicious website notifications, unwanted browser extensions, or adware installed on your computer. According to Microsoft’s guidance on staying protected with Windows Security, built-in security tools can help detect and protect your PC against malware and other threats.

However, fake virus pop-ups do not automatically mean your PC is infected. Some come from websites you previously allowed to send browser notifications. Others may indicate unwanted software that needs attention.

This guide explains how to remove fake virus pop-ups, block suspicious Chrome notifications, and identify potential adware. You will also learn how to manage browser security settings without weakening your computer’s protection.

How to remove fake virus pop-ups on Windows?

The best way to remove fake virus pop-ups is to identify their source first. These alerts may appear inside your browser or as notifications near the Windows taskbar. The correct solution depends on where they originate.

If the warnings appear when Chrome is closed, check whether your browser allows websites to send desktop notifications. If pop-ups continue appearing inside different applications, investigate possible adware or unwanted programs.

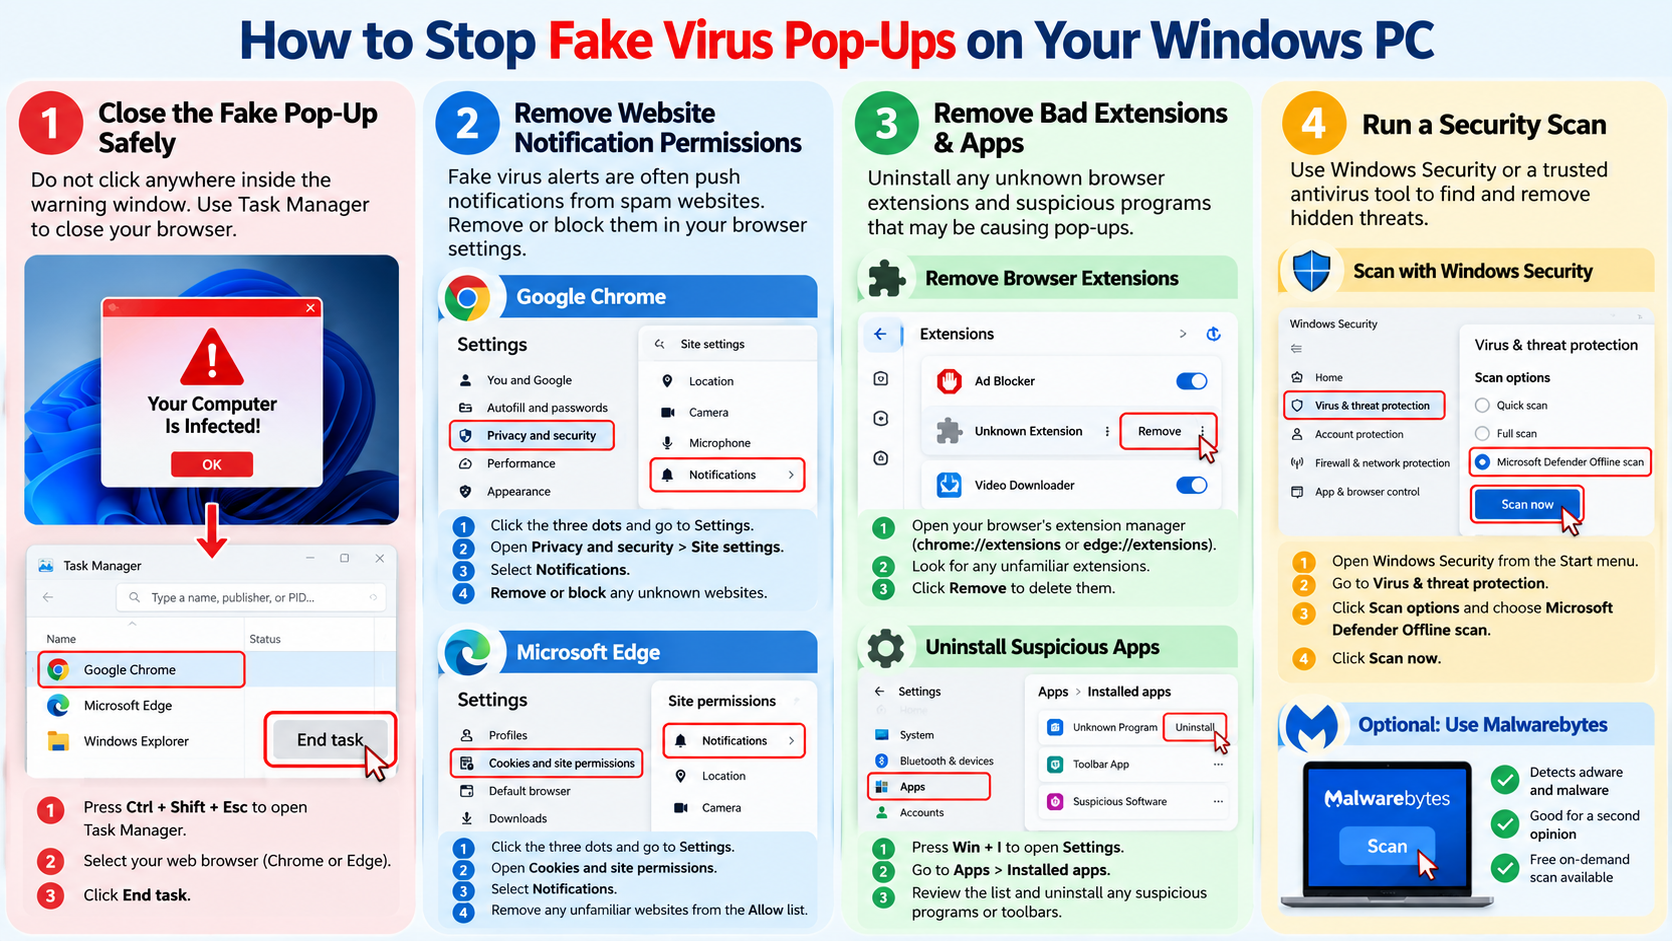
Start with these practical steps:

  1. Close the suspicious page. Avoid clicking its buttons, links, or telephone numbers.
  2. Check browser notifications. Remove permission for unfamiliar websites to send alerts.
  3. Review browser extensions. Disable extensions you do not recognize or trust.
  4. Uninstall suspicious applications. Check recently installed programs for unwanted software.
  5. Run a security scan. Use Windows Security or another reputable antivirus program to check for malware.

Avoid downloading software advertised by the pop-up itself. Genuine security tools should come from trusted sources.

Clearing browser notification settings manually

Malicious websites can exploit browser notification permissions to display repeated fake security warnings. Once you click Allow on a deceptive website, it may send alerts even after you leave the page.

To stop these notifications in Chrome:

  1. Open Google Chrome and select the three-dot menu.
  2. Choose Settings, then open Privacy and security.
  3. Select Site settings, followed by Notifications.
  4. Review websites permitted to send notifications.
  5. Remove or block unfamiliar and suspicious websites.

Chrome’s settings labels may vary slightly between versions. Removing a website’s permission prevents it from sending further notifications through that permission.

If the alerts continue, review your installed extensions and recently added applications. You should also run a Windows Security scan if you suspect adware or malware. If the scan detects a threat, follow a trusted guide on how to remove malware from Windows 11 safely.

Remember that removing notification permissions addresses browser notification spam. It does not remove any separate malicious software that might already be installed.

Why do I keep getting pop-ups on your computer saying I have a virus?

Repeated virus warnings do not necessarily indicate a real infection. Many scammers use browser notifications to make ordinary advertisements look like urgent Windows security alerts.

This often happens after visiting a website that requests permission to send notifications. Some sites disguise this request as a CAPTCHA, video verification, or download confirmation. Clicking Allow gives the website permission to send notifications through your browser.

These alerts may continue appearing after you close the original website. That behavior can make them seem like genuine Windows system messages.

To identify the cause, consider when and where the warnings appear. Notifications displaying a website name often point to browser notification abuse. Pop-ups appearing across multiple applications may require further investigation.

Check your browser permissions before assuming your computer has a virus. If the warnings persist after removing suspicious permissions, review your extensions and installed applications. A reputable antivirus scan can help identify threats that browser settings alone cannot remove. You can also review these signs your computer has malware to determine whether further investigation is necessary.

Identifying rogue website permissions instantly

The website name shown in a notification can help you identify the source of fake virus alerts. Look carefully at the notification’s heading, logo, or displayed domain.

If the notification names an unfamiliar website, open your browser settings and inspect its notification permissions. Remove or block that website if you do not trust it.

However, a familiar logo does not guarantee that an alert is genuine. Scammers can imitate antivirus brands, Windows notifications, and technical support messages.

Use these clues to investigate suspicious alerts:

  • Unexpected website names: The notification comes from a domain you do not recognize.
  • Urgent warnings: Messages claim your computer will be damaged unless you act immediately.
  • Suspicious links: Buttons direct you to unfamiliar websites or software downloads.
  • Payment requests: The alert demands money or asks you to call a support number.

Do not click the warning to investigate it. Instead, open your browser settings directly and review the notification permissions. If you have already clicked a suspicious link, follow these steps to stay safe after clicking a suspicious link and check whether you need to take additional security measures.

If the source remains unclear, run a security scan and check for unfamiliar applications. This approach helps distinguish notification spam from a possible malware infection.

Why am I getting fake virus notifications?

Fake virus notifications are commonly designed to make money through deception. Scammers may promote fraudulent antivirus subscriptions, collect personal information, or direct users toward harmful downloads.

Some alerts encourage victims to call fake technical support numbers. The person answering may demand payment for unnecessary repairs or request remote access to the computer. Giving strangers remote access can expose your files, accounts, and personal information.

Other campaigns use affiliate links or misleading advertisements to generate revenue. In some cases, unwanted software can also change browser settings or display intrusive advertisements.

These tactics rely on making users believe they must act immediately. Recognizing the warning signs can help you avoid costly mistakes.

Legitimate security software can display genuine threat notifications. However, an unsolicited browser alert demanding payment, a telephone call, or an immediate download deserves particular suspicion.

Never share passwords, banking details, or verification codes with someone who contacts you through a suspicious warning. If you already installed software after following an alert, remove anything suspicious and run a trusted security scan.

The psychology behind browser scare tactics

Scammers deliberately create urgency to make people react before thinking carefully. Messages such as “Your computer is infected” or “Your files are at risk” can trigger fear and confusion.

These warnings often imitate Windows security interfaces or well-known antivirus brands. Some use flashing banners, countdown timers, loud sounds, or repeated notifications to increase pressure.

The goal is to make clicking a button feel safer than ignoring the warning. In reality, interacting with the alert may expose you to further scams.

Stay cautious when a notification:

  • Claims your computer has multiple viruses without a trusted security scan.
  • Demands immediate payment to prevent damage.
  • Asks you to call an unfamiliar technical support number.
  • Encourages you to install an unknown application.
  • Requests remote access to your computer.

Close the suspicious page without interacting with its contents. Then open Windows Security or your installed antivirus directly to check your computer.

Do not rely on spelling mistakes alone to identify scams. Some fraudulent alerts look convincing, while legitimate security warnings can vary in appearance. Verify the message through trusted security software instead.

How do I stop fake virus pop-ups on Chrome?

Google Chrome allows websites to request notification permissions. Unfortunately, scammers can abuse this feature to send fake virus warnings directly to your desktop.

To stop fake virus pop-ups in Chrome, begin by removing notification permissions from suspicious websites. Then check your installed extensions for unfamiliar or unwanted additions.

Follow these steps:

  1. Open Chrome and navigate to Settings.
  2. Select Privacy and security, then Site settings.
  3. Open Notifications and review the permitted websites.
  4. Block or remove websites you do not recognize.
  5. Visit Extensions and disable suspicious add-ons.
  6. Remove extensions you cannot verify or no longer need.

Next, review recently installed applications if the notifications continue. Some adware programs can create persistent advertisements or redirect your browser.

You can also reset Chrome if the problem remains after these checks. A reset restores many browser settings to their defaults, but it does not remove every possible malware infection.

Keep Chrome updated and leave Safe Browsing enabled. These precautions help reduce exposure to malicious websites and suspicious downloads.

Resetting Chrome settings to factory defaults

If fake virus pop-ups continue after you remove suspicious permissions and extensions, resetting Chrome may help. This restores many browser settings to their original defaults without deleting your saved bookmarks or passwords.

To reset Chrome:

  1. Open Chrome and select the three-dot menu.
  2. Choose Settings.
  3. Open Reset settings.
  4. Select Restore settings to their original defaults.
  5. Review the changes and confirm the reset.

A Chrome reset can disable extensions, restore default search and startup settings, and remove certain temporary configurations. However, its effects differ from a complete browser reinstall.

Your bookmarks and saved passwords generally remain intact, but review the confirmation screen before proceeding. You may need to re-enable trusted extensions and adjust some preferences afterward.

A reset will not necessarily remove Windows adware or other malicious applications. If pop-ups return, inspect installed programs and run a full scan using Windows Security. If you are considering a more extensive solution, understand whether a factory reset removes a computer virus before resetting your entire PC.

Before resetting, make sure you know how to access your important accounts. Never enter your password into a suspicious pop-up claiming that a reset or security check is required.

How do I turn off virus detection in Chrome?

Turning off Chrome’s security protection is generally unnecessary when dealing with fake virus pop-ups. The usual solution is to remove suspicious notification permissions, check extensions, and investigate unwanted software.

Chrome includes Google Safe Browsing, which helps warn users about dangerous websites, downloads, and other online threats. Disabling these protections can increase your exposure to phishing pages and malicious files.

If Chrome blocks a legitimate download, verify the file’s source before changing any security settings. Visit the developer’s official website and check whether the download is available there.

You should also scan downloaded files with Windows Security before opening them. Do not assume a file is safe simply because a website claims it is.

Chrome’s security options may vary depending on your browser version and operating system. If a setting is unavailable, check Chrome’s current help documentation rather than following instructions intended for an older version.

For most users, keeping Safe Browsing enabled is the safer choice. You do not need to disable virus detection to remove fake browser notifications.

Managing safe browsing protection levels safely

Chrome provides several Safe Browsing options under its privacy and security settings. These options help protect you against malicious websites, phishing attempts, and dangerous downloads.

To review your protection settings:

  1. Open Google Chrome.
  2. Select the three-dot menu and choose Settings.
  3. Open Privacy and security.
  4. Select Security.
  5. Review the available Safe Browsing protection levels.

Depending on your Chrome version, you may see Enhanced Protection, Standard Protection, and an option to disable protection.

Enhanced Protection offers additional safeguards, while Standard Protection provides essential warnings against known online threats. Disabling Safe Browsing removes important browser-level protections.

If Chrome incorrectly flags a legitimate file, verify its authenticity through the official developer. Check the file using reputable security software before deciding whether to proceed.

Do not lower your browser’s protection simply to stop fake virus notifications. Instead, remove suspicious site permissions and investigate any unwanted extensions or applications.

Keeping Safe Browsing enabled, updating Chrome, and scanning suspicious downloads provides a safer approach to everyday browsing.

Is Paid Antivirus Actually a Waste of Money for Your PC in 2026?

Is Paid Antivirus Actually a Waste of Money for Your PC in 2026?

Is paid antivirus a waste of money in 2026? Many PC users face this question when deciding how to protect their devices. Modern operating systems include built-in security tools, making extra antivirus subscriptions less necessary for some people.

However, built-in protection does not eliminate every cybersecurity risk. Paid security suites may offer additional privacy features, identity monitoring, and protection across multiple devices. Whether these extras justify the cost depends on your needs.

Microsoft’s Windows Security guidance explains how built-in protections help defend against modern threats. This article explores whether you need paid antivirus software, why McAfee receives criticism, and when a subscription makes sense. It also examines the risks of using Windows 10 after its support ended. By the end, you will understand which security options offer practical value for your PC.

Do You Really Need Antivirus in 2026?

Most modern Windows PCs include built-in security tools that protect against common digital threats. Microsoft Defender Antivirus provides real-time scanning and monitors suspicious activity. Windows Security also includes other protections, such as firewall controls and safeguards against potentially harmful applications. These features make paid antivirus software unnecessary for many everyday users. Microsoft’s Windows Security overview explains these built-in protections.

However, no antivirus can guarantee complete protection. Phishing scams, unsafe downloads, weak passwords, and outdated software can still expose your data. Understanding how to handle suspicious links safely can help you avoid common online threats. Your online habits matter just as much as your security software.

For users who browse trusted websites, install legitimate applications, and keep Windows updated, built-in protection may be sufficient. Those who handle sensitive information or manage several devices might benefit from additional security features. The key is to identify your actual risks before paying for another subscription.

Evaluating Your Personal Threat Exposure Level

Your browsing habits influence how much additional protection you may need. Someone who downloads files from unfamiliar websites faces different risks than someone who uses a PC mainly for email, work, and streaming. Understanding how malware spreads between devices and through downloads can help you recognize these risks before they compromise your computer.

Before purchasing paid antivirus, consider your typical online activities. These factors can help you assess your exposure:

  • Frequent downloads: Unverified installers and suspicious attachments can contain malware.
  • Torrent websites: Untrusted downloads may expose your computer to malicious files.
  • Online banking: Financial accounts require strong passwords, secure connections, and careful phishing awareness.
  • Multiple devices: A household with several computers and smartphones may benefit from centralized security management.
  • Sensitive information: Business documents, financial records, and personal files may justify additional safeguards.

Even cautious users can encounter sophisticated scams. Therefore, safe browsing should complement antivirus protection rather than replace it.

If Microsoft Defender is active, Windows is updated, and your browsing habits are sensible, free protection may meet your needs. Consider paid software when it addresses a specific security gap.

Why Is McAfee So Shady?

McAfee receives criticism from some consumers because of its marketing practices and bundled installations. Many PC manufacturers offer antivirus trials on new laptops. These trials can introduce users to the software before they have decided whether they need another security subscription.

The frustration often begins when renewal reminders and promotional notifications appear frequently. Users may interpret these messages as pressure to purchase a product they never requested. This experience can make legitimate antivirus software feel more like unwanted advertising.

However, aggressive marketing does not automatically mean a security product is ineffective or malicious. Antivirus performance and customer experience are separate issues. A product can provide useful protection while still frustrating users through its sales approach.

Before purchasing McAfee or another paid antivirus, examine its features, renewal terms, and total subscription cost. Compare these details with the protection already available on your computer. The important question is whether the software provides enough additional value to justify its price.

Navigating Aggressive Software Bundles and Trials

Preinstalled antivirus trials can confuse new PC owners. A manufacturer may include a security product through a commercial partnership. As a result, users sometimes assume a paid subscription is essential for their computers to function safely.

You can evaluate these bundled applications before committing to a purchase. Start by checking which antivirus software is active and whether your subscription has expired.

Follow these steps:

  1. Open Windows Security and review your current protection status.
  2. Check whether another antivirus product is installed and running.
  3. Review the trial’s expiration date, renewal price, and included features.
  4. Decide whether its extra tools offer benefits you genuinely need.
  5. Uninstall unwanted software through Windows Settings if you choose not to keep it.

Windows normally reactivates Microsoft Defender Antivirus when you remove a compatible third-party antivirus product, provided no other active antivirus prevents it from running. Verify your protection status after uninstalling anything.

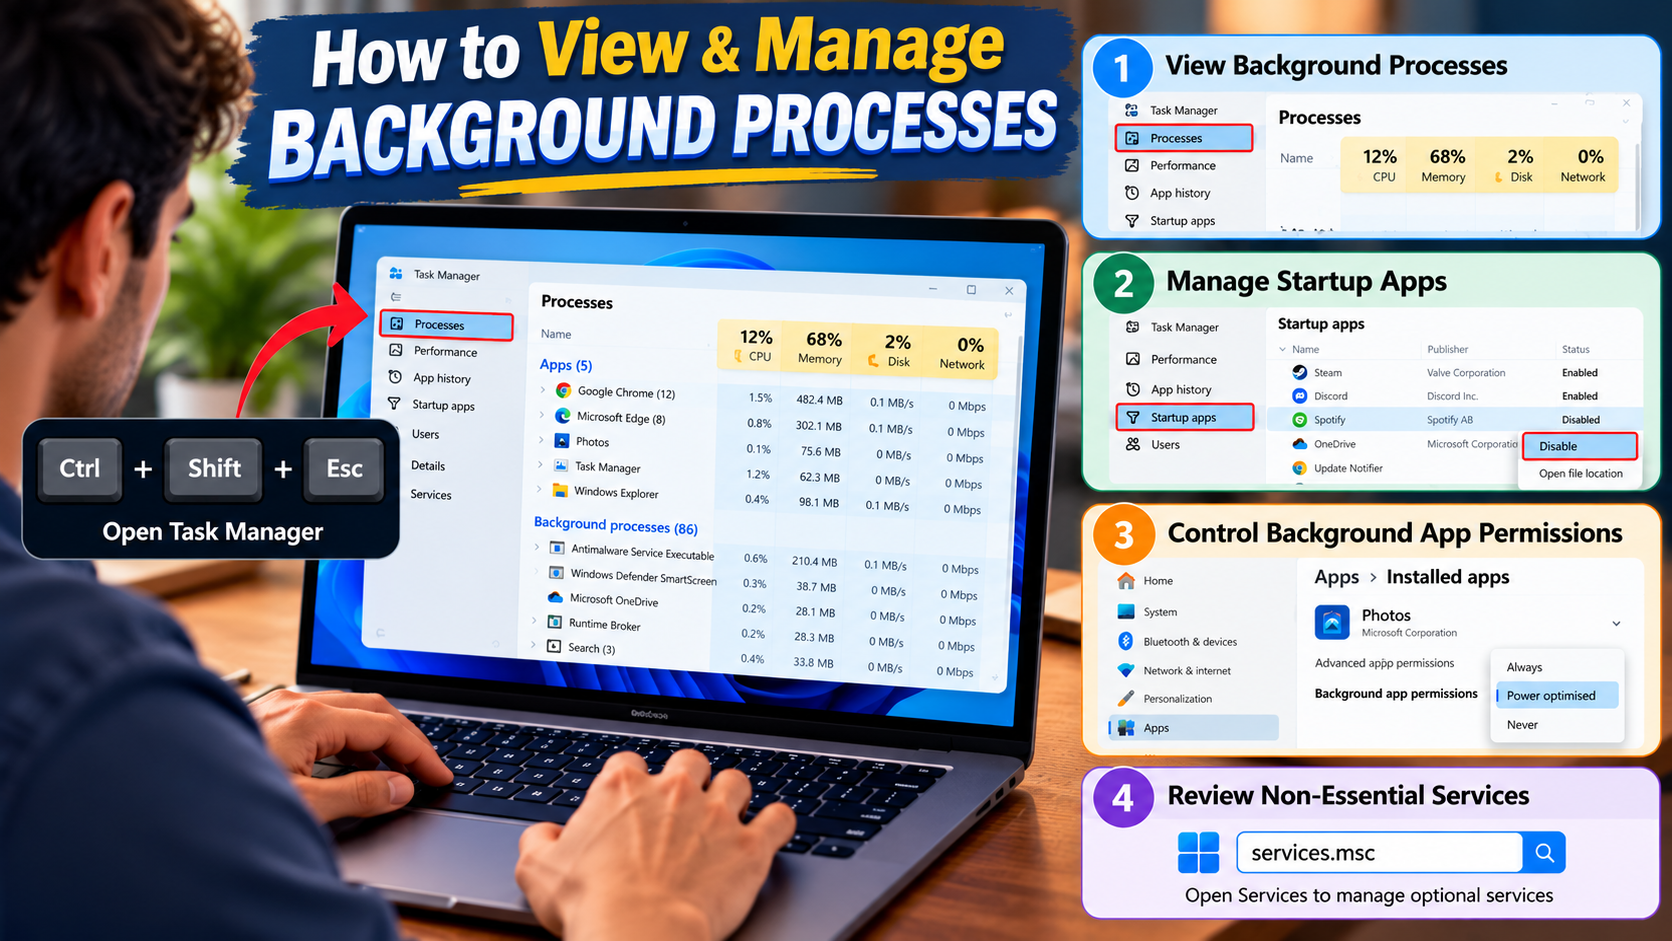
Removing unnecessary software can also reduce unwanted notifications and background activity. Learning how PC background processes affect performance can help you understand whether installed applications are using unnecessary system resources. However, avoid assuming every preinstalled security application is useless. Compare its actual benefits before making a decision.

Is a Paid Antivirus Worth It?

Paid antivirus software can be worthwhile, but its value depends on what the subscription includes. Many security suites combine malware protection with tools that go beyond basic virus detection. These may include password managers, identity monitoring, parental controls, and virtual private network (VPN) services.

Such features can help users who want several security tools under one subscription. Families managing multiple devices may also appreciate centralized controls and simplified account management. However, these benefits do not automatically make paid antivirus more secure than free alternatives.

Microsoft Defender already provides substantial baseline protection on supported Windows systems. Paying for another antivirus solely to obtain basic malware scanning may therefore offer limited additional value. Some premium features also come with usage limits or require separate subscriptions.

Before buying, compare the product’s independent protection test results, device coverage, renewal price, and included features. Check whether the subscription duplicates tools you already use. The best choice is the one that fills genuine security gaps without adding unnecessary costs.

Weighing Advanced Privacy Tools Against Free Basics

Free antivirus software can provide effective protection against common malware. However, choosing the right software is only one part of staying secure. Following malware protection tips for home and business users can help you strengthen your defenses beyond antivirus scanning. Paid security suites may add useful services, but their value depends on your circumstances.

Consider the differences before choosing a subscription:

  • Malware protection: Microsoft Defender provides built-in antivirus protection on supported Windows systems.
  • VPN access: Some paid suites include encrypted VPN connections, although data limits and server options vary.
  • Password management: Premium plans may offer password vaults, but dedicated password managers are also available.
  • Identity monitoring: Some services alert you to possible exposure of personal information. Monitoring does not prevent every form of identity theft.
  • Parental controls: Certain subscriptions provide tools for managing children’s online activities across supported devices.
  • Multi-device coverage: Family plans can simplify security management for several users.

A paid plan makes sense when its extras replace tools you would otherwise purchase separately. Check the renewal price, cancellation conditions, and feature limitations before subscribing.

If you only need reliable malware protection on one well-maintained PC, free protection may be enough. Avoid paying for features you are unlikely to use.

Is Windows 10 Still Safe to Use in 2026?

Windows 10 requires special attention because standard support ended on October 14, 2025. Eligible consumer editions no longer receive regular security updates unless the device is enrolled in Microsoft’s Extended Security Updates (ESU) program. This change matters because newly discovered vulnerabilities may remain unpatched on systems without continued coverage. Microsoft’s official Windows 10 support guidance explains the available options.

An unsupported computer may still function normally, but continuing to use it can increase security risks. Third-party antivirus software can detect certain threats. However, it cannot replace missing operating system security patches. Understanding what happens when you skip Windows updates helps explain why keeping your system updated is essential for security.

If your computer supports Windows 11, upgrading is generally the preferable long-term option. If you need more time, check whether your device qualifies for ESU. This program provides eligible devices with important security updates through October 12, 2026, for the applicable consumer coverage period.

Do not assume that buying paid antivirus alone makes an unsupported PC safe. Keeping the operating system supported remains an essential part of computer security.

Understanding the Risks of Unsupported Operating Systems

Operating system updates help fix security vulnerabilities that attackers could exploit. When standard support ends, a device without extended coverage loses access to regular security patches. This can increase exposure to certain attacks over time. Learn more about Windows 10 security risks in 2026 before deciding whether to continue using an unsupported computer.

Windows 10 users should identify which support option applies to their devices. Available choices include upgrading to Windows 11, enrolling in eligible Extended Security Updates, or replacing hardware that cannot run a supported operating system.

If you must continue using Windows 10 temporarily, take these precautions:

  • Install all available security updates and confirm whether ESU coverage is active.
  • Keep your browser and other applications updated.
  • Use reputable antivirus protection with real-time scanning enabled.
  • Maintain regular backups of important files.
  • Avoid suspicious downloads, unknown attachments, and untrusted websites.
  • Use strong, unique passwords and enable multifactor authentication where available.

These measures reduce avoidable risks, but they cannot eliminate every vulnerability. Antivirus software cannot fully compensate for missing operating system patches.

Treat continued use of an unsupported system as a temporary arrangement. Plan an upgrade or replacement rather than relying on additional antivirus software as a permanent solution.

Final Verdict: Should You Pay for Antivirus in 2026?

Paid antivirus is not automatically a waste of money, but many PC users do not need an additional subscription. Microsoft Defender and other built-in Windows Security features provide a useful baseline when enabled and kept up to date.

A paid security suite may be worth considering if you need identity monitoring, parental controls, VPN access, or protection across multiple devices. Compare these extras with the tools you already own before deciding whether the cost is justified.

Your operating system also matters. If you use Windows 10, check your support status and consider upgrading or enrolling in an eligible Extended Security Updates program. Paying for antivirus does not replace operating system updates.

Ultimately, choose paid antivirus for specific benefits, not simply because you fear viruses. Review your online habits, secure your accounts, install updates, and maintain reliable backups. These steps help you make a more informed decision about protecting your PC in 2026.

Cat6a vs Cat6: Complete Ethernet Cable Comparison

Cat6a vs Cat6: Which Ethernet Cable Should You Choose?

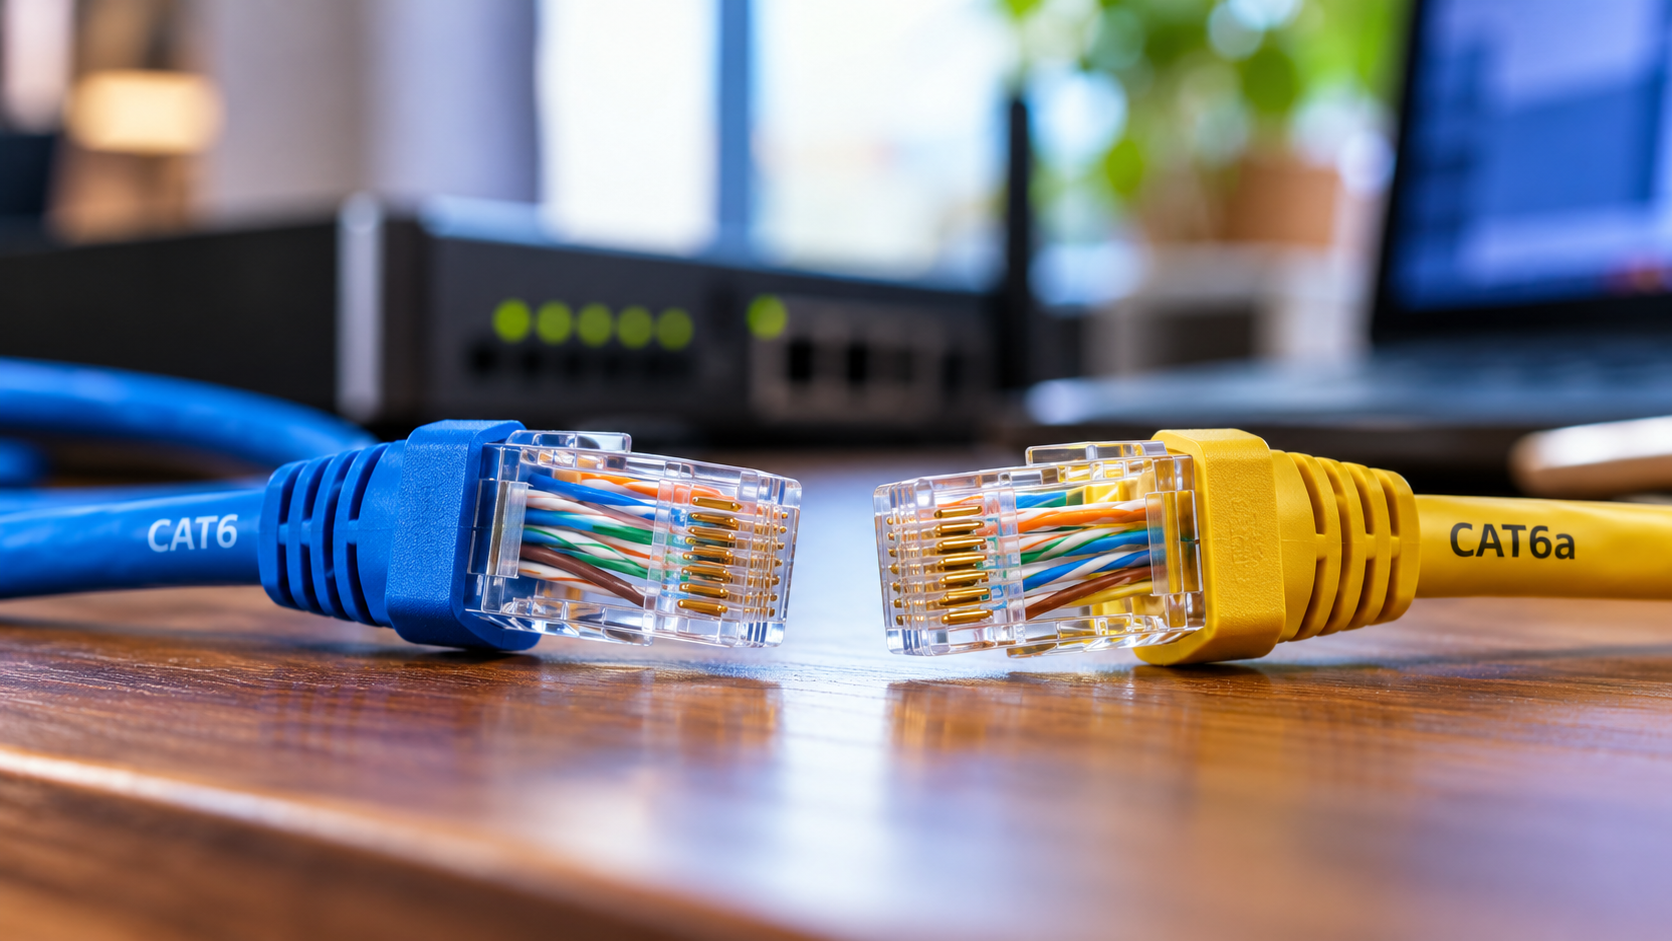
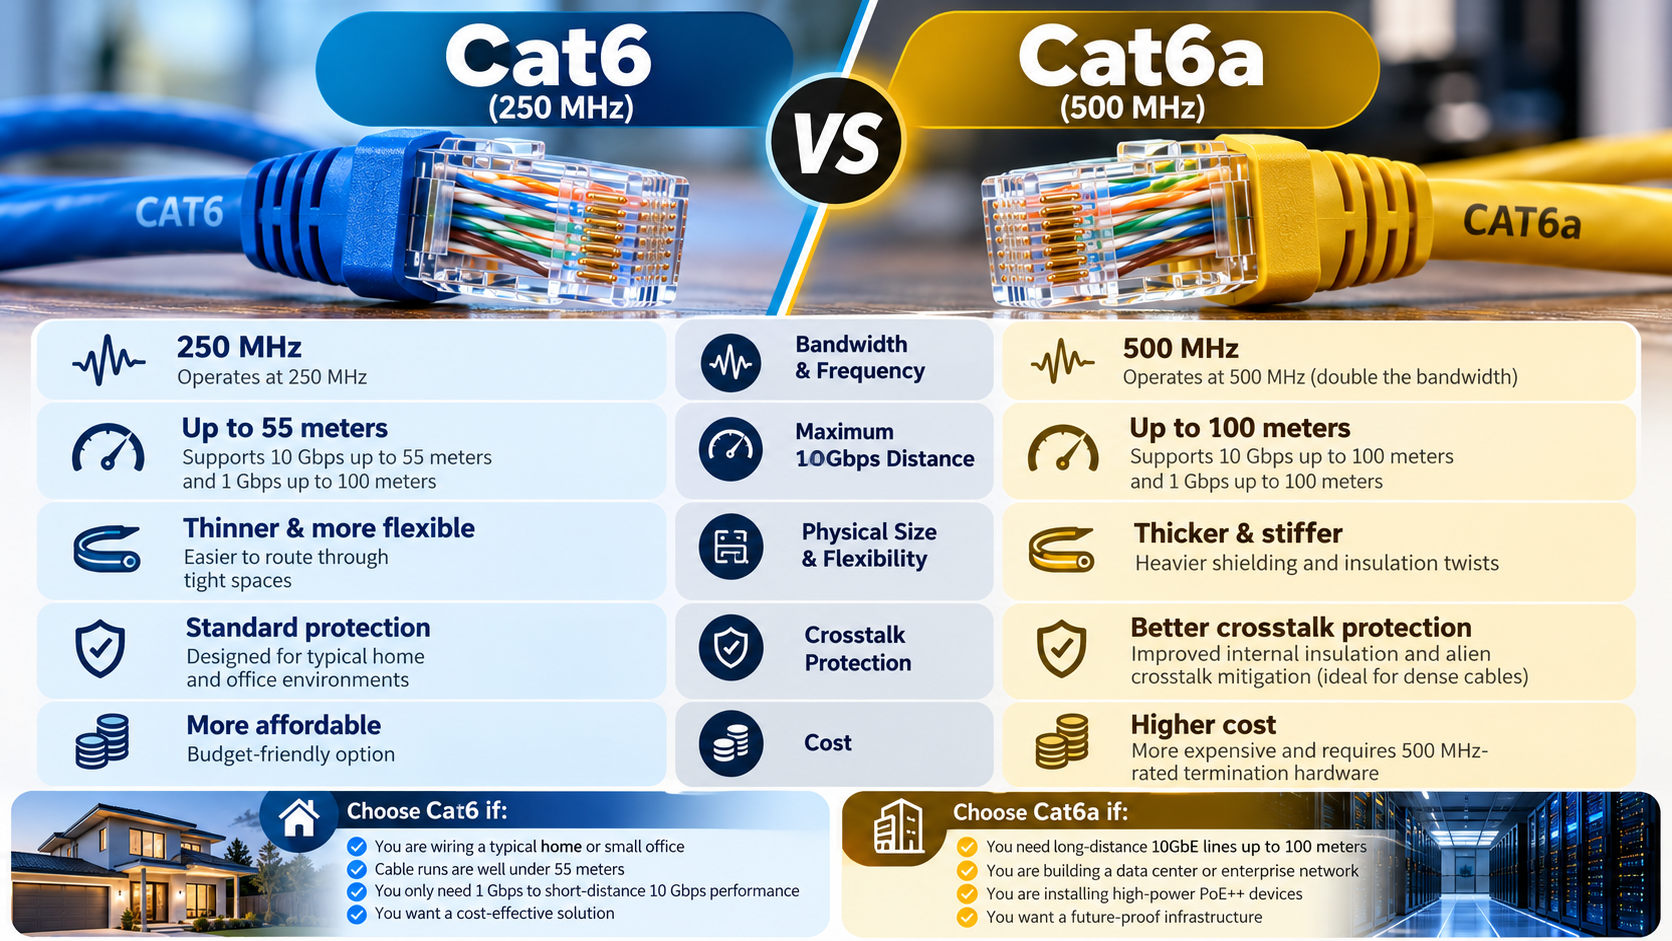
Choosing between Cat6a vs Cat6 Ethernet cables can affect your network’s speed, reliability, and future upgrade options. Both cable categories support high-speed connections for homes and businesses. However, they differ in bandwidth, 10Gbps transmission distance, and installation requirements.

Cat6 supports 1Gbps Ethernet over distances up to 100 meters. Cat6a supports 10Gbps Ethernet across the same distance. This makes Cat6a suitable for demanding networks that require faster data transfers. Meanwhile, Cat6 remains a cost-effective choice for everyday internet use, online gaming, and streaming.

Structured cabling standards help ensure reliable network installations. Choosing the right cable also reduces the risk of expensive upgrades later.

This guide explains the differences between Cat6a and Cat6, including speed, cost, compatibility, and cable construction. You will also discover whether Cat6a is necessary for home use and whether Cat6e is a reliable alternative.

Is Cat6a overkill for home use?

For most households, Cat6 provides sufficient performance for everyday networking. It supports gigabit Ethernet over distances up to 100 meters. This is suitable for 4K streaming, online gaming, video calls, and remote work. Your internet plan and networking equipment often limit performance before a Cat6 cable does.

The Cat6a vs Cat6 comparison becomes more important when you need 10Gbps connections. Cat6a supports this speed over a full 100-meter channel when installed correctly. Cat6 may support 10Gbps over shorter distances, depending on cable quality and installation conditions.

When Future-Proofing Justifies the Cost

Cat6a can be worthwhile during new construction or major home renovations. Installing cables before closing walls makes future upgrades easier. It also benefits households using network-attached storage, large file transfers, and multiple high-speed devices.

However, future-proofing should match your actual needs. Cat6a usually costs more and may require additional installation space. If you only need gigabit connectivity, the extra expense may offer little immediate benefit.

Consider these factors before choosing:

  • Choose Cat6 for standard home networking and gigabit connections.
  • Choose Cat6a for 10Gbps connections across longer cable runs.
  • Plan for upgrades when installing permanent in-wall cabling.

Is Cat6a better than Cat6?

Cat6a offers greater bandwidth and more reliable 10Gbps performance over long distances. Cat6 supports frequencies up to 250 MHz, while Cat6a supports up to 500 MHz. Both categories support gigabit Ethernet over distances up to 100 meters.

The main difference appears when comparing 10Gbps Ethernet capabilities. Cat6a supports 10Gbps across a 100-meter channel. Cat6 can support the same speed over shorter distances, commonly up to around 55 meters under suitable conditions. Actual performance depends on installation quality, cable construction, and interference.

Physical Differences and Cable Flexibility

Cat6a cables are often thicker and less flexible than comparable Cat6 cables. This can make routing them through narrow conduits, tight corners, and crowded patch panels more difficult. If you are installing Ethernet wiring around your home, these clever ways to hide Ethernet cables can help you manage visible wiring without compromising accessibility.

Shielding also varies between cable models. Both Cat6 and Cat6a are available in shielded and unshielded versions. Shielding can help reduce electromagnetic interference, but not every Cat6a cable includes it.

Feature Cat6 Cat6a
Maximum frequency 250 MHz 500 MHz
1Gbps Ethernet Up to 100 m Up to 100 m
10Gbps Ethernet Shorter distances; commonly up to 55 m under suitable conditions Up to 100 m
Cable size Usually smaller Often larger
Typical cost Lower Higher
Best use General home networking High-speed, demanding networks

Cat6a is more capable, but Cat6 may deliver better value for less demanding installations.

What are the disadvantages of Cat6a cable?

Cat6a offers dependable 10Gbps performance over long distances, but it has several disadvantages. Its most noticeable drawback is its physical size. Many Cat6a cables are thicker and stiffer than Cat6 alternatives. These limitations are worth considering alongside the drawbacks of using Ethernet cables for home internet, especially when planning a residential network installation.

The cable itself may also cost more. Depending on its construction, you might need compatible connectors, patch panels, and additional installation space. These expenses can increase the total cost of a residential or commercial networking project.

Cost and Installation Complexities

Installation requirements depend on whether you choose shielded or unshielded Cat6a. Shielded systems require compatible components and proper grounding according to manufacturer instructions. Incorrect installation can undermine shielding effectiveness and create electrical problems.

Unshielded Cat6a avoids some grounding requirements but still needs careful installation. You should also consider conduit capacity, bend radius, and cable management before purchasing.

The main disadvantages include:

  • Higher initial cost: Cable and compatible components may cost more.
  • Installation challenges: Thicker cables can be harder to route.
  • Space requirements: Larger cables may reduce conduit capacity.
  • Additional setup requirements: Shielded systems need suitable components and grounding.

For small home networks, Cat6 may provide sufficient performance at a lower price. Cat6a makes more sense when its extended 10Gbps range addresses a specific requirement.

Is Cat6a compatible with Cat6?

Cat6a and Cat6 Ethernet connections generally work together without special adapters. Both use the familiar eight-position modular Ethernet interface, commonly called RJ45. A Cat6a patch cable can connect to a compatible Ethernet port designed for Cat6 connections.

However, physical compatibility does not guarantee Cat6a performance. The complete network channel determines the available performance. This includes the cable, connectors, patch panels, and active networking equipment.

For example, connecting a Cat6a cable to a gigabit switch will not create a 10Gbps connection. The switch limits the negotiated link speed. Similarly, using Cat6 components in a Cat6a installation may prevent the complete channel from meeting Cat6a performance requirements.

Maintaining Hardware Interoperability

You can upgrade your network gradually instead of replacing every component. Existing Cat6 cables can remain in use wherever their performance meets your requirements. New Cat6a runs can serve equipment that needs 10Gbps connectivity over longer distances.

Check your router, switch, network adapter, and connector specifications before upgrading. Their supported Ethernet speeds matter as much as the cable category.

Remember these practical points:

  • Cat6a patch cables work with compatible Cat6 Ethernet ports.
  • A Cat6a cable cannot upgrade a gigabit-only device to 10Gbps.
  • Mixed-category cabling may limit the complete channel’s performance.
  • Certified components help ensure the installation meets its intended category.

Compatibility makes gradual upgrades practical, but every component must support your target performance.

Which is better for my needs, Cat6A or Cat6e?

When comparing Cat6a vs Cat6e, the main distinction is standardization. Cat6a is a recognized Ethernet cabling category with established performance requirements. Cat6e, by contrast, is not an official TIA category. Some manufacturers use this term to market cables that claim enhanced performance beyond standard Cat6.

These claims do not automatically mean a Cat6e cable meets Cat6a requirements. The label alone cannot confirm bandwidth, construction quality, or the ability to support 10Gbps Ethernet over 100 meters.

Conclusion

Choosing between Cat6a vs Cat6 depends on your network requirements, budget, and future upgrade plans. Cat6 is the better choice for most homes because it supports gigabit Ethernet over distances up to 100 meters at an affordable cost. It handles everyday activities such as streaming, gaming, and remote work with ease.

Cat6a is worth the investment if you need 10Gbps speeds over longer distances. It supports 10Gbps Ethernet up to 100 meters, making it suitable for demanding home networks, offices, and commercial installations. Although it typically costs more and can be harder to install, it provides greater bandwidth for future upgrades.

For reliable results, choose quality cabling that meets recognized industry standards. You can learn more about structured cabling requirements in the Telecommunications Industry Association’s official standards announcement.

Ultimately, the best Ethernet cable is the one that delivers the performance you need without unnecessary expense.

Optical or Laser Mouse: Which One Should You Choose?

Optical or Laser: Which Mouse Technology Is Right for You?

Choosing between an optical or laser mouse can affect your everyday computing experience. The right sensor influences cursor accuracy, tracking consistency, and comfort during work or gaming. Whether you browse the web, edit graphics, or compete in esports, your mouse should match your needs.

Modern optical and laser mice use different illumination technologies to detect movement. However, the best option depends on the sensor design, surface, and intended use. An optical mouse often delivers consistent tracking on a suitable mousepad. A laser mouse can work on a wider range of surfaces, including some glass surfaces.

Before choosing a mouse, consider how you use your computer and where you work. This guide explains the differences between optical and laser mice, their advantages and disadvantages, and how to identify your current mouse’s sensor type. You will also learn which technology suits gaming, office work, and everyday tasks.

Is Optical or Laser Better for a Mouse?

For most users, an optical mouse is the better choice because it offers consistent tracking on common mousepad surfaces. Many modern optical sensors provide the precision needed for everyday computing, graphic design, and competitive gaming. However, sensor quality matters more than the technology label alone.

Laser mice can track on a wider variety of surfaces, including some glossy materials. Their higher sensitivity can also suit particular setups. However, certain laser sensors may capture tiny surface irregularities, causing unwanted cursor movement. This behavior depends on the sensor and its implementation.

Consider these factors when choosing between optical and laser mice:

  • Gaming: Optical mice often provide predictable tracking on suitable mousepads.
  • Office work: Either type can work well for browsing, spreadsheets, and general productivity.
  • Glass desks: Some laser mice can track on compatible glass surfaces, while traditional optical models usually struggle.
  • Precision: Sensor quality, tracking consistency, and settings matter more than maximum DPI alone.

For most users, an optical mouse is the better choice because it offers consistent tracking on common mousepad surfaces. Many modern optical sensors provide the precision needed for everyday computing, graphic design, and competitive gaming. If you’re also improving your workspace for everyday productivity, explore this guide to Home Office Setup. However, sensor quality matters more than the technology label alone.

Understanding Surface Tracking Dynamics

The surface beneath your mouse affects how accurately its sensor detects movement. Optical sensors use LED or similar non-laser illumination to capture surface details. They generally perform well on opaque mousepads and textured desk mats.

Laser sensors use laser illumination to detect surface features. Depending on their design, they can track on materials that challenge conventional optical mice. However, not every laser mouse works on glass, mirrors, or highly reflective surfaces.

Choose your mouse according to your actual working environment. A cloth mousepad provides a consistent tracking surface for most optical and laser models. If you frequently work on glass desks, check the manufacturer’s supported surfaces before buying.

A compatible surface can improve tracking consistency and reduce unexpected cursor movement. It can also make your mouse easier to control during precise tasks. Ultimately, the sensor and surface should work together to deliver reliable performance.

Which Type of Mouse Is Better?

The best mouse type depends on your activities, preferred sensitivity, and working environment. Optical mice are popular among gamers, designers, and office users because many models deliver consistent tracking on standard mousepads. They are also available in a wide range of prices, shapes, and performance levels. If gaming is your priority, explore this guide to gaming equipment to learn about other peripherals that can improve your setup.

Laser mice offer another option for users who need greater surface compatibility. Some models track effectively on polished desks and other surfaces where traditional optical sensors may struggle. However, performance varies between individual products, so a laser sensor does not guarantee better tracking.

Before making your decision, consider these factors:

  • Competitive gaming: Look for consistent tracking, low latency, and a sensor with minimal unwanted acceleration.
  • Graphic design: Choose a mouse that supports controlled, predictable cursor movement.
  • Office productivity: Prioritize comfort, button layout, connectivity, and battery life alongside sensor performance.
  • Mobile work: Consider a laser mouse if you frequently use different desk surfaces, but verify compatibility first.

For most users, a quality optical mouse offers an effective balance of performance, reliability, and value.

Evaluating Your Personal Computing Habits

Your daily routine can help determine which mouse technology suits you best. Start by identifying the tasks you perform most often. Then consider your desk surface, preferred sensitivity, and the level of precision you need. If you regularly work away from the office, explore these productivity gadgets for remote work to help build a more practical setup.

Gamers should prioritize reliable sensor tracking rather than choosing a mouse based on its maximum DPI rating. A high DPI setting does not automatically improve accuracy. Consistent movement and comfortable control are usually more useful.

Graphic designers and other creative professionals should look for smooth tracking and a comfortable shape. Office workers may benefit more from ergonomic support, programmable buttons, and wireless connectivity than from a particular sensor type.

If you travel frequently, surface compatibility may also influence your decision. A laser mouse can be useful when you cannot carry a mousepad, provided it supports the surfaces you encounter.

Testing a mouse on your usual desk is one of the best ways to evaluate its performance. Your comfort and control should guide the final choice.

What Are the Disadvantages of Using an Optical Mouse?

Optical mice have several limitations, although their practical impact depends on the model and surface. The main drawback is that some optical sensors struggle with transparent, glossy, or highly reflective materials. A traditional optical mouse may fail to track reliably on clear glass without a suitable mousepad.

Another limitation is surface compatibility. If your desk has an unsuitable finish, you may need a desk mat or mousepad for consistent movement. This adds a small expense and can be inconvenient when working away from your usual setup.

Older or entry-level optical mice may also have lower sensitivity or less advanced tracking capabilities than some premium models. However, this is not a universal limitation of optical technology. Modern optical gaming mice can offer excellent performance and high DPI settings.

Common disadvantages include:

  • Surface restrictions: Some materials prevent reliable tracking.
  • Mousepad dependence: Certain models work best on a suitable mat.
  • Model differences: Budget sensors may offer less consistent tracking than premium alternatives.

Despite these limitations, a quality optical mouse remains a reliable choice for most everyday users.

Overcoming Surface Limitations With Mousepads

A suitable mousepad can resolve many tracking problems associated with optical mice. Cloth mousepads are widely used because they provide a consistent surface for detecting movement. They are also available in different sizes, thicknesses, and textures.

When choosing a mousepad, consider your preferred mouse sensitivity and available desk space. A larger pad gives you more room for broad movements, which can be particularly useful for gaming. A smaller pad may be sufficient for office work and general browsing.

If your mouse skips, stutters, or stops tracking, check the surface before replacing the device. Dust, fingerprints, and uneven textures can interfere with sensor performance. Cleaning the sensor area and testing another surface may help identify the problem.

A mousepad is not always necessary, but it can improve consistency on unsuitable desks. For most optical mice, a clean, opaque surface is a simple way to achieve more reliable tracking.

What Is the Difference Between Optical and Laser Mice?

The main difference between optical and laser mice is the illumination technology used to detect surface movement. Optical mice typically use an LED or another non-laser light source. Laser mice use a laser diode, often operating in the infrared range. Both types capture surface information and translate changes into cursor movement.

Their illumination methods affect how each sensor detects surface details. Optical sensors generally perform consistently on suitable, textured mousepads. Laser sensors can detect finer surface features and may work on a broader range of materials.

However, greater sensitivity does not automatically mean better performance. Depending on the design, a laser sensor may respond to tiny surface irregularities that cause unwanted cursor movement. Modern sensor designs have reduced many historical differences between the two technologies.

Feature Optical Mouse Laser Mouse
Light source Typically an LED Laser diode
Common surfaces Opaque mousepads and desk mats A wider range of compatible surfaces
Glass tracking Usually limited Possible with supported surfaces and models
Tracking consistency Often predictable on suitable mousepads Depends on the sensor and surface
Gaming suitability Excellent with a quality sensor Can also be excellent with a quality sensor

Choose based on real-world tracking performance rather than the sensor label alone.

Examining Illumination Technologies and Performance

Optical and laser sensors use light to detect changes in the surface beneath a mouse. A sensor captures successive images and processes those changes to estimate movement. The mouse then translates that information into cursor motion on your screen.

An optical sensor typically illuminates the surface with an LED. Its performance depends on the surface texture, image processing, and sensor design. A laser sensor uses a focused laser beam to detect surface details, which can improve compatibility with certain materials.

Neither technology guarantees superior accuracy in every situation. Factors such as sensor quality, DPI settings, polling rate, and firmware can influence performance. A well-designed optical sensor may outperform a poorly designed laser sensor.

When comparing mice, check independent reviews and real-world tracking tests. Pay particular attention to unwanted acceleration, jitter, and lift-off behavior if you play competitive games.

Understanding these differences helps you select a mouse that fits your work or gaming setup. The best option is the one that delivers reliable tracking on your preferred surface.

How Do I Know If My Mouse Is Optical or Laser?

Identifying whether your mouse uses optical or laser technology can be difficult from appearance alone. Start by turning the mouse over and checking the sensor area. Some optical mice show a visible red glow, while others use infrared illumination that is invisible to the human eye. For a closer explanation of this feature, read why optical computer mice use red lights.

A visible red light does not always provide definitive proof of the sensor type. Likewise, a mouse that appears dark underneath is not necessarily a laser model. Sensor illumination and housing designs vary between manufacturers.

For a more reliable identification, follow these steps:

  1. Find the model number: Check the label on the underside of the mouse.
  2. Visit the manufacturer’s website: Search for the exact model and its technical specifications.
  3. Read the product manual: Look for references to optical tracking, laser tracking, or the specific sensor model.
  4. Check the original packaging: The sensor technology may appear in the product specifications.

If the information is unclear, contact the manufacturer or consult a trustworthy technical review. Avoid relying on appearance alone, especially when the sensor uses invisible infrared light.

Inspecting the Sensor and Manufacturer Specifications

The underside of your mouse can offer useful clues, but it cannot always confirm the sensor type. Some optical mice emit visible red light, while others use invisible illumination. Laser mice may also have sensor openings that appear dark to the naked eye.

For a dependable answer, identify the exact model number. Manufacturers often list the sensor technology, tracking capabilities, and supported surfaces on their official product pages. The user manual may provide additional technical details.

You can also search for independent reviews that examine the mouse’s sensor. These reviews may explain its tracking behavior, sensitivity range, and suitability for gaming or productivity.

If you are choosing a replacement mouse, do not assume that laser technology is automatically more advanced. Compare the actual sensor performance, ergonomics, connectivity, and price. A well-designed optical mouse may be the better option for your needs.

Ultimately, the most useful specification is how reliably the mouse tracks on your usual surface. Choose the device that provides comfortable, predictable control for your everyday tasks.

Conclusion: Optical or Laser Mouse — Which Should You Choose?

Choosing between an optical or laser mouse depends on your needs, budget, and working environment. For most users, an optical mouse offers reliable tracking for everyday computing, office work, and gaming. A laser mouse may be more suitable if you frequently work on different surfaces, including certain glass desks.

However, sensor quality matters more than the technology label alone. Consider tracking accuracy, comfort, DPI settings, and surface compatibility before making your decision. For additional guidance, read Logitech’s gaming mouse guide, which explains sensor types, DPI, and other important features.

Ultimately, choose a mouse that delivers comfortable, consistent, and predictable cursor movement. The best option is the one that fits your setup and makes your everyday tasks easier.

How To Stop Siri From Reading Notifications On AirPods

How to Stop Siri From Reading Notifications on AirPods

If you want to stop Siri from reading notifications, you can change a few settings on your iPhone. Apple’s Announce Notifications feature allows Siri to read incoming messages and app alerts through compatible AirPods. Although this feature helps you stay informed hands-free, frequent voice announcements can interrupt music, podcasts, calls, and important tasks.

Fortunately, you don’t need to disable Siri completely to enjoy uninterrupted listening. You can turn off all spoken notifications or adjust the settings for specific apps. These options help you control which alerts reach your ears without changing every notification preference on your device.

This guide explains how to stop Siri from reading notifications on AirPods, why announcements sometimes stop working, and how to troubleshoot alerts that continue unexpectedly. Follow the steps below to customize your iPhone settings and enjoy a quieter listening experience.

How Do I Stop Siri From Reading Messages When I Have AirPods In?

To stop Siri from reading messages through your AirPods, adjust the announcement settings on your iPhone. You can disable spoken alerts for Messages without affecting notifications from other applications. This option works well if you want to keep useful announcements but prefer reading text messages privately.

Follow these steps:

  1. Open the Settings app on your iPhone.
  2. Tap Notifications and select Announce Notifications.
  3. Find Messages in the available application list.
  4. Open its announcement settings.
  5. Turn off the relevant announcement option.

Depending on your iOS version, Announce Notifications may appear under Siri or Apple Intelligence & Siri instead.

After changing this setting, Siri should stop reading incoming text messages through your AirPods. Other supported applications may continue announcing alerts if their settings remain enabled.

If your goal is to stop Siri from reading notifications from every application, use the main announcement switch instead. This prevents spoken alerts across supported apps without requiring you to change each one individually.

Accessing App-Specific Notification Controls

App-specific controls let you choose which notifications Siri announces through your AirPods. You can silence distracting applications while keeping useful alerts available.

For example, you might want Siri to announce reminders but remain silent when personal messages arrive. Adjusting individual app settings gives you greater control over your listening experience.

To manage these preferences, open Settings > Notifications > Announce Notifications. Select an available app and review its announcement options. The available choices depend on the application and your iOS version.

Some apps may offer options for announcing different notification types. Others provide fewer controls. Check the available settings rather than assuming every application supports the same features.

Remember that turning off spoken announcements doesn’t necessarily disable notifications themselves. Your iPhone can still display banners, show notification previews, and play sounds according to your existing preferences.

This approach is useful when you want to stop Siri from reading notifications from selected apps without losing important updates. Review your frequently used applications and adjust only the settings that cause unwanted interruptions.

How Do I Stop My AirPods From Reading Notifications?

If you want to stop Siri from reading notifications from every supported application, disable the main Announce Notifications feature. This setting controls spoken alerts through compatible headphones, including messages and supported third-party app notifications.

Follow these steps:

  1. Open Settings on your iPhone.
  2. Tap Notifications.
  3. Select Announce Notifications.
  4. Turn off the main announcement switch.

On some iOS versions, you may find this feature under Siri or Apple Intelligence & Siri. The exact menu location depends on your software version.

Disabling Announce Notifications prevents Siri from reading supported incoming alerts aloud through compatible headphones. Your regular notifications should continue appearing according to your other settings.

You don’t need to disable Siri entirely to achieve this result. You can still use voice commands, control music, and request information through your AirPods.

This method is useful when you want uninterrupted listening while working, studying, exercising, or relaxing. If you later want spoken alerts again, return to the same settings menu and enable the feature.

Managing Master Notification Toggles

The main Announce Notifications switch provides a quick way to silence spoken alerts across supported applications. However, understanding its purpose helps you avoid changing unrelated settings.

When you disable this feature, Siri stops announcing supported notifications through compatible headphones. Your iPhone may still display notification banners, play notification sounds, and show message previews.

If you only want to stop Siri from reading notifications while wearing AirPods, you don’t necessarily need to disable other iPhone notification settings. Keep your existing preferences unless you want to silence visual or audible alerts too.

You can also check whether your iPhone allows you to add an announcement control to Control Centre. Availability and customization options depend on your iOS version.

A convenient shortcut can help when switching between work, exercise, and leisure. However, the main Settings menu remains a reliable place to manage the feature.

After making changes, test the setting with a new incoming message. This confirms whether Siri has stopped announcing notifications without unnecessarily affecting your other preferences.

How Do I Get Siri to Stop Talking in My AirPods?

If Siri keeps speaking through your AirPods, first identify what it’s announcing. Spoken notifications, incoming calls, and responses to voice commands use different settings. Turning off one feature won’t necessarily silence the others.

To stop Siri from reading notifications, open Settings > Notifications > Announce Notifications and turn off the feature. Depending on your iOS version, you may find this option under Siri or Apple Intelligence & Siri.

If Siri announces incoming callers, open the relevant Siri settings and select Announce Calls. Choose an option that prevents unwanted spoken call announcements.

You can still use Siri manually without hearing every incoming notification. Disabling announcement features doesn’t necessarily prevent voice commands or other assistant functions from working.

If Siri activates unexpectedly, review your voice activation settings and AirPods controls. These determine how you activate the assistant rather than which notifications it announces.

Adjusting the correct settings helps eliminate unwanted interruptions while preserving useful functions. Test your changes with a new notification and an incoming call to confirm that each feature behaves as expected.

Disabling Voice Activation Triggers

If Siri activates unexpectedly while wearing your AirPods, review your voice activation and headphone controls. This issue differs from Siri reading notifications, so disabling Announce Notifications alone might not resolve it.

Start by opening Settings > Siri or Settings > Apple Intelligence & Siri. Review the available options for listening for Siri or responding to voice commands. Menu names vary across iOS versions and supported devices.

You can change the listening option if you don’t want Siri responding to a spoken activation phrase. However, doing so also affects hands-free access to the assistant. If you’re considering broader changes to Apple’s built-in AI features, see how to disable Apple Intelligence on your iPhone without confusing those settings with notification announcements.

Next, check your AirPods controls. Some models allow Siri activation through a configured press-and-hold action or another supported control. Review these settings if accidental touches trigger unwanted responses.

Keep in mind that disabling voice activation doesn’t necessarily disable spoken notifications or incoming call announcements. Those features have separate controls.

If your only concern is stopping Siri from reading notifications, leave voice activation enabled and turn off Announce Notifications instead. This targeted change preserves useful hands-free functions while reducing interruptions.

Why Did Siri Stop Reading My Messages Through My AirPods?

If Siri suddenly stops reading messages through your AirPods, several settings could explain the change. The Announce Notifications feature might be disabled, or Messages might no longer be configured to announce alerts.

First, check Settings > Notifications > Announce Notifications. Confirm that the main feature is enabled and review the settings for Messages. Depending on your iOS version, these controls may appear under the Siri settings menu.

Next, verify that your AirPods are connected to your iPhone. Open Bluetooth settings and confirm that your headphones show as connected.

Your iPhone’s current state also matters. Siri announces notifications through compatible headphones under supported conditions, including when the headphones are connected and worn and the device is locked. You might not hear announcements while actively using your iPhone.

Focus settings can also affect which notifications arrive or make sounds. However, don’t assume Focus is responsible without checking its configuration.

If the settings appear correct, restart your iPhone and reconnect your AirPods if necessary. These basic checks can help identify connection problems or incorrect preferences without requiring a factory reset.

Understanding Focus Modes and Notification Settings

Focus modes help reduce interruptions by filtering notifications according to your preferences. For example, Work Focus can silence alerts from selected apps or people while allowing others through.

If Siri stops announcing messages during certain periods, check whether a Focus mode is active. Open Control Centre and review the current Focus setting. You can also open Settings > Focus to inspect its allowed people, apps, and schedules.

Keep in mind that Focus doesn’t automatically explain every missing Siri announcement. The main announcement feature, app-specific preferences, headphone connection, and iPhone lock state can also affect the result.

To troubleshoot the issue, send yourself a test message while your AirPods are connected and your iPhone is locked. Then repeat the test with Focus disabled, if appropriate.

Compare the results to determine whether Focus is filtering the notification or another setting is responsible. If announcements remain unavailable, check the Messages announcement controls and confirm that your headphones support the feature.

This process helps isolate the cause instead of changing several unrelated settings at once. You can then restore your preferred Focus settings.

Why Is Siri Still Announcing Notifications?

If Siri continues announcing notifications after you’ve changed your settings, you might have disabled the wrong control. Turning off announcements for Messages, for example, doesn’t necessarily prevent other applications from speaking through your AirPods.

Start by checking the main Announce Notifications switch. If it remains enabled, review the announcement preferences for other supported apps. Some applications may continue announcing alerts even when you’ve restricted Messages.

Next, confirm that you’re changing settings on the iPhone connected to your AirPods. If your headphones switch between multiple Apple devices, check the device currently handling the notification.

Also, distinguish spoken notifications from incoming call announcements. If Siri announces callers rather than messages, review Announce Calls separately.

If the settings appear correct, disconnect and reconnect your AirPods. Restarting your iPhone can also help resolve temporary software issues.

Avoid resetting your AirPods immediately. A factory reset removes their existing pairing and configuration, so try simpler troubleshooting steps first. After each change, test a new notification to identify which adjustment solves the problem.

Troubleshooting Persistent Audio Glitches

When Siri continues announcing notifications despite correct settings, a temporary software or connection issue may be involved. Work through the simplest troubleshooting steps before attempting a complete reset.

Start with these checks:

  • Verify your settings: Confirm that Announce Notifications is disabled globally or for the relevant app.
  • Check the connection: Open Bluetooth settings and make sure your AirPods are connected to the intended iPhone.
  • Restart your iPhone: Restarting can resolve temporary software problems affecting connected devices.
  • Reconnect your AirPods: Disconnect and reconnect them, then test a new incoming notification.
  • Check for updates: Install available iOS updates if appropriate for your device.

If Siri still announces alerts, review Announce Calls and the settings of other supported applications. This helps identify whether another feature is responsible.

As a last resort, you can forget your AirPods in Bluetooth settings and pair them again. If necessary, follow Apple’s instructions for resetting your specific AirPods model.

A reset isn’t guaranteed to resolve every problem. If announcements continue unexpectedly, consult Apple Support for device-specific troubleshooting.

Final Thoughts

You can stop Siri from reading notifications by changing the Announce Notifications settings on your iPhone. Disable the feature entirely if you want quiet listening, or adjust individual applications if you prefer selective announcements.

If Siri continues speaking, check Announce Calls, verify your AirPods connection, and review your notification preferences. Restarting your devices may help when the settings appear correct but the problem persists.

You don’t need to disable Siri completely to enjoy uninterrupted listening. Choose the settings that match your needs and test them with a new notification.

With the right configuration, you can listen to music, attend calls, and use your AirPods without unnecessary spoken alerts.

What Is the Average Lifespan of a Smart Speaker?

What Is the Average Lifespan of a Smart Speaker?

Smart speakers have transformed how people manage daily routines, control smart home devices, and access information. However, these convenient gadgets have a limited useful life. Understanding the average lifespan of a smart speaker helps you plan upgrades and get better value from your investment.

Several factors influence how long a smart speaker remains useful. These include hardware quality, software support, internet connectivity, and everyday usage. Environmental conditions, such as excessive heat and moisture, can also affect device durability.

Some speakers continue producing sound long after their smart features become outdated. However, discontinued software updates or cloud services may reduce their functionality. This means a device can remain physically operational without providing its original features.

In this guide, we examine smart speaker longevity, common disadvantages, leading speaker brands, and the expected lifespan of JBL products. You will also discover practical maintenance tips to help your speaker perform reliably for longer.

How Many Years Can a Smart Speaker Last?

The average lifespan of a smart speaker is often estimated at around three to five years, although actual results vary by model and usage. Some devices remain functional for considerably longer when their hardware and software continue receiving adequate support.

Physical components, including speaker drivers and amplifiers, can last for many years under normal conditions. However, software updates and cloud services often determine how long a smart speaker remains fully functional. Manufacturers may eventually discontinue updates or remove certain online features.

Environmental conditions also influence longevity. Dust, moisture, excessive heat, and electrical surges can damage internal components. Speakers placed in clean, well-ventilated indoor spaces generally face fewer environmental risks.

You can help extend your device’s useful life through regular care. Keep it away from direct heat, clean it according to the manufacturer’s instructions, and use a reliable power source. Checking software support before purchasing can also help you avoid premature replacement.

The Impact of Software Support on Smart Speaker Longevity

Software support plays an important role in determining how long a smart speaker remains useful. Even when its hardware works correctly, outdated software can limit functionality and create security concerns.

Manufacturers release firmware updates to fix bugs, improve performance, and address security vulnerabilities. When support ends, your device may no longer receive these improvements. Some voice assistant features may also become unreliable as online services change.

However, discontinued support does not always mean immediate replacement is necessary. Basic audio playback may continue working, depending on the model and its available connections. Voice commands, smart home controls, and cloud-based services may become limited or unavailable.

Before buying a device, check the manufacturer’s software update policy. Consider whether the speaker supports Bluetooth or auxiliary connections, where available. If you plan to use Bluetooth regularly, understanding Bluetooth range and how far a wireless connection can reach can help you choose a suitable placement for your speaker. These features may allow continued audio playback even when certain smart functions stop working.

What Are the Disadvantages of Smart Speakers?

Smart speakers offer convenience, but they also have several disadvantages. Privacy concerns, internet dependence, security risks, and compatibility problems can affect the overall user experience.

Most smart speakers use microphones to detect wake words and respond to voice commands. Depending on the device and its settings, audio recordings may be processed or stored through cloud services. Accidental activations can sometimes trigger unintended recordings.

Internet connectivity is another limitation. Many voice assistant features require an active connection, so network outages can prevent access to online services. Choosing suitable networking equipment can help improve home network performance, and understanding the differences between dual-band and tri-band routers can help you select a router that meets your smart home’s connectivity needs. Compatibility issues may also arise when different devices use separate smart home platforms.

Other drawbacks include dependence on manufacturer services and possible changes to supported features. Some models collect usage data to improve voice recognition or personalize responses. These practices may concern users who prefer greater control over their personal information.

Before purchasing a smart speaker, review its privacy settings and supported integrations. Check whether you can delete recordings, disable the microphone, and manage data collection. These precautions can help you balance convenience with privacy and security.

Privacy Concerns and Data Collection Risks

Privacy is an important consideration when using voice-activated devices at home. The average lifespan of a smart speaker is not determined by hardware alone; privacy protections and ongoing software support also influence how useful and trustworthy a device remains. Smart speakers generally listen for a wake word, but accidental activations can sometimes occur. Depending on the device, these events may trigger audio recording or cloud processing.

Manufacturers may use voice recordings and related information to improve speech recognition or provide personalized features. Their data collection practices differ, so review the relevant privacy policy before making a purchase.

Encryption can help protect information during transmission, but it does not eliminate every privacy risk. Account compromise, insecure network settings, and excessive data collection can still create concerns.

You can take several practical steps to improve privacy:

  • Review voice history: Check and delete stored recordings when appropriate.
  • Adjust privacy settings: Disable optional recording storage or personalization features when available.
  • Mute the microphone: Use the physical microphone control when voice activation is unnecessary.
  • Secure your Wi-Fi: Use a strong password and keep your router’s software updated.
  • Check account access: Remove unfamiliar devices and enable additional security features where supported.

These precautions help reduce potential exposure while allowing you to continue using your smart speaker.

Which Is the No. 1 Speaker Brand?

There is no single number-one speaker brand for every buyer. The best choice depends on your priorities, including sound quality, smart home integration, portability, durability, and price.

In the smart speaker category, Amazon’s Echo range is a prominent competitor. Google Nest devices suit users who prefer Google’s services, while Apple HomePod models integrate closely with Apple’s ecosystem. Each product family offers different features and levels of compatibility.

For traditional audio products, JBL, Bose, Sony, and Sonos are established brands. Their products cover various needs, from portable Bluetooth speakers to home audio systems and premium wireless speakers. Sound performance, build quality, and pricing vary between models.

Rather than relying on a universal brand ranking, compare individual products before purchasing. Look at independent sound tests, warranty coverage, software support, and repair options. Understanding how bitrate affects audio quality can also help you evaluate sound performance when comparing speakers and audio sources. These details provide a more useful basis for evaluating long-term value.

Market Dominance of Amazon Echo Devices

Amazon Echo devices have helped establish Alexa as a prominent voice assistant in the smart speaker market. Their popularity is supported by a broad product range, smart home integrations, and compatibility with many third-party services.

Entry-level Echo models generally focus on affordability and everyday voice commands. More expensive options may provide improved audio performance or additional smart home capabilities. This range allows buyers to select devices according to their budgets and household requirements.

However, Amazon’s market presence does not automatically make every Echo speaker the best choice. Google Nest may suit households that rely heavily on Google services. Apple HomePod can be appealing to users who already own several Apple devices. If you already own an Echo device, understanding what it means when Alexa glows red and how to fix it can also help you troubleshoot a common indicator light issue.

Market leadership also depends on the country, product category, and reporting period. Therefore, claims about the world’s leading speaker brand should include current, reliable market data.

When comparing Echo devices, consider privacy controls, software support, and compatibility with your existing smart home equipment. These factors influence long-term usefulness more than popularity alone. Choosing a model that meets your needs can help reduce unnecessary upgrades.

What Is the Average Lifespan of a JBL Speaker?

The average lifespan of a JBL speaker depends on its design, usage, and maintenance. Many portable Bluetooth speakers can remain useful for several years, while wired home speakers may last a decade or longer under suitable conditions.

Portable JBL speakers use rechargeable batteries that gradually lose capacity through normal use. Frequent charging, high temperatures, and heavy usage can accelerate battery degradation. Consequently, battery performance may decline before the speaker’s audio components fail.

Wired speakers do not face rechargeable battery degradation, although their drivers, connections, and other components can still wear out. Their longevity depends on build quality, operating conditions, and how carefully they are used.

JBL offers products designed for different environments, including portable speakers intended for outdoor use. However, water and dust resistance vary by model. Before using a speaker near a pool or in wet conditions, understanding the differences between IP67 and IP68 water resistance ratings can help you interpret the protection specified for your device.

To extend your JBL speaker’s useful life, avoid excessive volume for prolonged periods. Keep it away from extreme temperatures and follow the manufacturer’s charging and cleaning instructions. Regular care can help preserve performance and delay replacement.

Factors Influencing JBL Battery Durability

Battery condition is one of the main factors affecting the lifespan of portable JBL speakers. Most rechargeable models use lithium-ion batteries, which gradually lose capacity as they age and complete charging cycles. This also raises a broader question about why tech companies stopped using removable batteries, particularly when battery degradation can eventually affect a device’s useful life.

Heat can accelerate battery degradation. Leaving a speaker inside a hot car, exposing it to direct sunlight for extended periods, or charging it in a poorly ventilated location may reduce battery health.

Charging habits also matter, although modern battery management systems help prevent some forms of overcharging. You do not need to follow a rigid charging schedule. Instead, avoid extreme temperatures and follow the instructions for your particular model.

Use these practical battery-care tips:

  • Avoid excessive heat: Store and charge the speaker in a cool, dry location.
  • Use suitable charging equipment: Follow JBL’s recommended charging specifications.
  • Prevent prolonged deep discharge: Recharge the battery when needed instead of leaving it empty for extended periods.
  • Keep charging ports clean: Protect them from dust, dirt, and moisture.
  • Monitor playback time: Noticeable reductions in battery life may indicate normal battery aging.

These recommendations can help preserve battery capacity, but rechargeable batteries naturally deteriorate over time. Reduced playback time does not necessarily mean the entire speaker has failed. Depending on the model, battery replacement may or may not be practical.

Conclusion

The average lifespan of a smart speaker depends on its build quality, software support, usage, and maintenance. Many smart speakers remain useful for around three to five years, although proper care can help extend their functionality. However, discontinued updates or cloud services may limit features before the hardware fails.

Before purchasing a smart speaker, consider its durability, privacy controls, and long-term software support. You can also explore the Consumer Reports website for independent product reviews and buying advice. For JBL speakers, protecting the battery from excessive heat and following recommended charging practices can help maintain performance.

Ultimately, choosing a reliable model and maintaining it properly will help you get the most value from your investment and reduce unnecessary replacements.

Google Photos vs. Gallery: Which One Should You Use?

Google Photos vs. Gallery: What’s the Difference and Which Should You Use?

Choosing between a phone’s native Gallery app and Google Photos can be confusing. Both apps display photos and videos, but they serve different purposes. When comparing Google Photos vs. Gallery, the main difference is how they manage local files, backups, syncing, and storage.

When comparing Google Photos vs. Gallery, the biggest differences involve storage, backup, syncing, privacy, and organization. Your Gallery usually focuses on files stored directly on your phone. Google Photos adds cloud backup, cross-device access, advanced search, editing, and sharing.

Many Android phones include both options. That can make it difficult to understand where your photos actually live. It can also create confusion when you delete files or try to free up storage.

Understanding Google Photos vs. Gallery can help you avoid accidental deletions. It can also help you choose the right app for everyday photo management.

This guide explains how both apps work. You will learn when to use Google Photos, when Gallery makes more sense, and whether you need both. You will also learn how to remove local photos without accidentally deleting your backed-up copies.

Is it better to use Google Photos or Gallery?

Choosing between Google Photos and Gallery depends on how you use your phone. Google Photos works well if you want automatic backups, cross-device access, advanced search, and cloud storage. It can organize your library and help you find photos using people, places, objects, and text.  If you are also comparing other cloud services, our guide to iCloud Photos vs Google Photos can help you understand the differences between the two platforms.

Your phone’s Gallery app works better for simple local browsing. It usually focuses on photos and videos stored on your device. You can browse local files without an internet connection or a Google account.

Privacy also matters when comparing Google Photos vs. Gallery. Google Photos can upload selected folders to your Google account when you enable backup. A local Gallery normally displays files without sending them to a cloud service.

Your choice becomes easier if you focus on your priorities:

  • Choose Google Photos for cloud backup and multi-device access.
  • Choose Gallery for fast local browsing and offline access.
  • Use both apps if you want local access and cloud backup.
  • Check backup settings before deleting any important photos.

Neither app works best for every user. Your storage needs, privacy preferences, and backup habits should guide your decision.

Assessing Offline Speed Versus Cloud Convenience

Your daily habits can help you decide between the two apps. A local Gallery can open photos stored on your phone without an internet connection. This makes it useful when you travel or have limited mobile coverage.

Google Photos can also show local photos. However, you may need an internet connection for photos that exist only in your cloud library. This can matter when you remove local copies to save storage.

Google Photos offers more convenience when you use several devices. You can sign into the same Google account and access backed-up photos across supported devices. You also get search, editing, sharing, and organization tools.

Gallery apps usually provide a simpler local experience. They can also integrate closely with your phone’s camera and file system.

For offline browsing, Gallery often has the advantage. For backup, synchronization, and cross-device access, Google Photos offers more features.

Your internet connection also affects the experience. If you frequently browse photos without reliable internet, keeping local copies remains useful.

Is there a better gallery app than Google Photos?

Yes. Several Gallery apps can suit users who mainly want local photo management. Google Photos combines photo viewing with cloud backup, search, editing, sharing, and account-based features.

A dedicated Gallery app can provide a simpler experience. Good photo management also depends on how you organize your library. These apps can support the same goal as following simple tips to organize your photos. Options such as Aves Gallery and other local-focused photo managers can offer folder browsing, metadata tools, and offline organization.

Manufacturer apps can also provide useful alternatives. Samsung Gallery, for example, integrates closely with Samsung devices and related services.

However, you should not assume that every third-party Gallery app offers better privacy. Some apps include advertising, analytics, cloud features, or other online services. Always check the app’s privacy information before installing it.

When comparing alternatives, consider these factors:

  • Whether the app focuses on local storage.
  • Whether it offers optional cloud backup.
  • Whether it displays advertisements.
  • What permissions it requests.
  • Whether it supports folders and hidden media.
  • Whether it provides useful metadata controls.

A lightweight Gallery app may suit you better than Google Photos if you rarely use cloud services. However, Google Photos remains useful if backup and cross-device access matter to you.

Selecting Standalone Tools for Enhanced Media Privacy

Local-focused Gallery apps can give you more control over your media. If an app does not upload your photos, your files remain on your device unless another service handles the backup.

This approach can help users who prefer local storage. It can also reduce the number of services that have access to their personal media.

However, local storage does not automatically provide complete privacy. Anyone who accesses your unlocked phone may still view your files. Your device security therefore matters just as much as your choice of Gallery app.

Before installing a privacy-focused Gallery, review its permissions and privacy policy. Check whether the developer collects usage information or connects the app to external services.

Local apps can also provide useful management features. Depending on the application, you may be able to browse folders, rename files, inspect EXIF information, or manage albums offline.

Remember that privacy and backup solve different problems. Local storage can reduce cloud exposure, but it also creates a backup risk.

If your phone gets lost, damaged, or stolen, locally stored photos may disappear. For important memories, keep an additional backup somewhere you trust.

Do I need both Google Photos and Gallery?

You do not need both apps, but using both can make photo management easier. Each app can handle a different part of your workflow.

Your Gallery app can provide fast access to photos stored on your phone. It may also offer device-specific editing, albums, and camera integration. Google Photos can provide cloud backup, search, sharing, and access across devices.

This makes Google Photos vs. Gallery less about choosing one winner. Instead, you can use each app for the task it handles best.

For example, you could use Gallery for quick local browsing. Google Photos could handle backups and access from another phone or computer.

A practical setup could look like this:

  • Use Gallery for local photos and videos.
  • Use Google Photos for cloud backups.
  • Check your backup status before deleting files.
  • Review your Google storage regularly.
  • Keep another backup for especially important photos.

Using both apps does not automatically mean that your phone stores two complete copies of every photo. Their behavior depends on your device, settings, and backup configuration.

If your phone has limited storage, Google Photos can help you remove eligible local copies after backup. Always confirm the backup before clearing space.

Coordinating Local Viewers with Automatic Background Uploads

Using both apps can create a simple photo workflow. You can capture photos with your phone’s camera and browse them through Gallery. Google Photos can then back up selected folders when you enable its backup feature.

Your backup settings control which folders Google Photos uploads. Camera photos may receive automatic backup, while screenshots, downloads, or messaging folders may require separate settings.

This makes regular checks important. Do not assume that every image on your phone has reached your Google Photos account.

A simple workflow looks like this:

  1. Take photos with your phone’s camera.
  2. Browse them through Gallery or Google Photos.
  3. Check which folders Google Photos backs up.
  4. Confirm important photos have finished uploading.
  5. Use storage-management tools when your phone needs space.

This approach gives you local access while maintaining an online copy. It also reduces the risk of losing photos after a phone failure.

However, cloud backup should not become your only backup for irreplaceable files. Your Google account could become inaccessible, or you could accidentally delete important content.

For valuable photographs, consider keeping another independent copy. An external drive or another trusted backup service can provide additional protection.

Is my phone gallery the same as Google Photos?

No. Your phone’s Gallery and Google Photos can display many of the same pictures, but they serve different purposes.

A typical Gallery app focuses on media stored on your device. It organizes photos according to local folders, albums, and storage locations. Some manufacturer Gallery apps also connect with their own cloud services.

Google Photos connects to your Google account. It can display local photos while also managing photos and videos that you back up to Google’s cloud storage.

This distinction explains much of the confusion around Google Photos vs. Gallery. Seeing the same photo in both apps does not necessarily mean that the phone has created two separate files.

A photo can exist in several locations:

  • On your phone: The local copy uses device storage.
  • In Google Photos: A backed-up copy uses your Google account storage.
  • In both places: You can access the local file and the cloud copy.

For example, a new camera photo may initially exist only on your phone. Google Photos can then back it up. Your Gallery can continue showing the local version.

If you later remove the local copy, the backed-up version can remain available in Google Photos.

Understanding these locations helps you manage storage without accidentally deleting important memories.

Understanding File Storage Locations and Remote Libraries

Your phone’s Gallery usually shows files stored in internal storage or an SD card. The exact folder structure depends on your phone and the apps you use.

Google Photos can also show local photos. However, its cloud library contains photos and videos that you have backed up to your Google account.

This creates an important difference between local storage and cloud storage. A photo can exist only on your phone, only in the cloud, or in both locations.

The deletion method matters when you want to remove one copy. Deleting a local file does not always produce the same result as deleting the photo from Google Photos.

Google Photos provides storage-management features that can help remove local copies after successful backup. You should still check the backup status before deleting anything important.

Think of the two locations separately:

  • Phone storage: Holds the physical file on your device.
  • Google Photos cloud storage: Holds backed-up copies in your Google account.
  • Gallery: Usually displays and organizes local media.
  • Google Photos: Manages local and backed-up media with additional cloud features.

This distinction makes Google Photos vs. Gallery much easier to understand. The apps can show the same image while managing different copies.

Can I delete photos in Gallery but keep them in Google Photos?

Yes, but first confirm that Google Photos has backed up the photos. Once the cloud backup finishes, you can remove eligible local copies and keep the backed-up versions in Google Photos.

The safest option involves Google Photos’ Free up space feature. This tool helps remove local copies of photos and videos that Google Photos has already backed up.

You should take care when using the normal delete option inside Google Photos. That option can remove the photo from your Google Photos library rather than simply removing the local copy.

Before freeing space, check these points:

  • Confirm that the photo shows as backed up.
  • Make sure you use the correct Google account.
  • Check which device folders receive backup.
  • Verify that important photos finished uploading.
  • Understand whether you are deleting a local or cloud copy.

You can also use your phone’s Gallery app to delete local files. However, the exact behavior can vary between devices and software versions.

For the safest workflow, confirm your backup first. Then use Google Photos’ storage-management tools when you want to remove local copies.

Never assume that a photo has a cloud backup simply because you can see it inside Google Photos.

Using the Dedicated Free Up Space Feature

Google Photos’ Free up space feature helps remove local copies of photos and videos that have already reached your Google Photos library. It can prove useful when your phone’s internal storage becomes full.

The feature does not simply delete random photos. It identifies eligible local files that Google Photos has already backed up. You can then remove those local copies while keeping the backed-up versions in your Google Photos library.

After you clear local copies, those photos may disappear from your phone’s Gallery. You can still access them through Google Photos while the cloud versions remain available.

Follow these steps before clearing space:

  1. Open Google Photos.
  2. Check that you use the correct Google account.
  3. Confirm that backup has finished.
  4. Open the storage-management options.
  5. Review the files selected for removal.
  6. Confirm the cleanup.

This process can recover valuable phone storage without intentionally deleting your cloud library.

However, you should still keep another backup for irreplaceable photos. Cloud storage protects against phone damage, but it does not eliminate every possible risk.

Understanding Google Photos vs. Gallery also helps you recognize which copy you are removing. Always check before tapping Delete or confirming a storage cleanup.

Conclusion

The choice between Google Photos vs. Gallery depends on how you use your phone. Google Photos works best when you want automatic backup, cloud storage, powerful search, and access to your photos across multiple devices.

Your phone’s Gallery remains useful for fast, offline access to locally stored photos and videos. It also works well when you prefer to keep your media on your device rather than rely heavily on cloud services.

For many users, you do not have to choose just one. Using Google Photos and Gallery together can give you the benefits of both. Use Gallery for everyday local browsing and Google Photos for backup and cloud access.

Before deleting any photo, always confirm that Google Photos has backed it up. Google explains how to check your backup status and safely remove local copies in its official Google Photos Help guide.

Ultimately, Google Photos is the better choice for backup and convenience, while Gallery is better for simple offline access and local control. Your storage needs, privacy preferences, and backup habits should determine which setup works best for you.

Can Your Samsung S Pen Be Traced? Find Your Stylus Fast

Can Your Samsung S Pen Be Traced?

Losing your stylus can disrupt your day, especially when you use it for notes, sketches, or navigation. Many Samsung users wonder whether they can track a missing S Pen using their phone or tablet.

The answer depends on your Samsung S Pen model and its connectivity features. Some S Pens support Bluetooth Low Energy (BLE), while others work without Bluetooth. Standard S Pens generally rely on electromagnetic resonance to interact with compatible screens.

However, Bluetooth connectivity does not automatically mean you can track a stylus on a map. Certain models offer disconnection alerts, but these features cannot provide GPS coordinates. Samsung’s available features also vary by device generation.

In this guide, you will learn how to track your Samsung S Pen, find a missing stylus, check its connectivity, and choose a compatible replacement. If you mainly use your stylus for writing, explore the 5 best note-taking apps for Android in 2026 to find apps that suit your workflow. These practical steps will help you understand your options and avoid wasting time on tracking methods your device does not support.

How Can I Track My Samsung Pen?

Whether you can track your Samsung pen depends on its hardware and the features supported by your device. Some S Pens include Bluetooth Low Energy technology, while others only support writing, drawing, and screen interactions.

A Bluetooth-enabled S Pen can communicate with a compatible Samsung phone or tablet when it remains within wireless range. Depending on the model, your device may offer connection status information or alerts when the stylus disconnects. These features can help you prevent future losses.

However, Bluetooth connectivity is not the same as location tracking. Most S Pens do not contain independent GPS hardware that can transmit their precise location. Once a compatible Bluetooth connection ends, your phone generally cannot determine the stylus’s exact position.

Before attempting to locate your pen, check your device’s S Pen settings and user manual. Confirm which features your specific model supports. This will help you choose a realistic recovery method instead of relying on unavailable tracking tools.

Understanding BLE Tracking Limitations

Bluetooth Low Energy helps compatible S Pens communicate wirelessly with supported Samsung devices. Depending on the model, this connection may support remote commands, charging-status information, or disconnection warnings. However, these functions do not necessarily include a way to locate a missing stylus.

A proximity or disconnection alert can warn you that your S Pen is no longer connected. This feature is particularly useful when you accidentally leave the stylus behind. However, the alert does not tell you the pen’s exact location or show its position on a map.

Keep these limitations in mind when searching for your missing accessory:

  • Bluetooth range: The connection works only within a limited wireless range, which varies with the device and surrounding conditions.
  • Disconnection alerts: Supported devices may warn you when the S Pen moves out of range.
  • GPS tracking: Bluetooth support alone does not provide independent GPS tracking.
  • Model compatibility: Available features differ between S Pen generations and Samsung devices.

Check your device documentation before assuming that a tracking or alert feature is available.

I Lost My Samsung S Pen. How Can I Find It?

If you have lost your Samsung S Pen, begin with a physical search rather than relying on digital tracking. Most S Pens cannot transmit their location independently, so retracing your recent movements is usually the most practical approach.

Think about where you last used the stylus. Check your desk, bedside table, sofa, backpack, and clothing pockets. Also inspect the area around your phone or tablet, especially if you usually store the S Pen inside its designated slot.

If your model supports Bluetooth, check whether your device still recognizes the stylus. A connection may help you determine whether the pen is nearby, but it will not necessarily reveal its exact position. Keep in mind that walls, furniture, and other obstacles can affect wireless connectivity.

Work through one area at a time to avoid repeating the same search. If you cannot recover the stylus, confirm your device model before exploring replacement options. This approach saves time and helps you avoid buying an incompatible accessory.

Utilizing Proximity Alerts Effectively

Proximity alerts can help prevent future losses when your Samsung S Pen and device support the relevant feature. However, they are not universal, and they may not help you recover a stylus that is already missing.

Start by opening your device’s settings and locating the S Pen options. Look for available alerts or notifications related to leaving the stylus behind. The exact menu names and available controls depend on your Samsung device and software version.

If your device supports an alert, make sure the feature is enabled. Follow the manufacturer’s instructions to understand when the warning appears and what conditions affect it.

When searching for a missing pen, keep your phone or tablet nearby and check whether the stylus reconnects as you move around. A connection may indicate that you have entered wireless range, but it does not confirm the pen’s exact distance or direction.

For future protection, enable supported disconnection warnings and return the S Pen to its designated storage slot after use. These habits can reduce the risk of losing your stylus again.

Can Your Phone Locate Your S Pen?

Your phone may detect a compatible Samsung S Pen through Bluetooth, but that does not mean it can locate the accessory like a smartphone or smartwatch. The available capabilities depend on the specific S Pen and the Samsung device you own.

Some Bluetooth-enabled models support features such as remote commands and alerts when the stylus disconnects. These functions can help you understand the connection status and reduce the chance of leaving the pen behind.

However, most S Pens do not have independent GPS tracking. Your phone therefore cannot rely on GPS coordinates to show the stylus’s precise location on a digital map. Standard passive S Pens also cannot transmit a wireless location signal.

If you have misplaced your stylus, check your device settings for supported S Pen features. Do not assume that your phone maintains a complete location history or records the pen’s last known position. Such information may not be available on your model.

The most reliable approach is to combine any supported connectivity features with a careful physical search. If you cannot find the pen, check compatibility before purchasing a replacement.

Checking Connection Information on Your Device

Checking your Samsung device’s settings can help you understand whether your S Pen supports Bluetooth and whether the relevant connection features are available. However, do not expect every device to display a last-connected timestamp or a recoverable location history.

Open your phone or tablet’s settings and look for the S Pen menu. Review the available options for Bluetooth connectivity, remote functions, and disconnection alerts. Menu names and features can differ between models and software versions.

If your stylus has Bluetooth capabilities, follow your device’s instructions to check its connection status. A connected status may suggest that the pen is nearby, but it does not establish its exact distance or direction.

If the S Pen appears disconnected, remember that this alone cannot tell you where you lost it. The pen might be nearby, outside wireless range, or unavailable for connection.

Use the information you can verify to narrow your physical search. Check the places you visited after last using the stylus, including your workspace, vehicle, and bags. Avoid relying on location logs unless your specific device explicitly supports them.

How Do I Find My Missing Pen?

Finding a missing Samsung S Pen usually requires a systematic physical search. Since most models cannot transmit their location independently, checking your surroundings is more useful than trying unrelated phone-tracking applications.

Begin with the places where you regularly use your stylus. Look around your desk, tablet stand, charging area, and bedside table. Check sofa cushions, furniture gaps, drawers, and bags where the pen could have slipped unnoticed.

Dark-colored S Pens can blend into furniture, clothing, and vehicle interiors. Use a flashlight to inspect shadowed areas and spaces beneath furniture. Check jacket pockets, notebook covers, and compartments where you store your phone or tablet.

If you recently travelled, retrace your movements and contact places you visited. Ask whether anyone found a small stylus and handed it in. If your device supports Bluetooth connectivity, you can also check for a possible reconnection while searching nearby areas.

Search one section at a time and avoid moving to another until you have checked the current area thoroughly. If the pen remains missing, identify your device model and explore compatible replacement options.

Systematic Room Sweeps for Success

A structured search can improve your chances of finding a missing S Pen without wasting time. Instead of searching your entire home repeatedly, divide the area into smaller sections and inspect each one carefully.

Start with the location where you last remember using the stylus. Check the desk surface, nearby drawers, chair cushions, and the space beneath your furniture. Then move to other areas where you recently carried or used your device.

Use this checklist to organize your search:

  • Workspaces: Check desks, notebooks, tablet stands, drawers, and nearby shelves.
  • Living areas: Inspect sofa cushions, rugs, furniture gaps, and side tables.
  • Clothing and bags: Search pockets, backpack compartments, handbags, and laptop sleeves.
  • Vehicles: Check seat gaps, door pockets, centre consoles, and floor mats.
  • Recent destinations: Contact offices, classrooms, cafés, or other places you visited.

Use a flashlight to inspect dark spaces and move objects carefully. If you find the pen, check its condition before using it again. For future prevention, return it to its designated slot or a consistent storage location whenever you finish using it.

Can a Samsung S Pen Be Replaced?

Yes, you can replace a lost or damaged Samsung S Pen, but you must choose a model compatible with your phone or tablet. Not every S Pen works with every Samsung device, even when the accessories look similar.

Different generations support different features, including pressure sensitivity, Bluetooth functions, charging requirements, and remote commands. A replacement designed for another device may offer basic writing functionality without supporting every feature you expect.

Before purchasing, identify your exact phone or tablet model. Check Samsung’s official compatibility information and compare it with the replacement stylus specifications. If you use an S Pen with Bluetooth features, confirm that the replacement supports the required functions.

You can explore genuine Samsung accessories through the manufacturer’s official channels or authorized retailers. Third-party alternatives may also be available, but their compatibility and capabilities can vary.

Review the product description carefully before placing an order. Matching the stylus to your device helps prevent unnecessary spending and functionality problems. If you are unsure which replacement to buy, consult Samsung Support or check your device’s user manual first.

Verifying Compatibility Before Purchase

Checking compatibility before buying a replacement Samsung S Pen can help you avoid problems with writing, drawing, and wireless features. The safest starting point is your device’s exact model number, rather than its general product name.

Open your device’s settings and look for the model information under the device details section. You can also check the original packaging or user manual. Use this information to find the S Pen models Samsung identifies as compatible.

Before purchasing, verify these details:

  • Device compatibility: Confirm that the replacement supports your exact phone or tablet model.
  • Writing and drawing: Check whether it supports the required screen interaction and pressure sensitivity.
  • Bluetooth functions: Confirm compatibility if you use supported remote commands or other wireless features.
  • Charging requirements: Check whether the stylus requires charging or uses a different power arrangement.
  • Authenticity: Consider genuine Samsung accessories or reputable retailers with clear product specifications.

Do not assume that a stylus will support every feature simply because it fits inside the phone. When compatibility information is unclear, ask Samsung Support or the seller to confirm before ordering.

Choosing the correct replacement helps restore the features your device supports without paying for unnecessary accessories.

Conclusion

A Samsung S Pen can be difficult to find when it goes missing, especially because most models do not support independent location tracking. While some Bluetooth-enabled S Pens offer connectivity features and disconnection alerts, these functions cannot provide precise GPS locations.

If you lose your stylus, start by retracing your steps, checking common hiding spots, and using any supported connectivity features. If you cannot recover it, verify your device model and choose a compatible replacement from Samsung or an authorized retailer.

For accurate information about supported features and compatible accessories, visit Samsung’s official Support page. You can check device-specific guidance before purchasing a replacement.

The key is to understand your S Pen’s capabilities before trying to track it. With the right search approach and a compatible replacement, you can get back to taking notes, drawing, and using your Samsung device without unnecessary delays.

CPU Cores and Threads Explained: Understanding Performance

CPU Cores and Threads Explained: The Ultimate Processor Guide

Understanding how computer processors work can feel overwhelming when you compare modern hardware specifications. Learning about CPU cores and threads explained in simple terms helps you choose the right computer. These components influence how smoothly your system handles gaming, multitasking, and demanding applications.

A processor’s architecture determines how efficiently it executes instructions and manages workloads. According to resources from Intel, modern processor designs support increasingly complex computing demands. Whether you’re building a gaming PC or upgrading a work laptop, understanding processor specifications helps you make informed decisions.

However, more cores or threads don’t automatically guarantee better performance. Clock speed, processor architecture, software optimization, and cooling also affect results. This guide answers four important questions about CPU cores and threads to help you understand processor performance.

Is It Better to Have More Cores or Threads?

Having more physical cores generally benefits demanding workloads, while additional threads can improve resource utilization and multitasking. A CPU core is a physical processing unit that executes program instructions. A thread represents a sequence of instructions that the operating system schedules for execution.

Modern processors can use simultaneous multithreading (SMT) to execute instructions from multiple threads on one physical core. Intel calls its implementation Hyper-Threading. However, two threads sharing one core don’t provide the same performance as two separate physical cores.

The right balance depends on how you use your computer. Gaming performance often depends on single-core speed, cache, and game optimization. Video editing, rendering, and other parallel workloads can benefit from additional cores and threads.

Before upgrading, consider these factors:

  • Gaming: Prioritize strong per-core performance and sufficient cores.
  • Video editing: Look for enough cores to handle demanding workloads.
  • Multitasking: Consider both core count and thread support.
  • Everyday computing: A modern mid-range processor is often sufficient.

Balancing Multi-Core and Multi-Threading

Choosing between more cores and more threads depends on your software and workload. Physical cores provide independent processing resources, while simultaneous multithreading helps each core use its resources more efficiently.

For gaming, a processor with fewer powerful cores can outperform one with more slower cores. However, demanding modern games may benefit from additional cores when handling physics, background tasks, and complex game environments. If you’re choosing a processor for your gaming PC, compare the options in our guide to which AMD CPU is best for gaming in 2026.

Video editors, 3D artists, and developers often benefit from higher core counts. Rendering, encoding, and compiling can distribute work across multiple cores when applications support parallel processing.

Consider your typical workload before spending more on a processor. Check application requirements, independent performance benchmarks, and power consumption. A balanced processor usually offers better value than choosing hardware based on core or thread counts alone.

How Do CPU Cores and Threads Work?

CPU cores and threads work together to execute instructions and manage software workloads. Think of each physical core as a worker capable of processing instructions. Threads represent separate sequences of instructions that need processing.

When you open an application, its software creates one or more threads. The operating system schedules these threads across available logical processors. Background applications also compete for processing time, so understanding how PC background processes work and impact performance can help explain why your computer slows down during multitasking.

A processor without simultaneous multithreading can generally execute instructions from one hardware thread per core at a time. A processor with SMT can maintain multiple hardware threads on each core. These threads share execution resources but may use them more efficiently when one thread cannot keep every resource busy.

This arrangement improves throughput in suitable workloads. However, performance gains vary by application. Threads do not automatically double processing power, and performance depends on architecture, scheduling, and available resources.

The Role of Simultaneous Multithreading

Simultaneous multithreading (SMT) allows a single physical CPU core to manage multiple hardware threads. On supported processors, each core can expose two logical processors to the operating system. Intel’s Hyper-Threading is one example of this technology.

SMT helps a processor use its execution resources more effectively. One thread may pause while waiting for data from memory. During that time, another thread may use resources that would otherwise remain idle.

This can improve overall throughput without requiring a separate physical core for every thread. However, the two threads still share important resources, including execution units and cache capacity.

The actual benefit depends on the workload. Some applications gain noticeable performance improvements, while others see smaller gains. Certain workloads may even experience limited benefits because competing threads need the same resources.

Therefore, more logical processors do not mean proportionally more processing power. When comparing CPUs, examine independent benchmarks alongside core and thread counts to understand their real-world performance. If you’re experiencing poor gaming performance, learn how to tell if your CPU is bottlenecking before upgrading your hardware.

What Does 6 Cores and 12 Threads Mean?

A processor with 6 cores and 12 threads contains six physical processing cores and supports twelve hardware execution contexts through simultaneous multithreading. Each physical core can manage two hardware threads when the processor supports this configuration.

The operating system typically identifies these twelve hardware threads as logical processors. This allows it to schedule work across more execution contexts. However, the processor still contains six physical cores, not twelve independent cores.

This configuration can suit gaming, everyday productivity, and moderate creative workloads. Six cores provide independent processing resources, while twelve threads can improve utilization during suitable multitasking and parallel workloads.

Actual performance depends on the processor’s generation, clock speed, architecture, and thermal limits. Software optimization also matters. A newer six-core processor can outperform an older model with the same core and thread counts.

Before purchasing, compare benchmark results for your intended applications. Consider graphics requirements, memory capacity, and storage performance as well. Core and thread counts provide useful context, but they don’t tell the complete performance story.

Real-World Benefits of This Setup

A six-core, twelve-thread processor can handle several demanding activities without requiring a high-end workstation. For example, it may support gaming while running voice chat, browser tabs, and background applications.

The experience depends on the game, graphics card, and processor performance. Some games rely heavily on a few fast cores, while others distribute workloads across more cores. Background applications also compete for processing time and memory resources. For example, if your browser consumes excessive processing power, understanding why Google Chrome uses so much CPU can help you identify a potential source of slowdowns.

For content creators, this configuration can support photo editing, light video editing, streaming, and everyday development tasks. More demanding rendering projects may benefit from processors with additional cores.

Consider these practical advantages:

  • Gaming: Sufficient processing capacity for many modern games.
  • Multitasking: Multiple applications can share available processing resources.
  • Content creation: Suitable for many entry-level and moderate creative workloads.
  • Value: Often offers a useful balance between performance and cost.

For most buyers, the best choice depends on current benchmarks, budget, and intended applications rather than thread count alone.

How Many Cores Does One CPU Have?

One CPU can contain multiple physical cores. A CPU, or central processing unit, is the processor responsible for executing instructions and coordinating computing tasks. A core is an individual processing unit within that processor.

Older consumer processors often featured a single core. Modern processors commonly contain multiple cores, allowing them to handle independent workloads more efficiently. Depending on the product category, a single CPU may have two, four, six, eight, sixteen, or even more cores.

The exact number varies by model. Mainstream desktop processors, laptop chips, and high-end workstation CPUs offer different core configurations. Some modern processors also combine performance cores and efficiency cores to balance speed and power consumption.

It’s important to distinguish a CPU from a core. One processor package may contain many cores, and each core may support one or more hardware threads. Therefore, seeing several logical processors in your operating system doesn’t mean your computer contains that many physical CPU chips.

Understanding Multi-Core Chip Architecture

Modern multi-core processors combine several computing components within one processor package. These components can include CPU cores, cache memory, memory controllers, and other supporting hardware. Their exact arrangement depends on the processor architecture.

Cache memory stores frequently needed data and instructions close to the cores. This reduces the need to retrieve every item from system memory. Larger or more effective caches can improve performance in workloads that benefit from faster data access.

Memory controllers coordinate communication between the processor and system RAM. Keeping these components closely integrated can reduce communication overhead and improve efficiency. However, not every processor uses the same physical layout, and some designs place components on separate chiplets.

Multi-core architecture allows a processor to distribute suitable workloads across several cores. This improves performance when software can execute tasks in parallel. However, some tasks depend on sequential processing and gain less from additional cores.

Understanding this architecture helps explain why core count alone cannot determine CPU performance. Architecture, cache, clock speed, memory bandwidth, and software optimization all contribute to the final result.

What Is The Most Affordable Gaming Console In 2026?

What Is the Most Affordable Gaming Console in 2026?

Finding the most affordable gaming console in 2026 means balancing purchase price, game availability, and long-term costs. Some players want a modern console for popular games, while others prefer inexpensive handhelds or older systems. The right choice depends on your budget and gaming preferences.

Console prices also vary by region, retailer, and device condition. Used systems can offer excellent value, but buyers should check their condition and included accessories. According to gaming publications such as TechRadar, comparing hardware and features can help shoppers make informed decisions.

This guide explores budget gaming consoles, cheap alternatives, expected pricing, and factors to consider before buying. Whether you want portable gaming or a home entertainment system, you can find an option that suits your needs without overspending.

What Is the Best Budget Console to Buy in 2026?

The best budget gaming console depends on the games you want to play and how much you can spend. The Xbox Series S is worth considering if you want modern gaming without paying for a premium console. It offers digital gaming and access to a broad selection of compatible titles. However, you should check current prices and subscription costs before buying.

Older systems can also provide excellent value. A used PlayStation 4 offers a large game library, while the original Nintendo Switch supports both handheld and television gaming. The Switch Lite costs less in many markets but works only as a handheld device.

Before choosing a console, compare these factors:

  • Purchase price: Check new, refurbished, and used options.
  • Game library: Make sure your preferred titles are available.
  • Online services: Consider recurring multiplayer or subscription fees.
  • Storage: Check whether you need additional storage for digital games.

The best choice is the system that delivers the games you enjoy at a manageable total cost.

Evaluating Value and Game Libraries

A console’s purchase price does not tell you its full value. You should also consider how much its games cost and whether you need an online subscription. Some platforms offer subscription libraries that provide access to multiple games for a recurring fee. However, these services only save money if you regularly play their included titles.

Used physical games can reduce costs, especially on consoles that support physical discs or cartridges. Digital storefronts also offer seasonal discounts, although prices and available deals vary. Before purchasing an older system, check whether its online services and favorite games remain supported.

Backward compatibility is another important consideration. It allows certain consoles to play games from earlier generations, depending on the model and title. This can help you enjoy more games without buying another device.

Ultimately, game availability and ongoing expenses matter as much as the initial price. Compare several games you genuinely want to play before deciding which console offers the best value.

What Is the Cheapest Gaming Console?

The cheapest gaming console depends on whether you want modern games, retro entertainment, or a traditional home gaming experience. Inexpensive retro handhelds and plug-and-play devices often cost less than mainstream consoles. They can suit casual players who enjoy classic arcade-style games. Exploring gaming history and facts can also help you understand the appeal of retro systems and the evolution of gaming. However, these devices vary considerably in game selection, build quality, and software support.

For a more established gaming experience, consider a used Nintendo Wii, PlayStation 4, or Xbox One. These systems offer different game libraries and features at prices that may fit smaller budgets. The Nintendo Switch Lite is another option if you prefer portable gaming and want access to Nintendo’s game library.

Before purchasing an extremely cheap device, check what it actually supports. Some low-cost products cannot run modern games, and advertised game libraries may not match your expectations.

Consider these options based on your priorities:

  • Lowest initial cost: Basic retro handhelds or plug-and-play devices.
  • Affordable modern portable gaming: A used Nintendo Switch Lite.
  • Budget home gaming: A pre-owned PlayStation 4 or Xbox One.
  • Nintendo exclusives: A compatible Nintendo Switch model.

Compare the total cost and available games rather than choosing solely by price.

Portable Versus Home Budget Systems

Portable and home consoles serve different needs. A portable system lets you play games while travelling, relaxing outdoors, or sitting away from a television. Devices such as the Nintendo Switch Lite are convenient for individual players, children, and people with limited living space. If you are also considering handheld PC gaming, compare the Steam Deck with a gaming laptop to understand which option better suits your gaming habits and budget. However, the Switch Lite cannot connect directly to a television.

Home consoles usually connect to a television or monitor. They can offer a better shared gaming experience for families and friends. Used systems such as the PlayStation 4 and Xbox One may also provide affordable access to physical games, depending on their condition and local availability.

Consider your available space, preferred games, and how you plan to play. If you mainly play alone while travelling, a handheld may offer better value. If you enjoy multiplayer games on a large screen, a home console could be the better choice.

Also check what comes with a used device. A missing controller, charger, or essential cable can increase your final spending. Choose the format that suits your lifestyle, not simply the lowest advertised price.

Is There a New Gaming Console Coming Out in 2026?

New gaming hardware can affect prices across the console market. Manufacturers may introduce successor systems, hardware revisions, or upgraded handheld devices. However, not every new release targets budget-conscious players. Premium launches often focus on performance, improved graphics, and additional features rather than affordability.

If you want the most affordable gaming console in 2026, check official announcements before making a purchase. Confirm release dates, regional pricing, and availability instead of relying on rumours. A newly announced device may also take time to reach retailers in your country.

Older consoles can become more affordable when newer models arrive. Retailers may discount remaining inventory, while used prices can change as more owners upgrade. However, price drops are not guaranteed, and popular older systems may retain their value.

Before waiting for a potential release, compare the cost of buying now with the benefits of waiting. If your preferred games already run well on an affordable existing console, a new launch may not justify the extra expense. Focus on confirmed information and actual prices rather than speculation.

Hardware Cycles and Price Drops

Console generations can create opportunities for budget-conscious buyers searching for the most affordable gaming console. When a new system launches, some retailers reduce prices on older hardware to clear stock. Used devices may also become more available as existing owners upgrade. These changes can make previous-generation consoles attractive alternatives to expensive new models.

However, a new console does not guarantee an immediate price drop. Discounts depend on retailer inventory, regional demand, product availability, and manufacturer pricing decisions. Some older systems may remain expensive because of strong demand or limited supply.

To improve your chances of finding a deal, compare prices across several reputable retailers. Check seasonal sales, refurbished products, and local second-hand listings. When buying used hardware, inspect the device, test its main functions, and confirm that the seller includes the necessary accessories.

It is also worth comparing the cost of games and online services. A discounted console may not be the cheapest option over several years if its games are expensive.

Set a maximum budget before shopping. Then compare the total cost of each option instead of focusing only on the advertised discount.

How Much Is the Cheapest Gaming Console?

The cheapest gaming console can cost very little if you choose a basic retro device. However, mainstream consoles generally require a larger budget. Prices also vary by country, retailer, storage capacity, availability, and whether a device is new or used.

As a rough guide, some basic retro handhelds and plug-and-play devices may cost under $20. A used Nintendo Switch Lite may fall around $110–$150, while pre-owned PlayStation 4 and Xbox One systems may cost approximately $130–$200. These are illustrative estimates, not verified prices for every market in 2026.

Use the following ranges as starting points for comparison:

  • Basic retro devices: Around $20 or less in some cases.
  • Used Nintendo Switch Lite: Approximately $110–$150.
  • Used PlayStation 4 or Xbox One: Approximately $130–$200.

Actual prices may fall outside these ranges. Check current listings in your country before purchasing. If you are shopping in India, compare prices in rupees and account for shipping, warranty coverage, and local availability.

Conclusion

Finding the most affordable gaming console in 2026 comes down to your budget, gaming preferences, and long-term costs. Retro handhelds are suitable for basic gaming, while a used PlayStation 4 or Xbox One can provide an affordable home gaming experience. If you prefer portable gaming, the Nintendo Switch Lite is another option worth considering.

Before making a purchase, compare prices, available games, subscription fees, and included accessories. Buying a used or refurbished console can help you save money, but always check its condition and warranty. Remember that the cheapest console is not always the best value.

Ultimately, choose a gaming system that fits your budget and offers the games you want to play. By comparing your options carefully, you can enjoy gaming without spending more than necessary.

What Does Samsung Care+ Cover & Cost?

Everything You Need to Know About Samsung Care+ Plans

Samsung Care+ helps protect eligible Samsung Galaxy smartphones, tablets, and wearables against certain unexpected repair costs. Buying a new device is a significant investment, and accidental drops, cracked screens, or liquid damage can lead to expensive repairs. Modern smartphones feature advanced OLED displays, camera systems, and complex foldable screens, making some repairs particularly costly. Understanding what Samsung Care+ covers, how much it costs, and whether it is worth buying can help you decide if the protection plan suits your needs.

Samsung Care+ offers additional protection for eligible Galaxy devices beyond the standard manufacturer’s warranty. Depending on your location and selected plan, coverage may include accidental damage, screen repairs, and other eligible services. However, exclusions, service fees, and enrollment requirements vary by country and policy.

Before purchasing a protection plan, it is important to understand what it covers and what it costs. You should also compare its benefits against potential repair expenses. This guide explains Samsung Care+ coverage, pricing considerations, potential value, and enrollment restrictions. For the latest regional terms, visit the official Samsung website.

What Does Samsung Care+ Cover?

Samsung Care+ provides additional protection for eligible Samsung Galaxy devices. Its coverage goes beyond the manufacturer’s standard warranty, which generally addresses qualifying defects in materials or workmanship. Accidental damage usually falls outside standard warranty protection.

Depending on the plan and country, Samsung Care+ may cover accidental damage, including cracked screens and certain liquid-related incidents. Some plans also include additional repair or replacement benefits. However, not every incident automatically qualifies for a claim.

The exact coverage depends on your device, policy terms, and location. Deductibles, claim limits, exclusions, and repair options can also differ. Therefore, you should review the applicable terms before purchasing a plan.

Samsung Care+ does not necessarily cover every type of damage or loss. Cosmetic damage, intentional damage, and certain other incidents may be excluded. Theft and loss protection, where available, may require a specific plan. Check your policy documents to understand the protection you will actually receive.

Protection Against Accidental Drops and Liquid Spills

Accidental damage protection is one of the main reasons people consider Samsung Care+. Depending on the selected plan, it may cover damage caused by everyday accidents. Examples include dropping your phone, cracking its display, or spilling liquid on it. If you’re considering a foldable device, explore whether a foldable phone is worth it before weighing its potential repair expenses and ownership costs.

These incidents can become expensive when they affect modern smartphones. A damaged display may require a complete screen assembly replacement. Liquid exposure can also affect internal components, potentially increasing repair costs.

When a claim qualifies, Samsung Care+ may provide access to authorized repair services. Eligible repairs generally follow the service standards specified in the applicable policy. Genuine Samsung parts may be used where provided for the covered repair.

However, coverage is subject to the plan’s conditions, exclusions, and claim limits. Liquid damage is not automatically covered under every policy. Check whether your particular plan includes the incident and whether a service fee applies. Understanding these details helps you avoid unexpected expenses when requesting a repair.

How Much Does Samsung Care+ Cost?

The cost of Samsung Care+ depends on several factors, including your country, device model, and selected coverage period. Premium Galaxy smartphones and foldable devices may have different prices from entry-level phones and wearables. Repair complexity and replacement costs can influence the available plan options.

Samsung may offer monthly subscriptions or upfront payment plans, depending on the market and device. Each option has different financial implications. Monthly payments spread the expense over time, while upfront plans require a larger initial payment.

You should also consider the cost of making a claim. Some policies require a service fee or deductible for covered repairs. This amount is separate from the subscription or purchase price.

To calculate the total cost, combine the plan payments with any applicable claim fees. Then compare that amount with potential out-of-warranty repair expenses. Check the official Samsung website for current prices and eligibility in your region. Do not rely on prices from another country because coverage and fees may differ.

Understanding Device Tiers and Deductible Fees

Samsung Care+ pricing can vary according to the device’s category and the coverage selected. A standard Galaxy smartphone may have different premiums from a premium flagship or foldable model. This difference reflects the varying costs and complexity of eligible repairs.

Your total expense also depends on the payment structure. Monthly plans involve recurring payments, while upfront options require payment at the beginning. Neither option is automatically cheaper for every customer.

A deductible or service fee may apply when you submit an eligible accidental damage claim. The amount depends on the policy and type of repair. You should confirm this fee before enrolling.

Consider a simple example: if a covered repair costs significantly more than your applicable service fee, insurance may reduce your immediate expense. However, your previous plan payments still count toward the total cost of protection.

Compare the premium, deductible, claim limits, and repair exclusions before deciding. These details provide a more realistic picture of the plan’s financial value.

Is Samsung Care+ Worth It?

Whether Samsung Care+ is worth the money depends on your device, daily routine, and tolerance for unexpected repair expenses. Someone using an expensive foldable phone may face higher repair costs than someone with a more affordable model. Protection may therefore offer different levels of value to different users.

People who travel frequently, work outdoors, or regularly use their phones in demanding environments may appreciate additional coverage. Accidental drops and other mishaps can happen even when users handle their devices carefully. A suitable protection plan can help reduce the financial impact of eligible accidents.

However, Samsung Care+ is not necessarily the best choice for everyone. If you rarely damage your devices and can comfortably afford a potential repair, paying recurring premiums may not be worthwhile. A protective case and screen protector can also reduce some risks, although they cannot prevent every type of damage.

Before purchasing coverage, compare the total plan cost with likely repair expenses. Review exclusions and deductibles as well. The best decision depends on your circumstances rather than the plan’s advertised benefits alone.

Weighing Repair Costs Against Protection Premiums

Repair costs are an important factor when evaluating Samsung Care+. Modern smartphone displays, camera modules, and foldable screens can be expensive to replace. Even a single accident may create a substantial bill, depending on the damage and device model.

Start by checking the typical repair cost for your specific Galaxy device. Then calculate the total Samsung Care+ premium over your expected ownership period. Include any applicable deductible or service fee if you anticipate making a claim. For Samsung tablet owners, comparing these expenses with the cost of replacing a Samsung tablet battery can also help when deciding whether to repair an aging device.

For example, compare two scenarios. In the first, you pay for the plan and later use an eligible repair benefit. In the second, you skip the plan and pay for any necessary repairs yourself. The financial advantage depends on the actual costs and whether a covered incident occurs.

Remember that protection plans also offer convenience and financial predictability. However, these benefits do not guarantee savings. If you rarely experience damage, your total premiums may exceed your eventual repair expenses. Evaluate both possibilities before making a decision.

Can I Buy Samsung Care+ After 2 Years?

In most cases, you cannot purchase Samsung Care+ for a device that is already two years old if it missed the applicable enrollment window. Samsung generally requires eligible devices to be enrolled within a specified period after purchase. The exact deadline depends on the country, device, and current program terms.

Some markets may offer different enrollment options or eligibility checks. Therefore, it is important not to assume that the same deadline applies worldwide. Check the official Samsung website for your region or contact Samsung support to confirm your device’s eligibility.

If your enrollment window has closed, you generally cannot backdate coverage to protect against existing damage. A new plan also may not be available for older devices. Third-party insurance, where offered, could provide an alternative, but eligibility and exclusions vary.

Before purchasing any alternative, check whether it covers your specific device and its current condition. Compare premiums, claim limits, deductibles, and repair arrangements. These checks can help you choose an appropriate option without relying on outdated enrollment information.

Exploring Alternatives When Enrollment Windows Close

If your Galaxy device is more than two years old, Samsung Care+ may no longer be available for it. However, you still have options for managing future repair expenses. The best choice depends on your device’s condition, local services, and available insurance products.

Consider these alternatives:

  • Third-party device insurance: Some providers offer protection for eligible existing devices. Check waiting periods, exclusions, deductibles, and enrollment requirements before buying a policy.
  • Out-of-warranty repairs: Samsung-authorized service centers can explain available repair options and provide a cost estimate for your device.
  • Independent repair shops: Reputable local technicians may offer another option. Confirm parts quality, repair warranties, and whether the service could affect your device’s water resistance.
  • Personal repair savings: Setting aside money for potential repairs can be practical if insurance is unavailable or does not offer sufficient value.
  • Existing purchase benefits: Review any applicable credit card or retailer protection benefits. These may have strict time limits and might not cover new damage after two years.

Compare the likely repair expense with each alternative’s total cost. Consider how long Android tablets last when estimating whether an older device is worth repairing or replacing. Choose an option that fits your budget and the remaining useful life of your device.

Is There Any Point In Buying A Radio In 2026?

Is There Any Point in Buying a Radio in 2026?

With streaming apps, podcasts, and smart speakers everywhere, you might wonder whether buying a radio in 2026 still makes sense. Modern technology offers endless entertainment, but traditional radio continues to provide several practical benefits.

Unlike internet-based services, broadcast radio does not require Wi-Fi, mobile data, or a paid subscription. A battery-powered receiver can also provide important information when internet access becomes unavailable. Local stations deliver weather forecasts, traffic updates, breaking news, and community announcements.

Radio also offers something different from on-demand entertainment. You can discover new music, listen to live presenters, and enjoy programmes without constantly choosing what to play next.

However, radio is not essential for everyone. Your listening habits, location, and emergency needs will influence its value. This guide explores radio’s relevance in 2026, emergency preparedness, younger listeners, future technology, and changing popularity. By the end, you can decide whether a traditional radio deserves a place in your home.

Is Radio Still Relevant in 2026?

Yes, radio remains relevant in 2026, although its usefulness depends on how you listen to audio. Streaming platforms offer convenience and extensive libraries, but broadcast radio provides a different experience. It delivers live programmes, local news, music, interviews, and community updates without requiring an internet connection.

One of its biggest advantages is accessibility. Anyone with a compatible receiver and adequate signal coverage can listen without paying a monthly streaming fee. This makes radio useful in homes, workplaces, vehicles, and locations with unreliable internet access.

Traditional radio also works well for people who prefer simple controls. You can switch stations without managing playlists, accounts, or recommendations. However, reception quality varies by location, and some broadcasts may have limited coverage.

Radio is not necessarily better than streaming. Instead, it serves a different purpose. If you prefer on-demand music, compare Spotify and Apple Music to see how popular streaming services differ. For listeners who value live content, local information, and internet-independent access, buying a radio in 2026 can still be worthwhile.

The Power of Local Broadcasts

Local radio stations offer information that national streaming platforms may not provide. Their programmes often focus on nearby communities, regional events, and issues affecting local residents. This makes them useful sources of everyday information.

For example, local presenters may share updates about road closures, school announcements, community events, and changing weather conditions. During severe weather, some stations also broadcast public safety messages and official emergency instructions.

These broadcasts can be especially valuable when mobile networks become congested or internet services experience interruptions. However, radio reception and station availability depend on your location. Not every station provides continuous emergency coverage.

Local radio also creates a sense of community. Presenters discuss regional concerns, interview local guests, and highlight events that might receive little attention elsewhere.

For listeners who want more than music, these local connections remain an important advantage. A radio receiver can provide useful updates while you work, travel, or complete household tasks. Nevertheless, you should verify critical announcements through official sources whenever possible.

What Is the 3-3-3 Rule for Radios?

The 3-3-3 rule is sometimes discussed in survival and emergency preparedness, but it is not specifically a radio rule. A commonly cited version suggests that people may survive approximately three minutes without air, three hours in harsh environmental conditions without adequate protection, three days without water, and three weeks without food. These are rough guidelines, not precise medical limits.

A radio can support emergency preparedness by helping you receive weather warnings, evacuation instructions, and public safety announcements. However, owning one does not automatically make you prepared for every emergency.

Choose a receiver that suits your local broadcasting system and likely risks. Depending on your location, a portable AM/FM radio or a compatible weather-alert receiver may be useful. Battery-powered and hand-crank models can offer additional flexibility during power cuts.

You should also keep spare batteries, drinking water, essential medicines, and a basic first-aid kit. Follow instructions from local emergency authorities rather than relying on general survival rules alone.

Essential Emergency Preparedness Guidelines

An emergency radio can help you stay informed when electricity, mobile networks, or internet services become unreliable. However, the right model depends on your location, available stations, and household needs. A radio is just one part of a preparedness plan, so consider other essential emergency tools for your home to help you prepare for unexpected situations.

Consider these features when choosing a radio for an emergency kit:

  • Battery operation: Choose a model that works without a mains power supply.
  • Hand-crank charging: Some models let you generate limited power manually.
  • Solar charging: A built-in solar panel can provide an additional charging option.
  • AM/FM reception: Check which bands local stations use before purchasing.
  • Weather alerts: Where supported, dedicated weather-alert receivers can provide relevant warnings.
  • Built-in flashlight: This can be useful during power cuts, although it may increase battery consumption.

Test your radio periodically and learn how to tune into local stations. Keep spare batteries in a dry, accessible place.

Most importantly, treat radio as one part of your emergency plan. It cannot replace reliable shelter, clean water, first aid, or official emergency guidance. A simple, dependable receiver may be more useful than an expensive model with features you never need.

Does Gen Z Still Listen to Radio?

Younger audiences have grown up with streaming services, smartphones, and on-demand entertainment. These platforms make it easy to access music and podcasts whenever convenient. As a result, traditional radio faces competition for their attention.

However, this does not mean younger listeners have abandoned broadcast audio entirely. Some enjoy discovering music through college stations, community broadcasters, and independent presenters. Others purchase vintage radios or modern devices with retro designs because they appreciate physical controls and distinctive styling.

Radio can also provide a different listening experience from algorithm-driven playlists. A live presenter might introduce an unfamiliar artist, discuss a local event, or play music a listener would not normally choose.

Still, it is important not to mistake interest in retro electronics for a widespread return to traditional radio. Someone may enjoy collecting vintage equipment without listening regularly.

For Gen Z, radio is best understood as one option among many. Its appeal depends on music preferences, local programming, convenience, and the desire for a break from screen-based entertainment.

The Appeal of Retro Audio Gear

Retro audio equipment appeals to people who enjoy physical objects, distinctive designs, and simpler technology. Vintage radios often feature tuning dials, tactile buttons, textured finishes, and compact wooden or plastic cabinets. These details can make them attractive decorative pieces as well as functional devices.

Modern manufacturers also produce retro-inspired radios that combine traditional styling with newer features. Depending on the model, these devices may include Bluetooth connectivity, USB charging, digital displays, or rechargeable batteries. If you plan to connect compatible wireless devices, understanding how far Bluetooth can reach can help you choose a suitable setup.

For younger listeners, such products can offer a change from smartphones and wireless earbuds. Turning a physical dial and exploring available stations can feel more engaging than scrolling through an endless list of songs.

However, appearance alone should not determine your purchase. Older radios may have worn components, limited reception, or outdated power requirements. Some vintage models also need repairs before they work reliably.

If you want both style and everyday usefulness, compare reception quality, battery options, speaker performance, and connectivity. A modern retro-styled radio may offer a practical balance between nostalgic design and contemporary convenience.

Does Radio Have a Future?

Radio is evolving rather than disappearing. Traditional broadcasting remains useful because it can reach listeners without requiring an individual internet connection. At the same time, broadcasters increasingly combine conventional transmission with digital platforms and online services.

Depending on the country, listeners may have access to AM, FM, DAB+, or HD Radio broadcasts. These technologies are not available everywhere, so buyers should check which standards local stations support before choosing a receiver.

Many broadcasters also offer websites, mobile applications, podcasts, and online streams. These services help stations reach audiences who prefer listening through smartphones or connected devices.

The automotive market presents another important challenge. Drivers increasingly have access to streaming apps and connected infotainment systems, while discussions continue about retaining traditional broadcast receivers in vehicles. Radio’s role in emergency communication also remains important.

Its future will depend on accessibility, audience demand, investment, and regional broadcasting policies. Rather than replacing every modern audio service, radio is likely to remain one part of a broader media environment.

Hybrid Broadcasting and Digital Evolution

Hybrid broadcasting combines traditional radio transmission with internet-based services. This approach allows broadcasters to reach listeners through conventional receivers while offering additional features through connected devices.

For example, a station might broadcast its regular programme over FM or digital radio while providing an online stream for listeners outside its coverage area. Its website or app may also offer programme schedules, presenter information, podcasts, and on-demand content.

Digital broadcasting can provide improved audio quality and additional information where supported. However, the benefits depend on the technology, receiver, signal conditions, and local broadcasting infrastructure.

Internet connectivity also introduces a limitation. Online streaming requires a suitable connection, while conventional broadcasting can continue without mobile data or Wi-Fi. If you rely on mobile internet for audio, understanding whether 5G is strong enough for streaming can help you decide when streaming is practical. These different strengths explain why the two approaches can complement each other.

When buying a radio in 2026, consider whether you need a basic broadcast receiver or a hybrid device. A simple radio may suit everyday listening, while a connected model could provide more flexibility. Choose features based on actual needs rather than assuming the most advanced device is always the best.

Is Radio Declining in Popularity?

Radio faces strong competition from music streaming, podcasts, video platforms, and other digital entertainment services. These alternatives let listeners choose specific songs, skip unwanted content, and listen whenever they want.

However, broadcast radio continues to serve audiences who value live programming and convenient access. Drivers may listen during their commutes, while shops and workplaces often use radio as background entertainment. Local stations can also attract listeners through interviews, regional news, and specialist programmes.

The extent of radio’s decline varies by country, age group, and listening method. Traditional broadcast listening may lose ground in some audiences while remaining an established habit in others. Online radio streams also complicate comparisons because people can listen to stations without using a physical radio.

Therefore, it would be misleading to assume that every market is experiencing the same trend. Radio’s long-term position depends on audience behaviour, station quality, advertising demand, and competition from other services.

For consumers, the more relevant question is whether radio fits their routines. If you value live content, local updates, and simple operation, it may still offer practical benefits.

The Undeniable Value of Car Commutes

Car journeys remain an important listening opportunity for traditional radio. Many drivers use broadcast stations for music, news, weather updates, interviews, and traffic reports. Radio can be convenient because drivers can listen without selecting individual tracks or managing a streaming playlist.

Local stations may also provide timely information about congestion, road closures, and changing travel conditions. These updates can help drivers understand what is happening nearby, although navigation apps and official traffic services may offer more detailed route information.

Radio’s availability in vehicles varies by market and model. Some cars include AM/FM receivers, while others emphasise connected infotainment systems and smartphone integration. Buyers should check the equipment included with a particular vehicle rather than assuming every model supports every broadcast band.

For people who drive regularly, radio can provide easy access to live programming throughout the day. It can also reduce reliance on mobile data when listening to terrestrial broadcasts.

However, commuting is only one reason to own a radio. Home listening, outdoor activities, and emergency preparedness may also influence your decision.

Is Buying a Radio in 2026 Worth It?

Buying a radio in 2026 can still be worthwhile, but it depends on how you plan to use it. A traditional receiver offers straightforward listening, access to local broadcasts, and independence from internet services. These advantages remain relevant even as streaming becomes more widespread.

Before purchasing, consider the following factors:

  • Everyday listening: A basic AM/FM radio may suit music, news, and talk programmes.
  • Emergency preparedness: Battery-powered models can provide information during power or internet outages.
  • Portability: Compact radios are useful for travel, outdoor activities, and moving between rooms.
  • Connectivity: Bluetooth and internet streaming may be useful if you want more than conventional broadcasts.
  • Budget: Compare reception quality, durability, battery life, and essential features before paying for extras.

A radio may be unnecessary if you already rely entirely on streaming and rarely listen to live broadcasts. However, it can be a useful secondary audio device for households that value simplicity and backup communication.

The best choice is not necessarily the most expensive or technologically advanced model. Select a radio that fits your listening habits, works with local stations, and offers features you will genuinely use.

Final Verdict

Radio has changed considerably, but it still serves a purpose in 2026. Streaming platforms offer greater control over music selection, while traditional broadcasting provides live programmes, local information, and access without an internet connection.

Its value depends on your priorities. If you enjoy local news, live presenters, simple audio equipment, or a reliable information source during outages, a radio may be worth buying. A battery-powered model can also complement other emergency supplies.

On the other hand, you may not need a dedicated receiver if streaming already meets all your audio needs. Your location, available stations, and intended use should guide your decision.

Ultimately, buying a radio in 2026 is a practical choice for some people, not a necessity for everyone. Consider how you plan to use it before making a purchase. If you value local broadcasts, live programmes, or backup access to information during power outages, a radio may still be worthwhile. For practical advice on choosing an emergency receiver and understanding its features, consult the National Weather Service’s guide to NOAA Weather Radio receivers. Choose a model that suits your needs, supports the broadcasts available in your area, and offers reliable battery operation.

Is There Any Point In Buying A Landline In 2026?

Is There Any Point in Buying a Landline in 2026?

Is buying a landline in 2026 still worth considering? Smartphones dominate modern communication, but home phones continue to serve specific needs. Some households prefer having a dedicated telephone for family calls, emergencies, and everyday convenience.

Traditional copper telephone networks are gradually giving way to fiber-optic connections and digital voice services. Therefore, buying a landline today may involve different technology than it did a decade ago.

You might wonder whether a home phone offers better reliability or simply adds another monthly expense. The answer depends on your location, budget, and communication needs.

This guide explains whether you can still get a landline, how much home phone service costs, and what happens to traditional telephone networks. It also explores the benefits, limitations, and alternatives to help you decide whether a home phone deserves a place in your household.

Can I Still Have a Landline in 2026?

Yes, you can still get a landline in 2026, although the technology behind the service may differ from older telephone systems. Many providers now offer digital voice services instead of traditional copper-wire connections.

These services can operate through fiber-optic networks, cable broadband, or Voice over Internet Protocol (VoIP). Depending on your provider, you might connect your telephone directly to a router or use a dedicated adapter.

Some internet providers also bundle home phone service with broadband packages. This arrangement can reduce the overall cost if you already subscribe to home internet.

However, availability varies by location. Some areas still support copper-based telephone connections, while others rely primarily on digital alternatives.

Before choosing a service, check what local providers offer. Ask about monthly charges, emergency calling, power requirements, and number portability. These details will help you choose a suitable home phone service without paying for unnecessary features.

Modern Fiber and Digital Voice Options

Modern landline services often use fiber-optic networks, cable connections, or internet-based telephone systems. These technologies transmit calls digitally rather than relying entirely on traditional copper telephone lines.

With a digital home phone, you may connect your existing handset to a broadband router or a provider-supplied adapter. Some services also support dedicated telephone equipment designed for digital networks.

Digital voice services can provide clear calls and useful features, including voicemail and call forwarding. Depending on your phone service, you may also have options for managing unwanted callers. Our guide explains how to block spam calls using practical steps. However, performance depends on your provider, internet connection, equipment, and local network conditions.

Emergency calling also requires attention. Providers may support emergency services with location information, but the arrangements vary. Confirm how your service handles emergency calls if your internet connection or electricity fails.

Before switching, check whether you can keep your existing telephone number. Also, confirm that any alarm systems or other devices connected to your current landline will remain compatible.

Do I Really Need a Landline Anymore?

Most households do not need a traditional landline for everyday communication. Smartphones allow people to make calls, send messages, and access online services almost anywhere with cellular coverage.

However, a home phone can still provide practical benefits in certain situations. Households with unreliable mobile reception may appreciate having another way to make calls.

Families with children might prefer a shared telephone that does not depend on someone owning a smartphone. Older adults may also find a familiar handset easier to use than a mobile device.

A landline can help separate personal calls from work calls. It may also suit people who prefer keeping a dedicated household number.

Still, a home phone is not automatically more reliable than a mobile phone. Modern digital landlines often depend on electricity and broadband connectivity.

Before buying a landline in 2026, consider how often your household would use it. If everyone has reliable mobile coverage, a separate home phone may offer limited additional value.

Safety and Emergency Reliability Benefits

A home phone can provide an additional communication option during emergencies. However, its reliability depends on the technology behind the service.

Traditional copper landlines often receive power through the telephone network. A compatible corded phone may therefore continue working during some household power outages, provided the external network remains operational.

Digital landlines work differently. Many depend on a powered router, an optical network terminal, or other equipment inside your home. If electricity fails, the phone may stop working unless backup power is available.

Consider these precautions to improve your household’s emergency preparedness:

  • Keep a charged mobile phone available as a backup.
  • Ask your provider whether its landline service works during power outages.
  • Check whether battery backup is available for digital phone equipment.
  • Confirm how emergency services receive your location when you call.

A home phone can be useful, but it should not be your only emergency communication method. Reliable backup options matter more than the type of handset you choose.

Will Landlines Work After 2027?

Yes, landline services are expected to continue after 2027, although traditional copper connections may become harder to obtain in some areas. Telecommunications providers are gradually replacing aging infrastructure with newer network technologies.

This transition does not mean every home phone will stop working. Instead, some customers may need to switch from copper-based service to fiber, cable, or digital voice alternatives.

The timing depends on your country, region, provider, and existing network. There is no single worldwide date when all traditional landlines will disappear.

If you currently use a copper landline, contact your provider about planned network changes. Find out whether your service will remain available and whether you need new equipment.

You should also check whether your existing telephone number can transfer to a replacement service. This step can help prevent unnecessary disruption when your provider changes its network.

Planning ahead is particularly important if you rely on a landline for emergencies, medical alert devices, security systems, or other connected equipment. Check compatibility before switching providers or technologies.

The Shift to Digital Networks

Telecommunications companies are moving away from older copper infrastructure for several reasons. Maintaining aging networks can be expensive, while newer technologies can support modern communication services more efficiently.

Fiber-optic connections carry data using light, while broadband-based voice services transmit calls digitally. These systems allow providers to deliver home phone services without relying on the same copper infrastructure used by traditional landlines.

However, digital networks introduce different requirements. Your telephone may depend on a working broadband connection, powered equipment, and compatible hardware.

Before your provider retires a copper connection, ask which replacement services are available. Check whether your existing phone, alarm system, or other connected devices will continue to work.

If you need reliable emergency communication, ask about backup power and emergency location support. Do not assume that a digital replacement will behave exactly like your previous landline.

The important distinction is that traditional copper landlines may decline, but home phone services can continue through newer technologies. Understanding this difference will help you make an informed decision about your household’s communication needs.

How Much Does a Landline Cost in 2026?

The cost of buying a landline in 2026 depends on your location, provider, and chosen service. A standalone home phone plan may cost more than adding voice service to an existing broadband package.

In some markets, traditional landline plans cost around $20–$40 per month. Digital voice packages may cost less, particularly when bundled with home internet. Some independent VoIP services also advertise plans below $15 per month.

These figures are general examples, not guaranteed current prices. Actual costs vary by country, provider, calling allowance, and available promotions.

You should also consider the total cost of ownership. Installation charges, telephone equipment, taxes, regulatory fees, and international calling can increase your monthly bill.

Before choosing a plan, compare the complete price rather than focusing on its advertised starting rate. Check contract length, cancellation charges, and any price increases after promotional periods.

If you rarely make calls, paying for a dedicated home phone may not be worthwhile. Compare the expense with your existing mobile plan before making a decision.

Bundling Options and Extra Fees

Bundling landline service with broadband or television can reduce the overall cost of home communications. Providers sometimes offer discounted voice packages to customers who already subscribe to their internet services.

However, a bundle is not always the cheapest option. Some providers advertise low introductory prices that increase when promotional periods end.

Compare the total monthly cost of each available option. Include equipment rental, installation, taxes, activation fees, and any required broadband subscription.

Before signing a contract, check these details:

  • Monthly charges: Confirm the standard price after promotional discounts expire.
  • Calling allowances: Check whether domestic, international, or premium-rate calls cost extra.
  • Equipment costs: Ask whether you need to rent a router, telephone adapter, or other device.
  • Contract terms: Review cancellation fees and minimum subscription periods.
  • Power backup: Determine whether backup equipment costs extra.

Independent VoIP services may offer greater flexibility, but they can require a reliable internet connection and compatible equipment.

The best option depends on your usage. Compare standalone plans, bundled packages, and mobile alternatives before committing to a new service.

How Long Will Landlines Exist?

Landline services are likely to remain available for many years, although their underlying technology will continue to change. Households, businesses, and organizations may still need dedicated telephone numbers for communication.

However, the future of home phones does not guarantee the survival of every traditional copper network. Providers can retire older infrastructure when regulations and local conditions permit.

Digital voice services offer another way to maintain home phone numbers without relying on the original telephone network. Fiber, cable, and internet-based systems can support calls through compatible equipment.

For consumers, this means the familiar concept of a home phone can survive even as its technology changes. You may continue using a handset and telephone number while your provider delivers calls through a digital connection.

Still, availability, pricing, and reliability will differ across regions. Some households may eventually find mobile services more convenient than maintaining a separate home phone.

Before buying a landline in 2026, consider how you expect to use it over the next few years. Choose a service that fits your needs rather than assuming traditional copper infrastructure will remain available indefinitely.

The Future of Stationary Voice

Stationary voice communication is evolving alongside broadband networks and connected devices. Rather than relying exclusively on copper telephone lines, home phone services can now use fiber, cable, and internet-based technology.

This change allows providers to offer calling features that older telephone systems may not support as easily. Depending on the service, these features can include voicemail, call forwarding, and integration with compatible applications.

However, a digital home phone is not automatically more secure or reliable. Its performance depends on network availability, equipment quality, provider support, and power backup.

Future home phone services may also work more closely with mobile applications and other connected devices. These developments could make dedicated telephone numbers useful for households that prefer separate personal and professional communication.

For consumers, the main consideration is practical value. A home phone may suit families, people with weak mobile reception, or users who prefer a stationary handset.

Ultimately, landlines are changing rather than simply disappearing. Buying a landline in 2026 can still make sense, provided the available service meets your needs and its ongoing costs justify the convenience.

Conclusion

Buying a landline in 2026 can still be worthwhile if you need a dedicated home phone, experience unreliable mobile reception, or prefer a shared telephone for your family. However, most households can manage everyday communication with a smartphone alone.

Before choosing a home phone service, compare monthly costs, local availability, emergency calling features, and backup power options. The Federal Communications Commission (FCC) provides useful information about telecommunications services and network changes.

Ultimately, the right choice depends on your household’s needs and budget. A landline is no longer essential for everyone, but it can still provide convenience and an additional communication option when chosen carefully.

How to Connect Bluetooth Speakers to Your PS5

How to Connect Bluetooth Speakers to Your PS5

If you want room-filling sound while gaming, learning how to connect Bluetooth speakers to your PS5 can improve your setup. The PlayStation 5 supports several audio output methods, but it does not offer native support for standard Bluetooth speakers. This means you cannot simply open the PS5 Bluetooth settings and pair most wireless speakers like you would with a phone.

Fortunately, there are several ways to connect Bluetooth speakers to your PS5 without relying on native Bluetooth pairing. You can use a compatible USB Bluetooth transmitter, the DualSense controller’s 3.5mm audio jack, or another supported audio connection. The best method depends on your speaker and the inputs it provides.

In this guide, you will learn how to connect Bluetooth speakers to your PS5 using practical workarounds. We will cover JBL speakers, USB Bluetooth adapters, wired connections, HDMI audio, and external speakers. You will also learn which option can provide the best balance between convenience, sound quality, and low latency.

Can I Pair My PS5 With a Bluetooth Speaker?

If you are wondering how to connect Bluetooth speakers to your PS5, there is one important limitation to understand. You cannot normally pair a standard Bluetooth speaker directly through the PS5’s Bluetooth settings. The console does not provide general Bluetooth audio support for ordinary speakers.

This differs from smartphones and computers, where Bluetooth speakers can usually be selected from the system’s audio settings. On PS5, an unsupported Bluetooth speaker may fail to connect even when it appears during a device search.

Fortunately, this does not mean Bluetooth speakers are unusable. You can introduce compatible external hardware between the PS5 and speaker. A USB Bluetooth audio transmitter is one of the most common solutions.

You can also use the DualSense controller’s 3.5mm audio connection if your speaker has an AUX input. This option is especially useful when you want a simple setup without buying another adapter.

The Role of Dedicated USB Transmitters

A USB Bluetooth audio transmitter can provide a practical way to connect wireless speakers to your PS5. The transmitter plugs into a compatible USB port and handles the Bluetooth connection separately.

Setup is usually simple. Plug the transmitter into the PS5, activate pairing mode, and then put your speaker into Bluetooth pairing mode. Once both devices connect, the transmitter sends the PS5’s audio to your wireless speaker.

However, compatibility matters. Not every USB Bluetooth adapter works with the PS5. Some adapters are designed specifically for computers and may not function correctly with the console.

Before buying one, check for PS5 compatibility and low-latency audio support. Also confirm that the transmitter supports the Bluetooth features used by your speaker.

For most users, this is one of the easiest ways to connect Bluetooth speakers to your PS5 while keeping the setup wireless.

Can I Connect Bluetooth Audio to My PS5?

You can use Bluetooth audio with a PS5, but standard Bluetooth speakers cannot normally connect directly to the console. If your goal is to connect Bluetooth speakers to your PS5, you will generally need compatible external hardware.

A USB Bluetooth transmitter is one practical solution. It receives audio from the PS5 through USB and sends that audio wirelessly to a compatible Bluetooth speaker. This avoids the need for direct Bluetooth pairing through the console.

Another option is the DualSense controller’s 3.5mm headphone jack. If your speaker has an AUX input, connect the speaker to the controller using a suitable audio cable. The controller can then send PS5 audio to the connected speaker.

Bluetooth latency is another factor to consider. Wireless audio can introduce a delay between on-screen actions and the corresponding sounds. This delay varies between the transmitter, speaker, and supported audio technology.

For casual gaming, a small delay may not be noticeable. Competitive players should consider a wired connection or equipment specifically designed for low-latency gaming audio.

Managing Codec Delays and Game Sync

Audio delay can affect the gaming experience when using Bluetooth speakers. You may notice a small gap between an action on screen and its sound. This can become distracting during fast-paced games.

A low-latency Bluetooth transmitter can reduce this problem. However, the transmitter is only one part of the audio chain. Your speaker must also support compatible low-latency technology for the best results.

Do not assume that every Bluetooth speaker will perform identically. Different speakers and transmitters can use different Bluetooth profiles and codecs. Their performance can therefore vary considerably.

If you want to connect Bluetooth speakers to your PS5 for casual gaming, a small amount of latency may be acceptable. For competitive games, however, wired audio is often the safer choice.

Before buying an adapter, check both devices’ specifications. Look for PS5 compatibility, supported Bluetooth features, and low-latency capabilities.

Do JBL Speakers Work on PS5?

Yes, JBL speakers can work with a PS5, although most models cannot connect directly through the console’s Bluetooth settings. If you want to connect Bluetooth speakers to your PS5, the JBL model and its available inputs will determine the best method.

If your JBL speaker has a 3.5mm AUX input, you can connect it to the DualSense controller with a suitable audio cable. This provides a straightforward wired connection without requiring a Bluetooth transmitter.

For wireless playback, you can use a compatible USB Bluetooth transmitter. The transmitter connects to the PS5 and then pairs with the JBL speaker. Always check compatibility before purchasing an adapter.

Some JBL speakers may support additional connection options, but features vary between models. You should therefore check your specific speaker’s specifications before choosing a connection method.

For gaming, a wired AUX connection usually provides lower latency than Bluetooth. A USB transmitter is more convenient if you specifically want a wireless setup.

Using the Auxiliary Cable Workaround

A 3.5mm AUX cable is one of the simplest ways to connect an external speaker to your PS5. It does not require a Bluetooth transmitter or additional wireless hardware.

Connect one end of the 3.5mm audio cable to the DualSense controller. Connect the other end to your speaker’s AUX input. Turn on the speaker and select the correct input if necessary.

The PS5 can then send audio through the controller and into the connected speaker. You can adjust the volume using the appropriate PS5 or speaker controls.

The main advantage is low latency. A wired connection avoids the additional wireless transmission delay associated with Bluetooth.

The main disadvantage is the cable. Your controller must remain connected to the speaker, which may be inconvenient if you want to sit far away from your gaming setup.

For a desktop gaming arrangement, however, this workaround is inexpensive and reliable. It is particularly useful if your Bluetooth speaker already includes an AUX port.

How to Connect External Speakers to PlayStation 5?

If you want to connect Bluetooth speakers to your PS5, Bluetooth is not your only option. The console can work with different external audio setups depending on the equipment you own.

A soundbar can connect through a compatible HDMI setup. You can connect the PS5 to your TV using HDMI and then connect the TV to a soundbar through HDMI ARC or eARC when supported.

An HDMI audio extractor is another option for certain setups. It separates audio from the HDMI signal and can provide outputs such as optical or analog audio. Make sure the extractor supports your required video resolution and refresh rate.

Compatible USB audio devices can also provide another connection method. However, compatibility should always be checked before purchasing an adapter.

If your external speaker has an AUX input, the DualSense controller provides a simple wired alternative. This can be useful when you want reliable audio without Bluetooth latency.

The best method depends on your equipment. Consider sound quality, cable requirements, latency, and convenience before choosing your setup.

Choosing HDMI eARC for Premium Sound

HDMI eARC can be useful for advanced soundbar and home theater setups. However, the connection path is important when using a PS5.

In a typical setup, connect the PS5 to your TV using HDMI. Then connect the TV’s HDMI eARC port to the soundbar’s HDMI eARC port. The television can pass supported audio from the PS5 to the soundbar through this connection.

This setup can provide high-quality digital audio and works well with compatible soundbars. It can also reduce cable clutter around your gaming area.

Your TV, soundbar, and HDMI cables must support the features you want to use. Older equipment may support ARC instead of eARC, which can provide different audio capabilities.

If you are trying to connect Bluetooth speakers to your PS5, HDMI eARC is not a Bluetooth solution. It is better suited to soundbars and home theater systems with HDMI connections.

Check the specifications of your equipment before changing the setup. You should also configure the PS5’s audio settings correctly for your chosen output.

Do Any Speakers Work With PS5?

Many external speakers can work with a PS5, but not every speaker can connect directly. The key factor is the speaker’s connection method rather than its brand.

Powered desktop speakers can work through compatible USB or analog connections. Soundbars can use supported HDMI configurations. Bluetooth speakers can work through appropriate external transmitters or other compatible audio paths.

If you want to connect Bluetooth speakers to your PS5, remember that ordinary Bluetooth pairing is not normally available. You will generally need a compatible transmitter or another supported connection method.

Before buying an adapter, check your speaker’s available inputs. Common options include:

  • 3.5mm AUX: Useful with the DualSense controller.
  • USB audio: Available on some compatible speaker systems.
  • HDMI ARC/eARC: Common on modern soundbars.
  • Optical: Useful with compatible audio extractors.
  • Bluetooth: Requires an appropriate transmitter for PS5 use.

Matching the speaker’s available input with a compatible PS5 output method can prevent unnecessary troubleshooting. It also helps you avoid purchasing an adapter that your equipment cannot use.

Checking Input Connections Before Setup

Before purchasing anything, check the connection options on your speaker. This simple step can prevent compatibility problems and unnecessary spending.

Look at the back or side of the speaker and identify its available ports. Check for a 3.5mm AUX port, USB audio input, HDMI input, optical input, or Bluetooth support.

Then choose a PS5-compatible connection method. An AUX-equipped speaker can connect through the DualSense controller. A Bluetooth-only speaker may require a compatible USB transmitter.

If you plan to buy an adapter, check its specifications carefully. A Bluetooth adapter designed for computers may not work correctly with the PS5. Look specifically for PS5 compatibility and supported audio features.

For HDMI equipment, check the supported standards across your PS5, TV, soundbar, and cables. This is especially important when using advanced audio or high-resolution gaming features.

Taking a few minutes to check these connections can save time later. It also helps you choose the simplest way to connect Bluetooth speakers to your PS5.

Conclusion

Learning how to connect Bluetooth speakers to your PS5 is easier once you understand the console’s Bluetooth limitations. The PS5 does not normally support direct Bluetooth audio connections with standard wireless speakers. For official information about supported PS5 audio and peripheral options, check the PlayStation Support Guide.

A USB Bluetooth transmitter is a practical choice if you want wireless audio. If your speaker has an AUX input, connecting it to the DualSense controller is simpler and can reduce audio latency. For soundbars and home theater systems, HDMI ARC or eARC can provide a higher-quality audio setup.

Before choosing a method, check your speaker’s available inputs and confirm adapter compatibility with the PS5. This can help you avoid connection problems and unnecessary purchases.

Whether you use a JBL speaker, desktop speakers, or a soundbar, the right connection method can improve your gaming setup. Choose the option that best fits your equipment, gaming style, and preferred audio quality.

If you are also comparing your console’s graphics performance with PC hardware, you can explore our guide to the Nvidia GPU equivalent to PlayStation 5.

What Do AMD GPU Names And Numbers Actually Mean?

What Do AMD GPU Names and Numbers Actually Mean?

Understanding computer hardware can feel overwhelming when you encounter complex model names and product generations. However, learning how AMD GPU names work makes comparing graphics cards much easier.

If you are planning a PC upgrade, knowing how to read a graphics card name can help you identify its generation and performance tier. You can also check the official AMD website for verified specifications.

Graphics processing units (GPUs) affect gaming performance, video editing speeds, and visual quality. However, a higher model number does not automatically guarantee better performance in every situation. Explore  things your GPU can do besides play games to understand how your graphics card can be useful beyond entertainment.

This guide explains what AMD Radeon GPU names mean, how model numbers differ across generations, and what suffixes such as XT indicate. It also answers common questions about the RX 9070, future graphics cards, and AMD Ryzen processor tiers.

What Do the Different Numbers in AMD GPU Names Mean?

AMD Radeon graphics card names contain letters and numbers that help identify the product family, generation, and performance tier. Understanding these details makes it easier to compare GPUs before purchasing one.

For example, consider the AMD Radeon RX 9070 XT. The Radeon name identifies the graphics brand, RX identifies the gaming graphics product line, and 9000 identifies the series. The 9070 portion identifies the specific model, while XT indicates a higher-performance variant within that model family.

However, AMD does not use one identical naming formula for every graphics generation. Older Radeon cards, such as the RX 6000 and RX 7000 series, follow related but different naming patterns.

Therefore, you should compare model numbers within their respective generations rather than relying on the digits alone. Architecture, memory capacity, power consumption, and independent benchmarks provide a clearer picture of actual performance.

Understanding Tier and Generation Digits

The series number in an AMD Radeon GPU name helps identify its product generation. For example, the RX 6000, RX 7000, and RX 9000 series belong to different generations of Radeon gaming graphics cards.

Within a series, the remaining digits help distinguish individual models and their approximate market positions. For instance, the RX 7900 XTX sits above the RX 7800 XT in AMD’s previous-generation gaming lineup. Similarly, the RX 9070 XT offers higher performance than the RX 9070.

However, these patterns are not universal rules. A newer mid-range graphics card may outperform an older high-end model in some games, while the older card may remain competitive in others. To get the best results from your existing hardware, learn how to get more out of your GPU without overclocking through practical performance adjustments.

When comparing AMD GPU model numbers, consider these factors:

  • Generation: Identifies the graphics card series and helps establish its technological age.
  • Model tier: Indicates the card’s approximate position within its product family.
  • Architecture: Determines important hardware features and influences performance.
  • Benchmarks: Show how the card performs in actual games and applications.

This approach helps you compare graphics cards without relying on model numbers alone.

Decoding Prefixes and Suffixes

Letters before and after an AMD GPU model number provide additional information about its product family or variant. Understanding these labels can help you distinguish gaming graphics cards from professional graphics solutions.

The RX prefix identifies AMD’s Radeon RX gaming graphics lineup. AMD also sells professional graphics products under other Radeon branding, so not every AMD GPU uses the RX designation.

Suffixes provide further distinctions between models. For example, XT commonly identifies a higher-performance variant within a Radeon family. The RX 9070 XT is positioned above the standard RX 9070, with more compute units and higher power consumption.

Some older Radeon cards also use XTX, while certain models include GRE in their names. These labels identify specific product variants, but their meanings should not be treated as universal performance rankings.

Third-party manufacturers may add their own branding to cards from companies such as Sapphire, ASUS, and PowerColor. These additions can identify cooling designs, factory overclocks, or product families.

Always check the manufacturer’s specifications before purchasing. A suffix alone cannot tell you everything about performance, cooling, dimensions, or power requirements.

Is the RX 9070 High-End?

The AMD Radeon RX 9070 is a capable upper-mainstream to high-performance gaming graphics card, but whether it qualifies as high-end depends on your expectations and the comparison group.

AMD introduced the RX 9070 and RX 9070 XT in its Radeon RX 9000 series, based on the RDNA 4 architecture. Both cards feature 16GB of GDDR6 memory and support modern gaming technologies. However, the RX 9070 XT has more compute units and higher power consumption than the standard RX 9070.

The standard RX 9070 can suit demanding 1440p gaming and some 4K workloads, depending on the game and graphics settings. The XT variant offers additional performance for users seeking higher frame rates or more demanding settings.

Before buying either model, consider your monitor resolution, target frame rate, preferred games, and budget. These factors matter more than whether a product is labelled high-end.

Performance Expectations for Flagship Hardware

High-performance graphics cards are designed for demanding workloads, including high-resolution gaming, complex visual effects, and GPU-accelerated creative applications. However, the RX 9070 should not automatically be treated as the flagship of every AMD graphics generation.

The RX 9070 XT delivers more processing capacity than the standard RX 9070, making it a better choice for some demanding gaming scenarios. Actual results still depend on the game, resolution, graphics settings, and processor used alongside the GPU.

Power requirements also deserve attention. AMD lists a typical board power of 304W and a minimum recommended power supply of 750W for the RX 9070 XT. The standard RX 9070 has lower power requirements, so check its specifications separately.

Cooling and case compatibility matter, too. Partner cards can differ in size, cooling systems, and factory clock speeds.

Before choosing a GPU, review independent benchmarks for the games you play. Compare average frame rates, ray-tracing performance, power consumption, and price to determine which card offers the best value for your needs. Since ray tracing can affect frame rates significantly, understanding how ray tracing can reduce FPS and when to turn it off can help you choose settings that balance visual quality and performance.

Is the AMD Radeon RX 6090 Coming?

The name RX 6090 should not be treated as a confirmed upcoming AMD graphics card. AMD’s official Radeon gaming graphics lineup includes the RX 9000 series, while the RX 6000 series belongs to an older generation.

A model name appearing in a forum post, social media discussion, or speculative article does not confirm that a product exists. Manufacturers can change product names and release plans before announcing new hardware.

It is also important not to confuse AMD Radeon naming with NVIDIA GeForce RTX naming. The two companies use different product families and numbering systems, so a model number associated with one brand does not establish what the other brand will release.

If you are planning a graphics card upgrade, focus on products with confirmed specifications, pricing, and availability. Waiting for an unannounced GPU can make sense if your current system meets your needs, but it can also delay an upgrade unnecessarily.

Tracking Hardware Rumors Safely

Following graphics card rumors can help you understand possible future developments, but speculation should not guide a purchasing decision on its own.

Before trusting a claim about an upcoming AMD GPU, check whether AMD has published an official announcement, product page, or technical specification. Reliable technology publications can also help explain leaks, although leaked information may change before launch.

Pay attention to the difference between confirmed details and predictions. A reported codename, possible release date, or rumored model number does not guarantee that a product will reach the market.

When comparing future and current graphics cards, wait for independent benchmarks whenever possible. These tests help establish actual performance, power consumption, and value rather than relying on marketing claims or estimated specifications.

If you need a graphics card now, compare available models against your budget and workload. If you can comfortably wait, monitor official announcements and credible reporting before making a final decision.

This approach reduces the risk of buying hardware based on inaccurate rumors or postponing an upgrade for a product that may not arrive as expected.

What Does Ryzen 5 or Ryzen 7 Mean?

AMD uses a separate naming system for its Ryzen processors, which handle general computing tasks rather than graphics rendering alone. Understanding Ryzen model names helps you choose a suitable CPU for gaming, multitasking, and productivity. If you are building a gaming PC, compare the available options in this guide to which AMD CPU is best for gaming in 2026 before choosing a processor to pair with your graphics card.

Ryzen 3, Ryzen 5, Ryzen 7, and Ryzen 9 broadly indicate different performance and market tiers. Ryzen 5 processors commonly target mainstream users, while Ryzen 7 models often provide additional processing capacity for demanding applications.

However, the tier alone does not determine a processor’s speed. Its generation, architecture, core count, clock speeds, cache, and power limits also affect performance.

For example, a newer Ryzen 5 processor may outperform an older Ryzen 7 in certain applications. Gaming performance also depends on the graphics card, game engine, resolution, and system configuration.

AMD GPU names and Ryzen processor names use numbers and suffixes to distinguish product families and specific models. Ryzen processor numbers help identify the product series, while suffixes may indicate features such as integrated graphics or a focus on performance and efficiency. However, these naming conventions vary by product category. Always check the official specifications to understand a processor’s capabilities before choosing one for gaming or productivity.

Conclusion

Understanding AMD GPU names makes it easier to compare graphics cards and choose the right hardware for your needs. Model numbers, series digits, and suffixes such as XT provide useful clues about a card’s generation and performance tier. However, these labels do not tell the whole story.

Before buying a graphics card, compare its specifications, gaming benchmarks, memory capacity, power requirements, and price. Also, remember that newer models do not always outperform older high-end cards in every workload. If you are building a PC, consider your processor and graphics card together to maintain balanced performance. You can also evaluate whether building your own PC is still the cheaper option in 2026 before deciding between assembling a system and buying a prebuilt computer.

Ultimately, the best AMD GPU is not necessarily the most expensive or the one with the highest model number. It is the one that delivers the performance you need within your budget.

Samsung Equivalent to Siri: Meet Your Voice Assistant Options

What Is the Samsung Equivalent to Siri?

If you use a Samsung Galaxy phone, you might wonder what the Samsung equivalent to Siri is. Apple users rely on Siri to send messages, set reminders, check the weather, and control their devices. Samsung offers a similar built-in voice assistant called Bixby. If you’re interested in how AI is changing Apple’s voice assistant and other iPhone features, explore popular iOS AI features.

Bixby helps users interact with compatible Samsung devices through voice commands. According to Samsung Support, the assistant integrates with supported features and services to make everyday tasks easier.

However, Bixby is not the only voice assistant available on Samsung phones. Depending on your device and software, you may also be able to use Google Assistant or Gemini for general questions and AI-powered tasks.

In this guide, you’ll learn how Bixby works, how to activate it, and whether it is still available. We’ll also compare Bixby with Siri to help you choose the right assistant for your needs.

Is There a Samsung Version of Siri?

Yes, Bixby is the Samsung equivalent to Siri. It is Samsung’s virtual assistant, designed to help users control compatible Galaxy devices through voice commands. You can use it for supported tasks without navigating through multiple menus.

Bixby focuses on controlling Samsung device features and working with supported apps and services. Depending on your phone model and software version, you may be able to adjust settings, manage reminders, or interact with compatible smart home devices.

Deep System Integration on Galaxy

One of Bixby’s main advantages is its integration with Samsung’s device ecosystem. It can help you perform supported actions through voice commands, making everyday tasks more convenient. You can also explore hidden features of your Android phone’s power button to discover other shortcuts for controlling your device.

For example, you may be able to ask Bixby to:

  • Turn Bluetooth on or off.
  • Adjust your screen brightness.
  • Open a supported application.
  • Change certain phone settings.
  • Control compatible SmartThings devices.

The available commands depend on your device, software version, language, and settings. If you want a Samsung equivalent to Siri that focuses on phone controls, Bixby is a useful option to explore.

How Do I Activate Bixby?

Activating Bixby on a compatible Samsung Galaxy phone is usually straightforward. You can launch the assistant using the Side button, open the Bixby app, or use voice activation if your device supports it.

On many Galaxy phones, pressing and holding the Side button can open Bixby when the button is configured for that function. If another feature opens instead, check your phone’s side-button settings.

You may also need to sign in to your Samsung account and complete the initial setup. Follow the on-screen instructions to configure the assistant and review its available features.

Setting Up Voice Wake-Up

To activate Bixby hands-free, follow these general steps:

  1. Open the Bixby app on your Galaxy phone.
  2. Open Bixby’s settings.
  3. Find the Voice wake-up option, if available.
  4. Enable the feature.
  5. Follow the instructions to register your voice and test the wake-up command.

Once configured, you can use the supported wake-up phrase without pressing a button.

Menu names and available options may vary by device and software version. If you cannot find voice wake-up, check Samsung’s support documentation for your model.

Is Bixby Still a Thing?

Yes, Bixby remains part of Samsung’s ecosystem. It continues to serve as a voice assistant on supported devices, although its features and availability vary by model, region, and software version.

Samsung has also introduced Galaxy AI features and other AI-powered experiences across newer devices. These tools serve different purposes, so Bixby should not be confused with every AI feature available on a Galaxy phone.

For example, Bixby can help with supported device controls and voice commands. Galaxy AI provides features such as writing assistance, translation, and photo editing on compatible devices. Google Assistant and Gemini may also be available, depending on your phone and software.

Evolution with Modern AI

Samsung’s approach to AI has expanded beyond traditional voice commands. However, this does not mean Bixby has disappeared or that every newer AI feature replaces it. To better understand the technology behind these tools, read this guide to AI terms every beginner should know.

Bixby remains useful for supported device-related tasks, especially when you want to change settings or interact with compatible Samsung services. Its usefulness depends on which commands your device supports.

If you’re deciding whether the Samsung equivalent to Siri meets your needs, consider the tasks you perform most often. Bixby may suit Samsung-specific controls, while Google Assistant or Gemini may be better for certain conversational questions and AI-powered workflows.

Is Bixby Available in India?

Yes, Bixby is available in India on supported Samsung devices. However, its features, language options, and compatibility can differ between phone models and software versions.

On compatible Galaxy phones, Bixby can help with supported voice commands, device settings, and certain applications. Some features may require a Samsung account or an internet connection.

If you purchased a Samsung phone in India, check whether Bixby is installed or available through your device’s software. You can also visit Samsung India Support for instructions specific to your model.

Regional Language Optimization

Language support is an important consideration when choosing a voice assistant. Bixby’s supported languages and features depend on the device, region, and software version. Check your phone’s current language options instead of assuming every regional language or accent is supported.

For Indian users, this matters when setting reminders, dictating messages, or issuing commands. Recognition accuracy can vary with pronunciation, background noise, and the selected language.

Some additional features, including Bixby Text Call, may be limited to specific devices, languages, or regions. Before relying on a particular feature, confirm its availability through your phone’s settings or Samsung’s regional support documentation.

Who Is Better, Bixby or Siri?

Neither Bixby nor Siri is universally better. The right choice depends on your smartphone, preferred applications, and the tasks you want to complete. If you’re comparing the two major mobile ecosystems for everyday use, this guide to choosing between an iPhone and Android for students offers another useful perspective.

Bixby is designed to work closely with supported Samsung devices. It can be useful for changing phone settings, executing supported voice commands, and controlling compatible SmartThings devices.

Siri integrates with Apple’s ecosystem, including the iPhone, iPad, Mac, Apple Watch, and compatible smart home accessories. It helps users send messages, set reminders, make calls, and interact with supported applications.

Both assistants have limitations. Their available features depend on device compatibility, software versions, language support, and regional availability.

Task Execution Versus Conversation

If you use a Samsung Galaxy phone and frequently change device settings, Bixby may be a convenient choice. Its integration with supported Samsung features makes certain controls easier to access.

Siri may be more suitable if you primarily use Apple devices and services. It can coordinate tasks across supported Apple products and applications.

However, general questions and advanced conversational tasks may also involve Google Assistant or Gemini on compatible Samsung devices. Therefore, the comparison is not limited to Bixby and Siri.

Conclusion

The Samsung equivalent to Siri is Bixby, Samsung’s voice assistant for compatible Galaxy devices. It helps you manage phone settings, use voice commands, and control supported smart home devices. While Siri works seamlessly within Apple’s ecosystem, Bixby focuses on Samsung’s device features. Your best choice depends on your smartphone and daily needs. If you use a Samsung Galaxy phone, try Bixby to see how it simplifies everyday tasks.

Dual-Band vs Tri-Band Routers: Which One Do You Need?

Dual-Band vs Tri-Band Routers: What Separates the Two?

Choosing the right router can feel overwhelming when you encounter unfamiliar wireless specifications. Understanding the differences between dual-band and tri-band routers helps you choose a reliable connection for your home. As households add smart devices, streaming boxes, and gaming consoles, wireless congestion can become a problem.

This guide explains five essential questions. You will learn which router type performs better, whether you need a third frequency band, what to consider when choosing a tri-band model, why dual-band routers remain popular, and which features matter for home use.

Your ideal choice depends on your internet plan, connected devices, home layout, and network usage. A more expensive router does not automatically deliver faster internet. Your devices must also support its wireless capabilities, and your internet connection must provide sufficient bandwidth.

Understanding these factors helps you avoid unnecessary spending. It also makes it easier to choose a router that delivers dependable performance for streaming, gaming, remote work, and everyday browsing.

Which Is Better, Tri-Band or Dual-Band?

Neither router type is automatically better for every household. The right choice depends on your network traffic, wireless environment, and performance requirements.

A dual-band router typically provides 2.4GHz and 5GHz frequency bands. The 2.4GHz band generally offers better range through obstacles, while 5GHz supports higher speeds over shorter distances.

A tri-band router adds another frequency band. Depending on the model, this could be a second 5GHz band or a 6GHz band. This extra capacity can help distribute network traffic and reduce competition between connected devices.

However, a third band does not automatically increase internet speed. Its benefits depend on device compatibility, interference, router configuration, and the available bandwidth from your internet provider.

For smaller households with moderate internet usage, dual-band routers often provide sufficient performance. Larger homes with many active devices may benefit from tri-band equipment, especially when using compatible mesh systems.

The Impact of Dedicated Backhaul Channels

Mesh Wi-Fi systems use multiple nodes to extend wireless coverage throughout a home. Some tri-band mesh systems can dedicate one frequency band to wireless backhaul, which carries data between the main router and satellite nodes. Others use Ethernet backhaul, which provides a wired connection between nodes. Before choosing a wired setup, consider the drawbacks of using Ethernet cables for home internet, including cable placement and installation requirements.

This arrangement can reduce competition between backhaul traffic and connected devices. It may also improve performance when several nodes serve busy areas.

However, not every tri-band router has a dedicated backhaul. Some systems share their available bands between backhaul communication and client devices. Others use Ethernet backhaul, which can provide a more consistent connection between nodes.

Before buying a mesh system, check whether its backhaul is dedicated, shared, or wired. Consider your home’s layout, wall materials, node placement, and internet requirements. These factors can influence performance as much as the number of frequency bands.

Do I Really Need a Tri-Band Router?

Most households do not need a tri-band router for reliable everyday internet access. A quality dual-band model can handle browsing, social media, online classes, video calls, and streaming without difficulty when properly configured.

A tri-band router becomes more useful when several devices demand substantial bandwidth simultaneously. Examples include households streaming high-resolution video, transferring large files, gaming online, and working remotely at the same time.

The number of connected devices alone does not determine whether you need an upgrade. Many smart devices use very little bandwidth, even when connected continuously. A few heavily used devices can create more network demand than dozens of inactive ones.

Your internet plan also matters. A faster router cannot overcome a slow internet connection. If your internet seems fast but downloads remain slow, investigate why your internet is fast but downloads are slow before upgrading your router. Similarly, upgrading your router may not solve problems caused by weak broadband service, poor placement, or interference.

Before spending more, identify your actual problem. If your connection is slow only in distant rooms, improved placement or a mesh system may help more than a tri-band router.

Evaluating Your Connected Device Count

Start by listing the devices connected to your Wi-Fi network. Include smartphones, laptops, tablets, televisions, smart speakers, security cameras, and gaming consoles.

Next, identify which devices use the network simultaneously. Pay particular attention to activities that consume substantial bandwidth, such as 4K streaming, large downloads, cloud backups, and video conferencing.

Use these questions to guide your decision:

  • Do multiple people experience slowdowns during busy periods?
  • Does performance drop when several devices stream or download simultaneously?
  • Does your current router struggle to maintain stable connections?
  • Do you have compatible devices that can benefit from an additional band?

If these problems persist, investigate congestion and router limitations before upgrading. Check your internet speed near the router and in affected rooms. A tri-band model may help when wireless capacity is the bottleneck, but it will not fix every connectivity problem.

Which 3-Band Router Is the Best?

The best three-band router depends on your budget, internet speed, home size, and connected devices. There is no single model that suits every household, so compare specifications against your actual requirements.

Start by checking the supported Wi-Fi standard. Wi-Fi 6 and Wi-Fi 6E offer different capabilities, while Wi-Fi 7 introduces additional features and wider channel options on compatible equipment. Remember that the benefits depend on both the router and the devices connected to it.

Next, examine wireless coverage, Ethernet ports, security updates, and network management features. Households with several gamers or remote workers may value traffic prioritization and low-latency performance. Larger homes may benefit more from a suitable mesh system than a powerful standalone router.

Manufacturers such as ASUS and NETGEAR offer routers and mesh systems across different price ranges. Compare individual models rather than relying on brand reputation alone.

Finally, consider long-term value. A premium router is worthwhile only if its additional features solve a real problem. Check independent reviews, firmware support, and compatibility before making your purchase.

Prioritizing Wi-Fi 6E and Wi-Fi 7 Standards

Wi-Fi 6E extends Wi-Fi 6 into the 6GHz frequency band, alongside the traditional 2.4GHz and 5GHz bands. This additional spectrum can offer more room for compatible devices and reduce competition from networks using lower frequencies.

Wi-Fi 7 builds on newer wireless capabilities, including support for wider channels and Multi-Link Operation on compatible devices. These features can improve throughput, responsiveness, and reliability under suitable conditions.

However, Wi-Fi 6E and Wi-Fi 7 are not interchangeable. Check the specifications to confirm which bands a particular router supports. A router advertised as tri-band does not necessarily include 6GHz.

The 6GHz band also has shorter effective range through walls than lower-frequency bands in many environments. Its performance depends on local regulations, interference, and signal strength.

Choose newer standards when your devices can use their benefits and your budget allows it. Otherwise, a well-designed Wi-Fi 6 router may provide better value for everyday home networking.

Why Is a Dual-Band Router Better?

Dual-band routers remain popular because they offer a practical balance between price, performance, and simplicity. For many households, two frequency bands provide enough capacity for browsing, streaming, video calls, and smart home devices.

The 2.4GHz band generally offers broader coverage, while 5GHz can provide higher data rates at shorter distances. Using both bands allows compatible devices to connect according to their needs and the router’s configuration.

Dual-band models also tend to cost less than comparable tri-band alternatives. This makes them attractive for smaller homes, apartments, and households with moderate network demands.

However, dual-band routers are not always less expensive to operate, cooler, or more energy-efficient. Those factors depend on hardware design, processor load, radio configuration, and power management.

The main advantage is straightforward value. You can invest the savings in a better internet plan, improved router placement, or additional access points if needed.

For users who do not experience congestion, upgrading to tri-band equipment may deliver little noticeable improvement. A reliable dual-band router with current security updates can remain a sensible long-term choice. Learn what happens if you never restart your router before deciding whether you need new hardware.

Cost Efficiency and Practical Value

A dual-band router can reduce your initial networking costs without sacrificing the features most households need. This is particularly useful when your internet plan and connected devices do not require additional wireless capacity.

Before buying, compare the total cost of improving your network. A reasonably priced router, better placement, and a wired connection for stationary devices may solve common performance problems.

Consider these practical priorities:

  • Coverage: Check whether the router can reach your main rooms.
  • Security: Look for supported security features and regular firmware updates.
  • Wired connections: Gigabit Ethernet ports are useful for compatible computers, consoles, and televisions.
  • Future needs: Consider whether you plan to add faster devices or increase your internet speed.

Spending more on a tri-band model makes sense when its additional capacity addresses a genuine limitation. Otherwise, the money may be better spent on stronger broadband service or improving Wi-Fi coverage.

Focus on the performance you need today while leaving room for realistic future requirements.

Which Dual-Band Router Is Best for Home?

The best dual-band router for home use provides reliable coverage, appropriate speeds, strong security, and dependable software support. Your choice should reflect the size of your property, the number of active devices, and your internet plan.

Start by comparing Wi-Fi 6 models with older Wi-Fi 5 options. Wi-Fi 6 can improve network efficiency in busy environments, although actual benefits depend on compatible devices and local conditions.

Check the router’s coverage claims carefully. Advertised coverage figures are estimates, and walls, furniture, interference, and neighboring networks can affect real-world results. For larger properties, a mesh system or additional access point may provide better coverage than one standalone router. Understanding why routers have external antennas unlike mesh systems can also help you compare their designs and coverage options.

Look for Gigabit Ethernet ports if you want reliable wired connections for desktop computers, gaming consoles, or smart televisions. A mobile app can simplify setup and network management, while parental controls may help households manage internet access.

Beamforming can help direct wireless transmissions toward compatible devices. However, it does not guarantee stronger signals in every environment.

Finally, choose a model with a clear firmware update policy. Reliable security support is essential for keeping your home network protected over time.

Key Features to Check Before Buying

Compare essential specifications before choosing a dual-band router. Marketing claims alone cannot tell you how well a model will perform in your home.

Prioritize the following features:

  • Wi-Fi standard: Consider Wi-Fi 6 for improved efficiency and compatibility with modern devices.
  • Security: Look for WPA3 support where compatible, regular firmware updates, and guidance on how long your router password should be to help protect your network from unauthorized access.

  • Ethernet ports: Gigabit ports support wired connections up to 1Gbps under suitable conditions.
  • Quality of Service (QoS): Some routers let you prioritize selected applications or devices when the network is busy.
  • Coverage: Consider your floor plan, wall materials, and router placement.
  • Parental controls: Check whether the available controls meet your household’s needs.
  • Management tools: Look for clear settings, guest networks, and useful monitoring features.

Remember that QoS cannot create additional internet bandwidth. It can only help manage available capacity, and its effectiveness depends on the router’s implementation.

Check the warranty, update history, and return policy before purchasing. The most suitable router is one that meets your needs consistently without unnecessary expense.

Final Verdict: Dual-Band vs Tri-Band Routers

Choosing between dual-band and tri-band routers comes down to your network requirements rather than the number of bands alone.

A dual-band router is usually sufficient for smaller homes, moderate internet usage, and everyday activities. It offers practical performance without requiring you to pay for additional wireless capacity you may not use.

A tri-band router is worth considering when several devices compete for bandwidth, when compatible 6GHz devices can benefit from additional spectrum, or when a suitable mesh system needs better wireless backhaul capacity.

Before upgrading, test your internet speed, check your router’s placement, and identify whether congestion or poor coverage causes your problems. Review the Wi-Fi Alliance’s official resources to learn more about Wi-Fi standards and wireless connectivity.

Choose dual-band for everyday value and tri-band when additional wireless capacity solves a specific problem. Consider Wi-Fi standards, security updates, coverage, and device compatibility before making your final decision.

What Does A Laser Do To Your Phone’s Camera? Risks & Facts

What Does a Laser Do to Your Phone’s Camera?

Lasers produce concentrated beams of light that can affect sensitive electronic and optical equipment. Although smartphone cameras handle everyday lighting conditions well, intense laser exposure can damage their internal components. Understanding what happens when you direct a laser to phone’s camera can help you protect your device from costly repairs.

Modern smartphones use complementary metal-oxide-semiconductor (CMOS) image sensors to capture photographs and videos. These sensors contain millions of light-sensitive pixels that convert incoming light into electrical signals. Under certain conditions, concentrated laser light can overwhelm or permanently damage these components.

The risk depends on the laser’s power, wavelength, exposure duration, and distance from the camera. Some exposures cause temporary image distortion, while others may leave permanent defects. This guide explains how a laser to phone’s camera can affect image quality and hardware. It also covers CCTV systems, LiDAR technology, safety precautions, and legal considerations.

Will lasers damage your phone camera?

Yes, lasers can damage smartphone cameras, but the outcome depends on the exposure conditions. When a concentrated beam enters the lens, the optics may focus its energy onto a small area of the image sensor. Sufficiently intense exposure can damage individual pixels or other sensitive components.

If you point a laser to phone’s camera, you might notice unusual colored lines, bright spots, dark patches, or distorted images. These symptoms can indicate sensor damage, although other hardware problems may produce similar results.

Several factors influence the risk:

  • Laser power: More powerful lasers generally present greater potential for damage.
  • Wavelength: The sensor’s sensitivity and optical filters affect how much energy reaches its components.
  • Exposure duration: Longer exposure can increase the likelihood of damage.
  • Distance: The energy reaching the camera depends partly on the beam’s characteristics and distance.

A low-powered pointer may cause no lasting harm, but stronger lasers can permanently damage a camera. Avoid deliberately testing these effects. If your camera develops persistent defects after exposure, seek professional inspection. If you own an iPhone 18 Pro, review AppleCare+ for the iPhone 18 Pro and check the plan’s terms before assuming camera damage is covered.

The Physics Behind Sensor Burnout

A smartphone camera uses a lens to focus incoming light onto a CMOS image sensor. The sensor’s pixels convert that light into electrical signals, allowing the phone to create an image. However, concentrated laser energy can overwhelm these light-sensitive components. For a broader explanation of how camera hardware and image processing work together, explore AI camera technology in smartphones.

When you direct a sufficiently powerful laser to phone’s camera, the sensor may experience temporary saturation or permanent physical damage. Intense exposure can generate localized heating or damage sensitive structures, depending on the laser’s characteristics.

Temporary saturation occurs when the sensor cannot accurately represent the intense light. You might see bright streaks or washed-out areas that disappear after the light moves away.

Permanent damage is different because physical changes to the sensor cannot be reversed through ordinary camera settings. Damaged pixels may produce persistent lines, bright spots, or dark patches in photographs.

Not every laser exposure burns the sensor. The outcome depends on the laser’s power, wavelength, exposure duration, and the camera’s optical design. Avoid directing concentrated beams into camera lenses, even for brief periods.

Can laser light destroy a CCTV camera?

Yes, sufficiently intense laser light can damage a CCTV camera, although permanent failure is not inevitable. Most modern surveillance systems use CMOS or, in some models, CCD image sensors. These components capture light and convert it into images for monitoring and recording.

When a laser reaches a surveillance lens, it may produce glare, bright patches, streaks, or temporary loss of image detail. More intense exposure can permanently damage the sensor. The result depends on the laser’s characteristics and the camera’s design.

Directing a laser to phone’s camera or a CCTV lens can create similar image disturbances. However, the exact effects vary because different cameras use different sensors, lenses, and protective components.

Some surveillance systems include optical filters or image-processing features that help manage difficult lighting conditions. These features do not guarantee protection against damaging laser exposure.

Camera placement, suitable protective housings, and appropriate equipment selection can help reduce risks. If a CCTV system continues producing distorted footage after the light source disappears, a technician should inspect its lens, sensor, and other components. Deliberately interfering with security equipment may also create legal problems.

Vulnerability of Night Vision Optics

Night-vision security cameras use infrared-sensitive sensors to capture images in low-light conditions. Some models also include infrared illuminators to improve visibility after dark. Their sensitivity to infrared light does not automatically make them more vulnerable to every laser.

The actual risk depends on the laser’s wavelength, intensity, exposure duration, and compatibility with the camera’s sensor. A laser may create temporary interference or overwhelm the image before causing permanent damage.

When a laser to phone’s camera or a night-vision camera produces a bright patch, that effect alone does not prove physical damage. The image may recover once the light disappears and the sensor adjusts to normal lighting.

However, sufficiently intense exposure can cause lasting harm to infrared-sensitive equipment. Damaged pixels may appear as persistent bright spots, lines, or unusual discoloration.

To protect night-vision equipment, avoid directing lasers toward its lenses. If the image remains distorted under normal lighting, arrange a professional inspection. Do not assume that a camera is permanently destroyed based on a single unusual image.

Can LiDAR destroy a camera?

LiDAR stands for Light Detection and Ranging. It uses laser pulses to measure distances and gather information about surrounding environments. The technology appears in some smartphones, vehicles, industrial systems, and surveying equipment.

Whether LiDAR can damage a camera depends on the optical output and the camera’s sensitivity. Consumer LiDAR sensors are generally designed to operate within applicable laser-safety limits. Their normal operation does not ordinarily damage nearby cameras.

However, a laser system designed to meet eye-safety requirements is not automatically guaranteed to protect every image sensor under every exposure condition. Specialized equipment may present different risks from consumer devices.

If a laser to phone’s camera comes from an intense optical source, the sensor may experience temporary saturation or, under certain conditions, permanent damage. Wavelength, pulse characteristics, distance, and optical design all influence the outcome.

For everyday users, the safest approach is to follow the equipment manufacturer’s instructions. Avoid deliberately directing laser beams into camera lenses to test their resistance. If you notice persistent image defects after exposure to a LiDAR or laser source, seek professional assessment.

Understanding Consumer LiDAR Safety Standards

Consumer LiDAR systems are designed to meet safety requirements appropriate to their intended use and operating characteristics. Some smartphones use low-power laser components for depth sensing, autofocus, or augmented reality features. Other devices use different optical technologies to estimate distance.

Manufacturers design these systems to comply with applicable laser-safety standards. However, classifications depend on the product, operating modes, and emitted radiation. It is inaccurate to assume that every LiDAR device has identical power levels or safety characteristics.

These standards also have specific purposes. Eye-safety classifications primarily address risks to human eyes under defined conditions. They do not guarantee that every camera sensor will remain unaffected by every possible exposure.

For example, a laser to phone’s camera may cause different effects depending on the source’s intensity and the camera’s optical design. Consumer devices generally present lower risks during normal operation, but that does not make every laser exposure harmless.

Use optical equipment according to its instructions and avoid directing concentrated beams into camera lenses. If persistent image defects appear after exposure, arrange a professional inspection rather than relying on assumptions about the device’s safety classification.

Does pointing a laser at a camera do anything?

Pointing a laser at a camera can affect its image, but the result varies considerably. Depending on the intensity and camera design, the display may show a bright spot, colored streaks, glare, or temporary loss of detail. These effects occur because concentrated light can overwhelm the sensor’s ability to capture the scene accurately.

Directing a laser to phone’s camera may produce temporary interference without causing permanent damage. However, intense exposure can also damage sensitive sensor components. The laser’s power, wavelength, distance, and exposure duration all influence the potential outcome.

Camera optics also affect how much light reaches the sensor. Some filters reduce specific wavelengths, but they do not provide universal protection against every laser.

A camera’s automatic exposure settings may adjust to bright light, but these adjustments cannot prevent all forms of sensor damage. Similarly, optical filters do not guarantee complete protection.

Do not use a laser to test a camera’s limits. Even if the image looks normal afterward, that does not establish that every component remains unaffected. Keep lasers away from camera lenses and seek professional inspection if persistent image problems appear.

Temporary Saturation Versus Permanent Destruction

Temporary sensor saturation and permanent sensor damage are different outcomes of intense light exposure. Understanding the distinction helps you assess unusual camera behavior without immediately assuming the hardware has failed.

Temporary saturation occurs when intense light overwhelms the sensor’s ability to capture image details. You may see a bright patch, streak, or washed-out area. The image may return to normal once the light source moves away and the camera readjusts.

Permanent damage occurs when exposure physically harms sensitive sensor components. Possible symptoms include persistent lines, dead pixels, unusual discoloration, or recurring image defects. These problems may remain even after restarting the phone or changing camera settings.

If a laser to phone’s camera causes persistent visual defects, the symptoms should be investigated. However, symptoms alone cannot confirm the cause. A damaged lens, software issue, or failing camera module can produce similar problems.

Test the camera only under ordinary lighting conditions. Compare the front and rear cameras if appropriate, and avoid further laser exposure. If the defects continue, ask a qualified technician to diagnose the device.

Is it illegal to point lasers at cameras?

The legality of pointing a laser at a camera depends on the location, circumstances, and consequences. Directing a laser toward private security equipment may constitute unlawful interference or property damage if it disrupts operations or causes physical harm. The applicable offence depends on local law and the facts of the incident.

Interfering with cameras used for traffic enforcement, public safety, or official functions may carry additional consequences. Damaging equipment, obstructing lawful activities, or creating a public hazard can lead to legal action in some jurisdictions.

Pointing a laser to phone’s camera may seem harmless, but intentionally damaging another person’s device can create legal and financial consequences. Interfering with surveillance equipment may also prevent people from recording important events or maintaining security.

Laser misuse can create risks beyond the camera itself. A beam may reflect from a surface or reach someone’s eyes, creating a separate safety concern. Never direct lasers at people, vehicles, aircraft, or sensitive optical equipment.

Do not assume that every laser pointer is illegal or that every incident carries the same penalty. Rules vary by country and device type. Check local regulations before using powerful laser equipment.

Legal Penalties and Public Safety Regulations

Legal consequences for laser misuse vary according to the jurisdiction, the device, and the circumstances. A person who accidentally directs a low-powered laser toward a camera may face a different situation from someone who deliberately damages property or interferes with public safety operations.

Depending on the applicable law, intentional damage could lead to fines, compensation claims, or criminal charges. Additional penalties may apply when laser misuse endangers people or disrupts regulated activities. The exact outcome depends on the evidence and relevant legal provisions.

In India, the legal position should be assessed under applicable national and local laws. Do not assume that a particular penalty applies without checking the relevant legislation and circumstances. For serious incidents involving damaged equipment or public safety, consult a qualified legal professional.

Whether someone directs a laser to phone’s camera or targets a surveillance system, responsible use remains essential. Follow the manufacturer’s instructions and keep laser beams away from cameras, vehicles, aircraft, and people.

These precautions help prevent equipment damage, avoid unnecessary disputes, and reduce the risk of injury. Using lasers responsibly also protects privacy and supports the safe operation of recording equipment.

Conclusion

A laser to phone’s camera can cause anything from temporary image distortion to permanent sensor damage. The outcome depends on the laser’s power, wavelength, exposure duration, and distance from the device. While some exposures leave no lasting effects, stronger lasers can damage sensitive camera components.

To protect your smartphone, avoid pointing lasers directly at the camera lens. For additional guidance, read Sony’s explanation of how lasers can damage camera image sensors. If you notice persistent lines, dark spots, or unusual colors after exposure, have your device inspected by a qualified technician.

The same precautions apply to CCTV cameras and other sensitive optical equipment. The safest approach is to keep lasers away from camera lenses. Understanding the risks can help you prevent expensive repairs, protect your devices, and use laser equipment responsibly.

Why Are Some Locations Blurred Out on Google Maps?

Why Are Some Locations Blurred Out on Google Maps?

Have you ever explored your neighborhood on Google Maps and noticed a pixelated building or an entire property? It can feel puzzling to see a blurred area where a house, vehicle, or other structure should appear.

There are several reasons why locations appear blurred out on Google Maps. Google automatically blurs identifiable faces and license plates in Street View imagery to protect people’s privacy. People can also explore how Google Maps differs from Google Earth when comparing street-level imagery with satellite views.

However, a blurred building does not necessarily indicate a security threat. A privacy request, an imagery limitation, or another issue may explain what you see.

Understanding these reasons helps you learn how Google Maps handles privacy and sensitive information. This article explains why locations appear blurred, whether celebrity homes receive special treatment, and how you can request a blur for your own house.

Why Are Some Locations Blurred Out on Google Maps?

Google Maps blurs certain objects and locations to protect privacy and limit the exposure of sensitive information. The platform automatically blurs recognizable faces and vehicle license plates in Street View imagery. Understanding what the camera symbol on Google Maps means can also help users interpret other visual indicators they encounter while exploring the map.

Property owners can also request additional blurring for eligible homes and other details. Google reviews these requests and decides whether the content meets its privacy guidelines.

Here are some common reasons for blurring:

  • Personal privacy: Google blurs faces and license plates to help protect people’s identities.
  • Property privacy: Eligible property owners can request additional blurring of their homes.
  • Security concerns: People may request a blur to limit public access to detailed exterior imagery.
  • Imagery limitations: Image quality, coverage, and other technical issues can affect what appears on the map.

Privacy Safeguards and Public Requests

Google uses privacy safeguards to reduce the exposure of personal information in Street View. Automatic blurring protects identifiable faces and license plates, while additional requests allow people to seek protection for certain properties.

If you want to blur your house, open Google Maps and locate your property in Street View. Select the option to report a problem, identify the area you want Google to blur, and explain your request.

Google reviews the submission before deciding whether to apply the requested change. Approval is not guaranteed, so do not assume that every request will result in a blur.

Are Celebrity Houses Blurred on Google Maps?

Google does not automatically blur celebrity homes simply because their owners are famous. Actors, musicians, athletes, and other public figures generally follow the same available privacy-request process as other property owners.

Consequently, some celebrity homes remain visible in Street View, while others appear partially or completely blurred. The result may depend on an approved privacy request and the imagery available for that location. If you also use competing navigation apps, comparing Apple Maps and Google Maps can help you understand the differences between their mapping experiences.

A visible celebrity home does not necessarily indicate poor security. Similarly, a blurred mansion does not prove that its owner faces a specific threat.

Paparazzi Deterrence and Security

Public figures often face unwanted attention, making residential privacy an important concern. Street View imagery can reveal visible entrances, driveway layouts, and other exterior features that people may prefer to keep less accessible.

A property blur can reduce the visual details available through Google Maps. Some homeowners may consider this step to discourage unwanted visits or limit unnecessary exposure of their surroundings.

However, blurring a home does not make the property completely invisible online. Address details, social media posts, property listings, and photographs from other websites may remain accessible.

For this reason, map blurring works best as one part of a broader privacy strategy. Public figures and other homeowners should also consider what personal information they share across the internet.

Is It a Good Idea to Blur Out Your House on Google Maps?

Whether you should blur your house on Google Maps depends on your privacy concerns and personal circumstances. Some homeowners prefer visible Street View imagery because it helps visitors, delivery drivers, and service providers recognize their properties.

Others feel uncomfortable when detailed exterior images of their homes appear online. This concern may matter more to people experiencing harassment, unwanted attention, or specific security risks.

Consider these factors before requesting a property blur:

  • Privacy: You may prefer to limit public access to detailed images of your home.
  • Security: A blur can reduce visual information, although it cannot prevent every potential threat.
  • Convenience: Visitors may find it harder to recognize your property using Street View.
  • Long-term preferences: Google generally treats approved property-blurring requests as permanent, so consider your decision carefully.

Weighing Security Versus Delivery Convenience

Blurring your home can make it harder for visitors to compare your property’s exterior with Street View imagery. Delivery drivers and ride-share passengers may need extra directions to identify the correct entrance.

However, a blur does not necessarily prevent people from finding your address. Google Maps may still display the street name, building location, and surrounding map information. If you regularly use navigation apps, comparing Google Maps and Waze can help you understand which app better suits your everyday driving needs.

If you decide to blur your property, consider providing clear delivery instructions. You can describe nearby landmarks, explain which entrance to use, or share a location pin with trusted visitors.

These simple steps can reduce confusion without compromising your privacy preferences. Ultimately, weigh the potential benefits against the practical limitations before submitting a request.

Why Would Someone’s Whole House Be Blurred on Google Maps?

An entire house may appear blurred on Google Maps because someone requested additional privacy protection for its Street View imagery. Google may apply the blur after reviewing and approving an eligible request.

Homeowners may seek this protection because they worry about personal privacy, unwanted attention, harassment, or other security concerns. However, the blur itself does not reveal who submitted the request or why.

Other imagery issues can also affect how a property appears online. Differences in image quality, available coverage, and updates may change what users see when exploring a location.

Stalking Prevention and Personal Safety

People who experience stalking, harassment, or unwanted attention may want to reduce the amount of information available about their homes. Street View imagery can reveal exterior features that they prefer to keep less accessible.

A property blur may reduce the visibility of those details on Google Maps. However, it cannot erase information that other websites have already published, including property listings, photographs, and social media posts.

Anyone facing a specific safety threat should not rely on map blurring alone. Depending on the circumstances, useful steps include reviewing public social media posts, limiting unnecessary personal information online, and contacting the appropriate authorities when necessary.

A property blur can support a broader privacy strategy, but it cannot guarantee complete protection. It also does not prove that the homeowner has experienced a particular incident.

Can I Unblur My House on Google Maps?

If Google has approved a request to blur your house in Street View, do not assume that you can reverse the change later. Google generally treats approved Street View blurring requests as permanent to help protect the privacy of the person who requested the change.

This policy matters if you plan to sell your home, move elsewhere, or change your mind about online privacy. A new owner should not expect to restore the original imagery simply by contacting Google. You can also learn how Google Maps knows a business is busy to better understand the information and signals that mapping services use to inform users.

If you have questions about an existing blur, consult Google’s official Maps support resources. Check the current policy and available options rather than assuming that Google offers a reversal process.

Permanent Digital Redaction Policies

Google’s approach to permanent blurring helps protect people who request additional privacy for their properties. Restoring the original imagery could expose details that someone deliberately chose to conceal.

For this reason, consider the long-term implications before requesting a property blur. Check the correct location, identify the imagery you want Google to blur, and explain your concerns clearly when submitting the request.

If Google approves your request, plan on the blur remaining in place. Do not rely on a future reversal to restore the original Street View imagery.

For the latest information about privacy requests and existing property blurs, visit the Google Maps Help Center.

Conclusion

Locations blurred out on Google Maps can reflect automatic privacy protections, approved property-blurring requests, or other imagery limitations. A blur does not necessarily indicate a security threat or reveal why someone chose to obscure a property.

If you worry about your home’s visibility, review Google’s Street View reporting options and current privacy policies. Consider both the potential benefits and the practical limitations before submitting a request.

Remember that map blurring only reduces the visibility of certain imagery. It does not remove every online reference to a property or guarantee complete privacy. Combining sensible digital privacy practices with appropriate security precautions offers a more comprehensive way to protect personal information.

How PC’s Background Processes Work and Impact Performance

Understanding Your PC’s Background Processes for Better Performance

When you start your computer, many tasks begin running behind the scenes. These tasks are known as PC’s background processes. They help Windows manage updates, synchronize files, maintain security, and support connected hardware.

Although these processes are essential, some applications consume more resources than necessary. This can cause slow performance, delayed responses, and reduced battery life. Understanding how background processes work helps you identify problems without disrupting important system functions.

Your computer needs some background activity to operate correctly. However, unnecessary applications can increase CPU usage, consume RAM, and slow down other programs. Managing these tasks can improve startup times and overall responsiveness.

Microsoft provides guidance on managing startup applications through its official support website. Reviewing your startup settings is a useful first step toward improving system performance.

In this guide, you will discover how many background processes are normal, why your PC runs so many tasks, and which ones you can safely disable. You will also learn how background applications affect computer speed and laptop battery life.

How Many Background Processes Should I Have on My PC?

There is no fixed number of background processes that every computer should have. The total depends on your installed applications, hardware specifications, Windows version, and system configuration. A clean Windows installation may run dozens of processes, while a computer with many installed programs can run well over a hundred.

Having numerous PC’s background processes is normal because modern operating systems rely on multiple services. These services manage network connections, security features, hardware communication, and other essential functions. Therefore, a high process count does not automatically indicate a problem.

Instead of focusing only on the number of running tasks, examine how much memory and processing power they consume. Open Task Manager and check CPU, memory, and disk usage when your computer is idle. If your PC still feels sluggish after checking resource usage, consider whether Performance Mode on your PC is worth using.

If resource usage remains relatively low and your computer responds normally, the process count may not require any changes. However, consistently high resource usage or unexpected performance problems deserve further investigation.

Monitoring Resource Usage Over Raw Numbers

Monitoring system resources is more useful than counting every active process. Windows Task Manager provides a quick overview of how PC’s background processes affect your computer’s performance.

Press Ctrl + Shift + Esc to open Task Manager. Select the Processes tab and review the CPU, Memory, and Disk columns. These figures help you identify applications consuming unusually high resources.

Check these values when your computer is idle and compare them with usage during normal activities. Brief increases are expected when applications launch, updates install, or files synchronize.

If CPU or memory usage remains unusually high, sort the relevant column to identify resource-intensive applications. Investigate unfamiliar processes before ending them.

Remember that acceptable resource usage varies by hardware and workload. A computer with limited RAM may experience pressure sooner than a system with more memory. Focus on actual performance symptoms rather than an arbitrary process limit.

Why Does My PC Have So Many Background Processes?

Modern computers run many background processes because different applications and system components perform separate tasks. Every installed software package may include helper programs, automatic updaters, synchronization tools, or notification services. Some launch when Windows starts, even if you do not open their main applications.

Windows also uses separate processes and services to manage different system functions. This approach helps isolate certain failures and allows multiple components to operate independently. For example, a browser may use separate processes for tabs, extensions, and other functions.

Cloud storage services synchronize files, while antivirus software monitors potential threats. Graphics and audio utilities help manage hardware features. Communication apps may also remain active to receive messages and notifications.

These PC’s background processes help applications work smoothly and keep essential services available. However, not every application needs to start automatically. Reviewing your installed software and startup settings can help reduce unnecessary activity without affecting important Windows functions.

The Role of Software Updaters and Utilities

Many applications install background utilities to check for updates and maintain essential features. These tools help keep software current, improve compatibility, and address security vulnerabilities. Some also support notifications, account synchronization, or connected devices.

However, running multiple updaters simultaneously can increase CPU, memory, disk, and network usage. Their impact is usually temporary, but poorly optimized utilities may consume resources more frequently than necessary.

You can review startup applications in Task Manager to identify programs that launch automatically. Disable automatic startup for optional tools you rarely use, such as game launchers or non-essential communication clients.

Before disabling an updater, consider its purpose. Security software, critical drivers, and important applications may depend on background services for proper operation.

Where possible, adjust the application’s own settings rather than ending its process manually. This approach helps preserve important functions while reducing unnecessary background activity.

Which Background Processes Can I Disable?

You can disable some background processes safely, but you should identify their purpose first. The safest candidates are usually optional third-party applications that you do not need immediately after startup. Examples include game launchers, chat clients, media utilities, and optional software assistants.

Disabling these applications from startup prevents them from launching automatically. You can still open them manually whenever necessary. This reduces unnecessary activity without removing the applications from your computer.

However, avoid disabling unfamiliar Windows services, essential driver components, or security-related processes without confirming their function. Some system tasks support networking, audio, graphics, device communication, and operating system stability.

To manage startup applications, open Task Manager and select Startup apps. Review each application’s name and startup impact before making changes. Disable only programs you recognize and do not need running automatically. If you are also adjusting Windows startup behavior, learn whether to enable or disable Fast Startup on your PC.

If you experience problems after changing a setting, re-enable the application and check whether normal functionality returns. Making one change at a time helps you identify its effects and avoid unnecessary troubleshooting.

Identifying Safe Targets for Restriction

Third-party utilities and optional helper applications are often the best starting points for reducing background activity. These programs may provide convenience without being necessary for everyday computer operation.

Look for applications that launch automatically but offer no immediate benefit. Examples include unused game clients, optional messaging tools, and software that checks for updates unnecessarily often.

You can disable their automatic startup through Task Manager or the application’s settings. To manage startup permissions, open Settings > Apps > Startup in Windows and review the available options.

Pay attention to startup impact when deciding which applications to disable. A high-impact application may noticeably affect startup time, especially on computers with limited resources.

Do not disable a program solely because its name looks unfamiliar or its resource usage appears high. Research its purpose first, particularly if it relates to hardware drivers or Windows security. This cautious approach helps you improve performance without compromising stability.

Will Background Processes Slow Down My Computer?

Background processes can slow down your computer when they consume excessive CPU power, memory, disk activity, or network bandwidth. Every resource-intensive application competes with your active programs for available system resources.

When resources become limited, you may notice slower application launches, delayed browser responses, stuttering games, or reduced multitasking performance. Computers with limited RAM are particularly vulnerable when several demanding applications run simultaneously.

However, PC’s background processes do not automatically cause performance problems. Many Windows services use minimal resources when idle. Modern processors can also handle multiple tasks efficiently when workloads remain within their capabilities.

The real issue is often excessive resource consumption rather than the total number of processes. Poorly optimized software, unnecessary startup applications, and malware can contribute to unusually high usage.

Open Task Manager to identify applications consuming significant resources. If a particular process consistently uses excessive CPU or memory, investigate its purpose and check for software updates. Addressing the underlying cause is usually more effective than randomly closing processes.

The Impact of Memory and Processor Hogging

Resource-intensive background applications can compete with your active programs for CPU time and available memory. When this competition becomes excessive, your computer may respond slowly or struggle with demanding tasks.

High CPU usage can delay calculations and make applications feel unresponsive. Memory pressure creates another problem. When available RAM becomes insufficient, Windows may rely more heavily on disk storage, which can reduce responsiveness.

To investigate these issues, open Task Manager and sort processes by CPU or Memory usage. Check whether a particular application repeatedly consumes an unusually large share of available resources.

Consider closing applications you recognize and no longer need. You can also disable unnecessary startup programs or adjust their background settings. These steps can help reduce the resource demands of PC’s background processes.

If high usage persists, check for software updates, malware, or other underlying problems. Avoid ending unfamiliar system processes simply because they use significant resources. Identifying the cause before taking action helps protect your computer’s stability.

Which Background Apps Should I Turn Off?

The background apps you should disable depend on how you use your computer. Optional applications that provide little value to your daily routine are usually the best candidates. These may include unused social media clients, promotional software, game launchers, and non-essential utilities.

Some applications continue running to deliver notifications, synchronize information, or update content. If you rarely use these features, restricting background activity may reduce resource consumption. On laptops, this can also help conserve battery power.

Start by reviewing your installed applications and identifying programs you seldom open. Then check their startup behavior and background permissions. Windows offers several settings for controlling application activity, although the available options vary by application type and Windows version.

Do not assume every pre-installed application is unnecessary. Some provide essential device features, accessibility tools, security protection, or system functionality.

Disable only applications you recognize and understand. After making changes, monitor your computer’s responsiveness and battery usage. If an important feature stops working, restore the relevant permission or startup setting.

Optimizing Laptop Battery and System Resources

Reducing unnecessary background activity can help laptops conserve energy and maintain smoother performance. Some applications continue using the processor, network connection, or storage even when you are not actively using them. This additional activity may contribute to battery drain.

Start by disabling automatic startup for applications you rarely use. Review background permissions where Windows provides them, and close unnecessary programs when they are no longer needed.

You can also use Windows battery settings to identify applications consuming significant power. On supported devices, Energy Saver or battery-saving features can reduce certain background activities and help extend battery life.

Avoid restricting essential applications that manage security, device drivers, synchronization you depend on, or important notifications. Excessive restrictions may interrupt useful functions without delivering meaningful performance improvements.

For better results, combine background app management with regular software updates and sensible power settings. Monitor battery usage after making changes to determine which adjustments actually help. You can also compare Sleep Mode vs Shutdown to understand which option better suits your computer usage and power-management needs.

A carefully managed system can remain responsive, reduce unnecessary energy consumption, and provide a more consistent experience throughout the day.

What Is The SC Port On Your Laptop For? Complete Guide

What Is the SC Port on Your Laptop For?

Have you ever noticed a narrow slot labeled “SC” on the side of your work laptop? If you have wondered what the SC port on your laptop is for, you are not alone. This small feature often confuses users who are unfamiliar with enterprise laptop hardware.

In most business laptops, SC stands for Smart Card. The slot houses a reader that communicates with compatible smart cards. These cards support secure authentication, digital signatures, and access to protected systems.

Smart card readers are common in corporate, government, healthcare, and financial environments. Organizations use them to strengthen security and protect sensitive information. However, not every laptop includes this feature, and most personal users rarely need it.

This guide explains what an SC port does, what SC means on different laptops, and how to use the reader. You will also learn about HP laptop compatibility, smart card drivers, and alternatives for personal security.

What Is an SC Port For?

An SC port on a laptop is generally a Smart Card reader slot. It allows the computer to communicate with compatible cards containing an integrated circuit chip. These cards can store credentials and perform cryptographic operations used to verify a user’s identity.

When you insert a supported card, the reader communicates with its chip. Compatible software then uses the card during authentication or other approved security operations. Depending on the setup, you may need to enter a personal identification number (PIN).

Organizations use smart card authentication to protect corporate networks, confidential records, and sensitive applications. It can also support digital signatures and secure remote access. The reader provides a convenient way to use physical authentication cards without connecting an external USB device.

However, the reader does not provide security automatically. Your organization must configure compatible software, credentials, and authentication policies. Smart cards work best as part of a broader security system that may also include encryption and multi-factor authentication.

Smart Card Authentication Security Benefits

The main benefit of a smart card reader is its support for stronger authentication. A typical setup requires a physical card and a PIN. These two elements combine something you possess with something you know.

This approach can reduce the risks associated with stolen or reused passwords. An attacker generally needs access to the card and the required credentials to impersonate its owner. Smart cards can also protect private cryptographic keys inside the card’s chip.

Key benefits include:

  • Stronger authentication: Combines physical credentials with a PIN or another required verification method.
  • Secure access: Helps organizations control entry to protected networks and applications.
  • Digital signatures: Supports signing documents and emails when compatible certificates and software are available.
  • Convenience: Allows users to authenticate without carrying a separate USB reader.

Security still depends on proper configuration, card management, and organizational policies.

What Does SC Mean on Laptops?

On many business laptops, SC stands for Smart Card. The label identifies a slot designed to accept compatible smart cards. These cards commonly use contact-based technology defined by standards such as ISO/IEC 7816.

Smart card readers are more common on enterprise laptops than on ordinary consumer or gaming models. Businesses often require them to meet internal security policies or support specific authentication systems. Manufacturers may therefore include readers in selected professional laptop configurations.

An SC label can help you identify the slot’s intended purpose. However, the label alone does not confirm which cards the reader supports. Compatibility depends on the reader hardware, card type, operating system, drivers, and security software.

A built-in reader also differs from a standard memory card slot. It is not intended for storing photos, transferring files, or reading ordinary SD cards. Instead, it communicates with the chip on a supported security card.

If you are unsure about your laptop’s capabilities, check the manufacturer’s specifications or user manual. This is particularly important when buying a refurbished business laptop or setting up a device for workplace authentication.

Identifying Enterprise Laptop Hardware Features

Business laptops often include hardware features designed for professional environments. These may include smart card readers, fingerprint sensors, facial recognition cameras, and a Trusted Platform Module (TPM).

A smart card reader provides an interface for communicating with compatible security cards. The TPM serves a different purpose by supporting protected cryptographic operations and security functions. Although both components can contribute to a secure computing environment, they are not the same device.

Manufacturers may offer a smart card reader only on selected models or configurations. Therefore, two laptops from the same product family may have different security features. An SC label or dedicated slot can help identify a reader, but the manufacturer’s documentation provides better confirmation.

When evaluating enterprise laptop hardware, check the specifications for smart card support, available drivers, and operating system compatibility. You should also confirm whether your organization requires particular cards or authentication software. These checks help prevent compatibility problems before deployment.

How to Use SC in a Laptop?

To use the SC port on your laptop, you need a compatible smart card and the necessary software. Your employer, government agency, or other organization may issue the card for authentication. A standard bank card or loyalty card is not a suitable substitute.

Follow these steps to get started:

  1. Check compatibility: Confirm that your smart card works with your laptop’s reader and operating system.
  2. Install the required software: Check whether your device needs a driver, smart card middleware, certificates, or other authentication components.
  3. Locate the reader: Find the SC label or smart card slot on your laptop. Consult the user manual if necessary.
  4. Insert the card carefully: Follow the manufacturer’s instructions for the correct orientation. Never force the card into the slot.
  5. Complete authentication: Follow the on-screen instructions and enter your PIN if requested.
  6. Remove the card safely: Follow your organization’s security policy when leaving your workstation or ending your session.

The exact process depends on your laptop, operating system, and card configuration. Some systems authenticate automatically, while others require additional software or administrator setup.

Installing Smart Card Drivers and Services

Many modern operating systems support standard smart card readers through built-in drivers and services. However, recognizing the reader does not guarantee that every smart card will work immediately.

Some setups require additional middleware, certificate configuration, or authentication software. You may need to obtain these components from your employer’s IT department or the card issuer. Always use trusted sources and follow the recommended installation process.

If your laptop does not detect the card, check whether the reader appears in your system’s device settings. Confirm that the required smart card service is running and that the card is inserted correctly. You should also verify that the card is valid and compatible with the reader.

Avoid downloading unofficial drivers from unfamiliar websites. If the reader still fails to work, contact your organization’s IT support team. Administrators can check driver compatibility, certificates, access policies, and other configuration issues.

What Is SC on an HP Laptop?

On an HP laptop, SC generally refers to a Smart Card reader. Selected professional models, including configurations in the HP EliteBook and ZBook families, may include this hardware. It allows compatible smart cards to support authentication and other security tasks.

The exact features depend on your laptop’s model and configuration. Not every HP EliteBook or ZBook includes a built-in reader. You should therefore check the product specifications or user manual before assuming your device supports smart cards.

In supported environments, an HP smart card reader can work with compatible operating system services and enterprise security software. Depending on the installed certificates and applications, it may support secure logins, digital signatures, or access to a corporate virtual private network (VPN).

Some older HP documentation references HP Client Security software. Available tools and management features vary by model, operating system, and software version. Do not assume that every HP laptop uses the same security suite.

If your HP laptop has an SC slot, ask your IT administrator which cards and software are supported. This will help you determine whether the reader is ready to use or requires additional configuration.

HP Client Security Software Integration

HP has offered security management tools that support different enterprise security features. Depending on the laptop generation, these tools may include HP Client Security or other security management applications.

Smart card functionality may depend on the operating system, card middleware, certificates, and organizational policies. The reader itself does not automatically manage every security function. Compatible software must be configured to use the card for the intended purpose.

Some enterprise environments can enforce policies that lock a workstation when a smart card is removed. However, this behavior depends on the authentication software and administrator settings. It is not a universal feature of every HP laptop.

If you cannot find the relevant security software, check your model’s support page and documentation. You can also ask your IT department whether your device requires a particular application or driver. Use software intended for your exact model and operating system to avoid compatibility issues.

Can I Use an SC Port on My Laptop?

Yes, you can use an SC port on your laptop if it has a compatible reader, a supported smart card, and the necessary software. However, having the slot does not mean you can use it for everyday identification or file storage.

These readers are primarily intended for users who receive smart cards from an organization. Common examples include corporate employees, government personnel, healthcare workers, and financial professionals. Their cards may provide access to protected applications, workplace networks, or digital signing tools.

If you do not have a compatible smart card, you probably do not need to do anything with the slot. Leaving it unused will not affect your laptop’s normal operation.

Never force a credit card, memory card, or other incompatible object into the reader. Doing so may damage the internal contacts or the card itself. If you need to identify the slot, check your laptop’s manual rather than testing it with random cards.

For personal security, other authentication options may be easier to set up. The best choice depends on the services you use and the security requirements you need to meet.

Finding Alternatives for Personal Security Needs

If your personal laptop lacks an SC port, you still have several ways to improve account security. The right option depends on whether you need smart card compatibility or simply stronger authentication for online accounts.

Consider these alternatives:

  • External USB smart card reader: Useful when you already have a compatible smart card and need a separate reader.
  • Hardware security key: Supports phishing-resistant authentication on compatible services without requiring a traditional smart card.
  • Built-in biometric authentication: Fingerprint readers and supported facial recognition systems can simplify device sign-in.
  • Multi-factor authentication: Authenticator apps and other supported verification methods add protection to online accounts.

These options are not interchangeable in every situation. An external reader may require specific drivers or middleware, while a hardware security key works only with supported authentication standards and services. If a damaged USB port prevents you from connecting an external reader, you can check how much it costs to replace a USB port on a laptop.

If your employer requires a particular smart card, follow its approved setup instructions. For personal accounts, a hardware security key or passkey may provide a simpler alternative. Always choose an authentication method that matches your devices, accounts, and security needs.

Conclusion

The SC port on your laptop is generally a built-in Smart Card reader designed to support secure authentication and protect access to sensitive information. It is commonly found on business laptops used in corporate, government, healthcare, and financial environments. With a compatible smart card and the required software, you can use this feature for secure logins, digital signatures, and protected network access.

If you use a personal laptop without a smart card, you probably do not need to worry about this port. However, if your organization requires smart card authentication, check your laptop’s specifications and follow the recommended setup instructions. For further guidance, explore the NIST Digital Identity Guidelines, which explain authentication requirements and digital identity security.

Understanding what the SC port on your laptop is for helps you identify its purpose and make better use of your device’s security features.

Why You Should Undervolt Your AMD GPU (And How To Do It)

Why You Should Undervolt Your AMD GPU (And How to Do It)

If you want better efficiency from your graphics card, learning how to undervolt your AMD GPU is worth considering. Modern graphics cards use carefully selected voltage settings to maintain stability across different workloads. However, some GPUs may operate with more voltage than necessary for their specific performance targets. If you want to explore other ways to improve efficiency, discover how to get more out of your GPU without overclocking. This can increase power consumption, temperatures, and fan noise.

Undervolting involves reducing the GPU’s operating voltage while aiming to maintain stable clock speeds. When successful, it can lower temperatures and power consumption without sacrificing noticeable gaming performance. Results depend on your specific GPU, cooling system, workload, and silicon characteristics.

AMD Software: Adrenalin Edition includes built-in tuning tools that make this process accessible to many Radeon users. This guide explains how to undervolt an AMD GPU, test stability, and understand the potential risks. It also answers common questions about GPU safety and operating temperatures, including whether 90°C is too hot and whether 45°C is normal.

How to Properly Undervolt an AMD GPU?

The easiest way to undervolt an AMD GPU is through AMD Software: Adrenalin Edition. This utility provides GPU tuning controls on supported Radeon graphics cards. Before making changes, update your graphics driver and note your current settings. Keeping your drivers current also helps you avoid issues associated with outdated software. Learn what happens if you don’t update your graphics card drivers to understand why driver maintenance matters. The available tuning options may vary depending on your GPU model and software version.

Follow these steps to begin:

  1. Open AMD Software: Adrenalin Edition and navigate to Performance.
  2. Select Tuning and switch to a custom tuning profile, if available.
  3. Find GPU tuning and enable advanced controls when supported.
  4. Reduce the voltage setting by a small increment, such as 10–25 mV, if the interface permits.
  5. Apply the change and test your GPU using a demanding game or a suitable stress-testing application.
  6. Watch for crashes, visual artifacts, driver timeouts, or unexpected performance drops.
  7. If the system remains stable, consider another small adjustment and repeat your tests.

There is no universal safe voltage for every AMD GPU. Start conservatively and test several games or workloads before accepting a setting. If instability occurs, restore the previous stable voltage or reset the tuning profile to its defaults.

Fine-Tuning Your Power Limits

Adjusting the power limit can complement an AMD GPU undervolt, but it is not always necessary. These settings control different aspects of GPU behavior. Voltage tuning reduces the voltage supplied at particular operating points, while the power limit controls the permitted power consumption.

A modest increase in the power limit may help some graphics cards maintain higher boost clocks. However, it can also increase power consumption, heat output, and fan noise. Combining a higher power limit with an undervolt does not guarantee better performance.

Start by testing your undervolt with the default power limit. Record your temperatures, clock speeds, power consumption, and frame rates. Only adjust the power limit if you identify a genuine performance limitation and your cooling system can handle the additional heat. Make one change at a time to understand its effect.

Is AMD Undervolting Safe?

Undervolting an AMD GPU is generally safe when you use the manufacturer’s supported tuning software and make gradual adjustments. Unlike conventional overvolting, undervolting reduces the operating voltage at selected performance levels. This can lower power consumption and temperatures when the GPU remains stable.

However, undervolting is not completely risk-free. Every graphics card has different voltage requirements, and an aggressive adjustment can make it unstable. You might experience game crashes, visual artifacts, driver timeouts, or unexpected system restarts. These problems usually indicate insufficient voltage for the selected clock speed rather than permanent physical damage.

Before making changes, save your existing settings or understand how to restore the default profile. Test the GPU under several demanding workloads instead of relying on a single benchmark. If you encounter instability, increase the voltage slightly or return to the default configuration. Avoid changing multiple tuning settings simultaneously, as this makes troubleshooting more difficult. Using supported software reduces the risk of incorrect adjustments, but it does not guarantee that every custom profile will work reliably.

The Role of Software Safeguards

AMD Software: Adrenalin Edition provides tuning controls and driver-level protections for supported Radeon GPUs. These features help users adjust operating parameters without manually modifying the graphics card’s firmware. However, they cannot guarantee stability when voltage settings are too aggressive.

If your undervolt fails, the GPU may experience a driver timeout, application crash, or system restart. Some configurations recover automatically, while others require you to reopen the software and reset the tuning profile. Do not assume every failed profile will automatically restore itself after rebooting.

To reduce troubleshooting risks, make small adjustments and test each one before proceeding. Keep a record of the last stable settings so you can restore them quickly. If the system becomes unstable, use the available reset controls to return to the default configuration. Avoid unofficial voltage-modification tools unless you fully understand their risks and limitations.

Is Undervolting Bad for GPUs?

Undervolting is not inherently bad for GPUs. When configured correctly, it can improve energy efficiency while maintaining similar gaming performance. Lower voltage can reduce power consumption and heat output, potentially allowing cooling fans to run more slowly. The actual improvement depends on the graphics card, workload, cooling solution, and selected settings.

However, undervolting does not automatically improve every aspect of GPU performance. An overly aggressive adjustment can cause instability, reduce effective clock speeds, or interrupt demanding applications. Some graphics cards also deliver little improvement because their factory settings are already efficient.

The main goal is to find a stable balance between voltage, clock speed, power consumption, and temperature. Monitor performance before and after making adjustments to determine whether your changes provide measurable benefits. If your GPU runs quietly and maintains comfortable temperatures already, undervolting may offer only modest gains. You should prioritize stability over achieving the lowest possible voltage. A reliable configuration is more useful than a lower voltage setting that causes frequent crashes or inconsistent performance.

Benefits for Long-Term Hardware Health

Lower operating temperatures and power consumption can reduce thermal and electrical stress under certain workloads. This may be beneficial when a graphics card regularly runs hot or consumes substantial power. Reduced heat can also help the cooling system operate more quietly.

However, undervolting does not guarantee a longer GPU lifespan. Component longevity depends on several factors, including operating conditions, manufacturing quality, cooling, and usage patterns. Thermal paste and fan bearings can also wear over time, even when temperatures remain reasonable.

To support long-term reliability, combine sensible voltage settings with regular maintenance. Keep dust filters clean, ensure adequate case airflow, and monitor GPU temperatures during demanding workloads. Avoid aggressive settings that compromise stability simply to achieve a small reduction in power consumption.

If your graphics card already operates within its expected temperature and power ranges, the practical benefit may be limited. Treat undervolting as an efficiency adjustment rather than a guaranteed hardware-longevity upgrade. Consistent stability and appropriate cooling should remain your primary priorities.

Is 90°C Bad for a GPU?

A GPU temperature of 90°C requires context before you can determine whether it is too high. Some graphics cards can operate within their specified limits at this temperature, while others may throttle performance or exceed their recommended operating range. The exact model and the type of temperature being reported matter.

Many modern GPUs report both a core temperature and a hotspot or junction temperature. The hotspot measures the hottest monitored area of the GPU die and can be considerably warmer than the core. Therefore, 90°C at the hotspot does not necessarily mean the same thing as 90°C at the core.

Check your graphics card manufacturer’s specifications before deciding whether intervention is necessary. If the core temperature reaches 90°C during gaming, inspect cooling performance and look for unusual fan behavior. Clean dust filters, improve case airflow, and confirm that the fans operate correctly. An undervolt may help reduce heat and power consumption, but it should not replace fixing a defective cooling system. If temperatures exceed the manufacturer’s limits or performance drops unexpectedly, investigate the cause before continuing demanding workloads.

Managing Junction Temperatures

Monitoring the GPU hotspot temperature is important because it reveals the hottest measured area of the graphics processor. The difference between hotspot and core temperature varies by model, workload, and cooling conditions. A larger-than-usual difference can sometimes indicate uneven cooling or poor contact between the GPU and its cooler. Regular maintenance also matters, so learn how to safely clean your electronics with compressed air to help remove dust from suitable PC components and improve airflow.

There is no single hotspot temperature that applies to every AMD graphics card. Some models support junction temperatures approaching 110°C, while others have different operating limits. Consult your specific model’s documentation rather than relying on a universal threshold.

Use AMD Software: Adrenalin Edition or another reputable monitoring utility to track core temperature, hotspot temperature, clock speeds, and fan behavior. Check these readings during demanding games, not just when the computer is idle. If the hotspot repeatedly approaches its specified limit, review your cooling setup and consider a conservative undervolt.

Keeping temperatures lower can improve noise levels and efficiency, but forcing every GPU below 80°C is not always necessary. Your model’s operating specifications and actual performance should guide your decisions.

Is 45°C Too Hot for a GPU?

A GPU temperature of 45°C is generally normal during idle or light workloads. Modern graphics cards can reach this temperature while browsing the web, watching videos, or performing routine desktop tasks. The exact idle temperature depends on room temperature, case airflow, background applications, and the graphics card’s cooling design.

Many Radeon GPUs also support zero-RPM fan modes. These modes stop the cooling fans when temperatures and power demands are low. As a result, a GPU may remain around 45°C with its fans completely stationary. This behavior is often intentional and helps reduce noise during everyday use.

However, idle temperature alone cannot confirm that a cooling system is healthy. A card that reaches 45°C while idle but overheats during gaming may still have an airflow or cooling problem. Check temperatures under both light and heavy workloads to understand how the card behaves.

If your GPU stays around 45°C during normal desktop use, its fans operate as expected, and gaming temperatures remain within the manufacturer’s limits, there is usually no reason to intervene. You generally do not need to undervolt a GPU simply because its idle temperature reaches 45°C.

Understanding Idle Fan Modes

Zero-RPM fan modes allow compatible graphics cards to operate quietly during light workloads. When the GPU produces little heat, passive cooling may be sufficient to maintain an acceptable temperature. The fans start spinning when the card reaches its configured activation threshold or requires additional cooling.

The activation temperature varies by graphics card and fan-control settings. Some models begin spinning near 50°C, while others use different thresholds. Therefore, stationary fans at 45°C do not automatically indicate a malfunction.

During gaming, the fans should respond to rising temperatures according to the card’s cooling profile. You can monitor their speed through AMD Software: Adrenalin Edition when supported. If temperatures climb unusually high while the fans remain inactive under heavy loads, inspect the fan settings and check for possible hardware issues.

Avoid forcing the fans to run continuously unless your temperatures or workload justify it. Doing so can increase noise and mechanical wear without providing a meaningful benefit during idle use. A suitable automatic fan curve, clean airflow paths, and stable GPU settings usually provide a better balance between cooling and quiet operation.

Conclusion

Learning how to undervolt your AMD GPU can help reduce power consumption, lower temperatures, and minimize fan noise while maintaining stable gaming performance. However, results depend on your graphics card, cooling system, and chosen settings. Make small voltage adjustments, test stability carefully, and avoid pushing your GPU beyond its reliable limits.

Before making changes, save your default settings and monitor core and hotspot temperatures during demanding games. If you experience crashes, visual artifacts, or driver timeouts, restore your last stable configuration. For official software guidance and compatible tuning options, visit AMD Software: Adrenalin Edition Support.

Ultimately, the best AMD GPU undervolt balances performance, efficiency, and stability. You do not need to achieve the lowest possible voltage to see benefits. A stable, well-tested configuration can help your graphics card operate more efficiently while delivering a smooth and reliable gaming experience.

What Does the Camera Symbol on Google Maps Mean?

What Does the Camera Symbol on Google Maps Mean?

Driving with digital navigation tools has changed how people plan and manage daily trips. However, unfamiliar icons can still cause confusion during navigation. One of the most noticeable symbols is the camera symbol on Google Maps.

When this icon appears during navigation, it can indicate a reported or mapped speed camera or another type of speed enforcement location. Google Maps can show these alerts during active navigation, although availability and features can vary by country and region.

These markers are useful because they give drivers advance notice of potential enforcement areas. They can remind you to check your speed and follow the posted limit. They should not be treated as a guarantee that every camera or enforcement location will appear.

The meaning can also depend on where you see the camera-shaped icon. A camera-related symbol during turn-by-turn navigation is different from a camera button used for photos or visual features.

In this guide, we explain what the camera icon on Google Maps means, how speed-camera alerts work, and why camera-related icons can look different across Maps features and regions.

What is the camera icon on Google Maps?

The camera icon on Google Maps can identify a speed camera or reported speed enforcement location during navigation. It is designed to give drivers advance notice of a potential enforcement point along their route. Speed-camera information may come from map data or reports made by Maps users, depending on the location and feature.

When the icon appears on your route, use it as a reminder to check your speedometer. Follow the posted speed limit rather than relying only on the information shown by Google Maps.

The feature is generally associated with active navigation rather than ordinary map browsing. Google Maps users have reported seeing speed-camera markers while following a planned route. Availability can differ between countries and regions.

It is also important to understand that the camera icon does not mean Google has detected a camera in real time. Map information can change, and user-reported information may not always be complete or current. If you are comparing navigation apps, understanding the differences between Google Maps and Waze can also help you choose the right tool for your driving needs.

Audio Warnings for Speed Cameras

Google Maps can provide alerts related to reported road incidents and speed-camera locations in supported areas. However, the exact alert behavior can vary by device, region, app version, and navigation settings. Google Maps users have also reported situations where the camera icon appeared without an audible warning.

Because of these differences, you should not depend on an audio alert alone. Keep your attention on the road and follow the speed limit shown on road signs. If you use Android Auto, Android Auto Gemini voice commands can also help you interact with navigation features while keeping your attention focused on driving.

If you are expecting an alert but do not hear one, check your navigation sound settings. Google Maps may also have different alert availability depending on your location.

The safest approach is simple:

  • Keep navigation audio enabled when appropriate.
  • Watch the road and posted speed-limit signs.
  • Treat camera markers as helpful information, not a guarantee.
  • Avoid using your phone while driving.

These steps make the feature useful without turning it into your primary safety system.

What does the orange camera symbol mean on Google Maps?

The orange camera symbol on Google Maps is often described online as a speed-camera warning. However, Google does not provide an official universal color guide stating that every orange camera icon has one specific meaning.

This distinction matters because Google Maps uses colors for several different map features. For example, Google’s official Maps documentation states that orange road lines can indicate medium traffic. That color does not mean a speed camera.

If you see an orange camera-shaped marker during navigation, the most useful interpretation is to look at its context. If it appears as a camera or speed-enforcement marker on your active route, it may represent a reported camera location.

Do not assume that the color alone identifies the type of enforcement device. The exact appearance can change with the Maps interface, platform, location, and feature.

Instead, focus on the symbol’s location and context. Most importantly, follow the posted speed limit and local traffic rules.

Distinguishing Live Route Hazards

Google Maps displays several types of alerts during navigation. These can include crashes, construction, road closures, traffic slowdowns, and other reported incidents. The official Maps legend confirms that traffic incidents have their own symbols and that traffic colors indicate traffic speed.

A camera marker should therefore not be confused with a general traffic warning. Its presence on your navigation route can point to a reported camera or speed-enforcement location.

The best way to interpret the alert is to consider what symbol appears, where it appears, and whether you are actively navigating.

Remember that map data can change. A reported camera may be missing, outdated, or unavailable in a particular region. Google Maps does not replace official road signs or local traffic information.

If you see a camera marker, use it as an additional reminder to drive carefully. Do not suddenly brake because of an icon. Maintain a safe speed and follow the road conditions around you.

What does a yellow camera mean on Maps?

There is no reliable Google documentation showing that a yellow camera on Maps has one universal meaning across all versions and regions. Search results and user discussions may describe different colors, but those descriptions should not be treated as an official Google Maps color code.

Google’s official Maps documentation explains several traffic colors. Orange indicates medium traffic, while red indicates traffic delays. These colors describe road traffic conditions rather than camera enforcement.

Therefore, seeing a yellow or orange camera-shaped marker does not automatically mean it is a red-light camera, speed camera, or mobile radar unit.

The symbol’s context is more important than its color. If it appears during active navigation near your route, it may relate to a reported speed or enforcement location.

Google Maps features can also vary by country and region. Some reporting and alert features are not available everywhere.

For safe driving, treat any enforcement warning as a reminder to follow the posted limit and local traffic rules.

Regional Differences in Camera Color Palettes

Google Maps does not provide a single public color guide that assigns a specific enforcement meaning to every camera color. This makes it risky to claim that yellow always means one type of camera.

The appearance of map markers can vary with the Maps interface, device, location, and available features. Some camera information may also depend on local reporting and regional availability. These differences are one reason it can be useful to understand how Apple Maps and Google Maps compare across navigation features.

Google Maps users have reported differences in the availability of speed-camera alerts between locations. Community discussions also show that camera alerts can disappear or behave differently after updates.

For this reason, avoid interpreting a camera marker solely by its color. Instead, consider whether you are in active navigation and what the marker represents on the route.

If the icon appears near a known enforcement location, reduce distractions and follow the posted speed limit. Do not rely on the marker as a complete list of cameras.

The most dependable source for driving restrictions remains the road signage and traffic rules in the area where you are driving.

What does the camera icon mean?

The meaning of a camera icon in Google Maps depends on where the icon appears. During turn-by-turn navigation, a camera-shaped marker can relate to a speed camera or reported speed-enforcement location. In other parts of Maps, camera buttons can have completely different purposes.

For example, Google Maps lets users interact with photos and visual information for places. A camera-related control in a place, review, or photo interface can be associated with adding or viewing images rather than road enforcement.

This difference is important because the same general camera shape does not necessarily represent the same feature everywhere in the app.

If you are driving and see a camera marker directly on your navigation route, consider it a possible road-enforcement alert. If you are browsing a business or landmark, a camera button is more likely related to photos or visual content.

When in doubt, check the surrounding interface and the context in which the icon appears. Most importantly, never interact with your phone while driving unless it can be done safely and legally.

Uploading Helpful Photos for Local Communities

Google Maps also includes photo features that let users contribute visual information about places. These photos can help other people understand what a business, landmark, or location looks like before they visit. If you regularly contribute photos or other information, you may also wonder whether contributing to Google Maps can earn rewards or recognition.

For example, useful images can show a storefront, entrance, menu, parking area, or interior. Clear and relevant photos can make local listings easier for other Maps users to understand.

However, this photo feature should not be confused with the camera symbol on Google Maps that appears during navigation. A camera button for uploading or viewing photos serves a different purpose from a camera marker associated with road information.

The easiest way to tell them apart is to check where the icon appears. A camera marker on your driving route relates to navigation information. A camera control near photos or place details relates to visual content.

Understanding this distinction can prevent confusion when switching between navigation and ordinary Google Maps browsing.

Conclusion

Understanding the camera symbol on Google Maps can make navigation less confusing, especially when you are driving through an unfamiliar area. In most navigation situations, a camera marker can indicate a reported speed camera or speed-enforcement location along your route.

However, do not assume that every camera icon or color has the same meaning. Google Maps uses different symbols across its navigation, traffic, photo, and place features. Camera colors can also vary by region, interface, or feature.

The safest approach is to treat camera alerts as helpful reminders rather than guaranteed warnings. Always follow the posted speed limit, traffic signs, and local driving laws. Google Maps can support safer navigation, but it should never replace your attention to the road.

For a complete explanation of Google Maps colors, symbols, traffic indicators, and map features, you can also refer to the official Google Maps Help guide.

Once you understand the difference between navigation camera markers and photo-related camera buttons, these icons become much easier to recognize and interpret.

What Do Purple Icons on Google Maps Mean?

What Do Purple Icons on Google Maps Mean?

Purple icons on Google Maps can be confusing when they suddenly appear on your screen. You may wonder whether a purple pin represents a saved place, business, attraction, route, or another map feature. The answer depends on the type of icon and where it appears.

Google Maps uses different colors, icons, and symbols to organize information. These visual markers help users identify businesses, landmarks, transportation features, saved locations, and geographic areas. Google has also changed its map design several times, which can make familiar colors look different after an update.

Not every purple marker has the same meaning. Its purpose depends on the icon, map layer, location, and current Maps interface.

In this guide, we explain purple icons on Google Maps and the situations where you may see them. We will also explain saved places, route colors, map colors, and recent visual changes.

What Are the Purple Icons on Google Maps?

The meaning of purple icons on Google Maps depends on the specific marker you see. Google Maps does not use purple as one universal label for every location or feature. Instead, colors work together with icons, labels, and map layers to help users understand the map.

A purple-looking marker may be connected to a saved location, a particular point of interest, or another map feature. If the marker belongs to a business, you may also notice information about how busy that location is, which can help you understand what the place represents. The exact appearance can also vary between mobile devices, desktop browsers, zoom levels, and different versions of Google Maps.

If you notice a purple pin, the easiest way to identify it is to tap it. Google Maps will open information about the selected location. This usually provides more useful information than trying to identify the marker by color alone.

You should also check whether the location appears inside your Saved section. Custom lists can make saved locations easier to recognize while browsing the map.

Identifying Custom Saved Place Markers

Google Maps allows you to create custom lists for places you want to remember. You can use lists for restaurants, travel destinations, favorite locations, or places you plan to visit. Google also lets you choose an emoji icon for custom lists. If you regularly use Maps to save and explore locations, you may also want to understand how Google Maps differs from Google Earth.

This means a saved location can look different from an ordinary business marker. However, you should not assume that every purple marker represents a saved place.

To check, open Google Maps and select the Saved tab. Review your custom lists and look for the location you marked earlier. You can also tap the marker directly and inspect the information card.

If the location belongs to a saved list, the card can help confirm that connection. If it does not, check the icon, label, and surrounding map features.

This approach is more reliable than using color alone. Google can change the appearance of saved locations as its interface develops.

What Does Purple Mean on Maps?

There is no single answer to what purple means across every part of Google Maps. The platform uses different colors for points of interest, roads, routes, transportation, and geographic features. The meaning therefore depends on where the purple color appears.

A purple pin and a purple route line should not automatically be interpreted in the same way. They may represent completely different map elements. If you regularly compare navigation options, it can also help to understand the differences between major mapping apps, including Google Maps and Waze. The same principle applies to purple areas or boundaries shown on the map.

Google has updated its Maps color system over time. These redesigns have changed the appearance of roads, landmarks, natural areas, and other features.

If you see a purple feature, first identify its shape. Then check whether it is a pin, line, shaded area, or another symbol. Tapping the feature can provide additional information.

This prevents a common mistake: assuming that one color always has one fixed meaning.

How Alternate Navigation Routes Use Purple

Google Maps can show several route options when you search for directions. The selected route is usually emphasized, while other available routes appear less prominently. If you are comparing navigation apps, it can also be useful to see how Apple Maps compares with Google Maps. However, it is not accurate to say that every alternate route is always purple.

Route colors can vary based on the navigation mode, current interface, traffic information, and Google Maps updates. Different transportation modes can also display routes differently.

If you see a purple-looking route, compare it with the other routes displayed on your screen. Look at the estimated arrival time, distance, traffic conditions, and route details.

You can then select the route that best fits your journey. Google Maps will update the navigation instructions after you make your choice.

The important point is that purple does not automatically mean alternate route. The line’s appearance can change as Google updates its navigation interface.

For that reason, use the route information shown on your screen instead of relying only on its color. This is especially important when driving in unfamiliar areas.

What Do the Colors Mean on Google Maps?

Google Maps uses a color system to make locations and geographic features easier to recognize. However, these colors are not necessarily permanent. Google can change the design as it improves the Maps interface.

Different colors can help distinguish categories such as food and drink, healthcare, shopping, recreation, transportation, and other points of interest. These visual differences make it easier to identify locations while browsing the map.

Roads, water, vegetation, buildings, and other geographic features also use different shades. These background colors provide context while you explore an area.

This is why you should not rely on a single color chart to identify every Google Maps marker. The appearance can change based on the current interface, zoom level, map type, and location.

When identifying purple icons on Google Maps, combine the color with the icon, label, and location information. That gives you a much more reliable answer.

Deciphering Background Environmental Tones

Some colors on Google Maps describe the environment rather than individual businesses. These background tones help you recognize geographic features before you zoom closer.

Water commonly appears in blue shades, while vegetation and parks use green tones. Developed areas, roads, and buildings can use different neutral or muted shades. Google has also introduced more detailed and colorful representations of natural features in recent map updates.

A purple or violet appearance does not automatically identify a specific environmental feature. Several map elements can overlap, creating a different visual effect.

Your device settings can also affect how these colors appear. Dark mode, display filters, and color adjustments can change the way neutral colors look.

If a background area appears purple, zoom in and examine the labels and surrounding features. You can also change the map layer to compare the appearance.

This helps you determine whether the color represents geography, a map overlay, or another interface element.

Why Is Google Maps Purple Now?

If Google Maps suddenly looks more purple, the change may be related to a map design update, display setting, or specific map feature. Google regularly updates Maps to improve navigation, visual clarity, and location discovery.

Google has introduced several redesigns that changed road colors, icons, landmarks, and other visual elements. These changes can make familiar areas look noticeably different after an update.

However, Google Maps has not simply changed the entire application to purple. The appearance depends on the feature you are viewing, your navigation mode, map layer, device, and current version of the app.

If only certain markers look purple, tap one to identify the feature. If the entire map looks different, check whether the application recently received an update.

You should also consider your device’s display settings. Dark mode, blue-light filters, and color adjustments can affect how map colors appear.

So, if you notice purple icons on Google Maps, do not assume the app is malfunctioning. First identify which map element has changed.

Managing Dark Mode and Contrast Settings

If Google Maps suddenly looks unusually purple, check your device and application display settings. Dark mode can change how roads, labels, and other map elements appear on your screen.

You should also check whether your phone has a blue-light filter or color adjustment enabled. These features can change the appearance of neutral colors and make some shades look warmer, cooler, or more violet.

Common settings to check include:

  • Dark mode or light mode
  • Night Light or blue-light filters
  • Color correction
  • Color inversion
  • Display contrast settings

You can also compare Google Maps on another device. If the colors look normal there, the difference may come from your original device settings.

Keeping Google Maps updated is also useful. Google regularly changes its interface, navigation visuals, and map styling.

Most importantly, do not change your display settings just because one marker looks purple. Tap the marker first and check what it represents.

Purple icons on Google Maps can have different meanings. The icon, location, and surrounding information are more reliable than color alone.

Conclusion

Understanding purple icons on Google Maps is easier when you look beyond the color itself. A purple marker can represent different map features depending on where it appears and how Google Maps currently displays information.

If you see a purple pin, tap it to view its details. You can also check your saved places and lists to see whether the marker is connected to a location you saved. For a deeper explanation of Google Maps markers, colors, and map layers, see Google Maps Help: Map colors, symbols, and layers.

If the appearance seems unusual, check your map layers and display settings. You can learn more about changing map views and layers in Google Maps Help: Using map layers.

The key takeaway is simple: purple does not have one universal meaning on Google Maps. Always check the icon, label, and location details before deciding what a purple marker represents.

What Does The 1 In A Circle Symbol Mean On Google Maps?

What Does the 1 in a Circle Symbol Mean on Google Maps?

The 1 in a circle symbol on Google Maps can be confusing when you first notice it. The meaning depends on where the symbol appears. It may be a notification badge on the Google Maps app icon. It can also be a numbered marker displayed directly on the map.

A number on the app icon usually relates to an unread notification. A numbered circle on the map can identify a destination, search result, or stop on a multi-destination route. These symbols may look similar, but they serve different purposes.

Understanding the 1 in a circle symbol on Google Maps can make the app easier to use. It also helps you determine whether you need to check a notification or follow a map marker.

In this guide, we explain the different meanings of the number one. We also cover notification badges, numbered map markers, small circles, and location accuracy indicators. If you are comparing navigation platforms, understanding Google Maps vs. Waze can also help you choose the right app for different driving needs.

Why Is There a 1 on My Google Maps Icon?

A 1 on the Google Maps app icon usually represents a notification badge. Your phone’s operating system displays this badge when Google Maps has an unread notification or another item that may need your attention. The badge itself does not normally indicate a problem with navigation or your current route.

The exact notification can vary based on your device and Google Maps settings. It may relate to travel information, places, location sharing, contributions, or other account activity. If you contribute information or reviews to Maps, you may also be interested in getting rewarded for contributing to Google Maps. The number simply indicates that something connected with Maps has not been reviewed.

To investigate the badge, open Google Maps and check the available notifications. You can also tap your profile picture and review relevant account activity.

If the badge remains, check your phone’s notification settings. Android and iPhone provide different controls for app badges. Therefore, the steps may vary depending on your device.

The 1 in a circle symbol on Google Maps is therefore best understood by checking its location. If it sits on the app icon, start with your notifications.

How to Clear the Notification Badge

Open Google Maps and tap your profile picture in the upper-right corner. Look for notifications, alerts, or other items that may require your attention. Opening the relevant notification may remove the number from the app icon.

If the badge remains visible, check your phone’s notification settings. Search for Google Maps under the Notifications section. Your device may provide an option for showing or hiding notification badges.

On some phones, dismissing the notification from the notification panel can also remove the badge. If the number still appears, close Google Maps and reopen it. A restart can refresh the notification status displayed by the operating system.

Keep in mind that notification controls differ between Android and iPhone. The menu names and available options may therefore look different.

You do not normally need to change your Google Maps settings simply because a number appears. First, check whether an unread notification is responsible.

If the notification is not important, you can manage the app’s notification permissions. This can reduce unnecessary badges without affecting basic navigation features.

What Is the Symbol for a Circle With 1 Inside?

A circle with the number 1 inside does not have one universal meaning throughout Google Maps. Its meaning depends on where the symbol appears and what you are doing in the app. Google Maps uses different visual markers to organize destinations, search results, routes, and other information.

For example, a numbered marker can identify a location from a list of search results. It can also represent the first destination in a route containing multiple stops. In these situations, the number provides context rather than indicating a notification.

The same visual idea can therefore have different meanings. A number on the Google Maps app icon relates to an app notification. A number displayed directly on the map relates to map information.

The easiest way to identify the symbol is to examine its surroundings. Check whether it appears on the app icon, beside a destination, or directly over a location.

This context is more useful than the shape of the symbol alone.

Distinct Roles for Interface and Map Badges

The location of the number is the most useful clue when identifying its purpose. A number displayed over the Google Maps app icon generally functions as a notification badge. It tells you that the app has an unread notification or another pending item.

A numbered circle displayed inside the map has a different role. It can identify a search result, route stop, or another location-related feature. The marker helps you connect a specific place with information shown elsewhere in the interface.

This difference is important because the symbols can look almost identical. Their appearance alone does not tell you what they mean.

If the number appears on your phone’s home screen, check Google Maps notifications first. If it appears over a location on the map, examine the route or search results.

The 1 in a circle symbol on Google Maps should therefore be interpreted according to its position and surrounding information.

Understanding this distinction can prevent unnecessary changes to your notification settings. It also makes numbered map features easier to recognize during navigation.

What Are the Numbers on Google Maps?

Numbers on Google Maps can represent several types of information. Their meaning depends on the feature you are using and where the number appears. For example, numbered markers can identify search results when you search for businesses, restaurants, attractions, or other nearby places. When searching for businesses, you may also wonder how Google Maps knows a business is busy, since Maps can display information about how crowded certain places are.

These numbers help connect locations on the map with entries in the search results. If a list contains several places, the corresponding numbers make it easier to identify each location.

Numbers can also appear when you create a route with multiple destinations. In that situation, the numbers indicate the order of your stops. Number 1 represents the first destination, followed by the next stops in sequence.

Road numbers serve another purpose. Highway shields and road labels identify specific roads or routes. They should not be confused with numbered search markers or destination markers.

Because Google Maps uses numbers in different ways, context matters. Look at the marker’s shape, position, color, and surrounding labels before deciding what it represents.

This approach makes unfamiliar Google Maps symbols easier to understand.

Deciphering Highway Shields and Waypoints

Highway shields identify roads and official route numbers. Their designs vary between countries and road systems. They are different from numbered markers used for destinations or search results.

Waypoints and route stops have another function. When you create a journey with multiple destinations, Google Maps can number the stops according to their order. A marker containing 1 can therefore identify the first destination on the route.

Search results can also use numbered markers. These markers correspond with places shown in the search results list. Selecting a marker can provide more information about that specific location.

The easiest way to distinguish these features is to consider their context. A road shield appears with a road. A search marker relates to a search result. A numbered route stop belongs to a planned journey.

The numbers themselves are not necessarily warnings or notifications. They often provide simple organizational information.

This distinction becomes especially useful when several symbols appear together. Instead of focusing only on the number, look at the entire marker and its surrounding map information.

What Are the Little Circles on Google Maps?

The small circles visible on Google Maps can represent several different map features. Depending on the location and zoom level, they may identify businesses, places, transit facilities, search results, or groups of nearby locations. If you want to understand how Google’s mapping products differ, it can also help to compare Google Maps and Google Earth and their different purposes.

Google Maps changes the amount of information shown as you zoom in and out. A busy area may contain many businesses and landmarks. Showing every individual marker at once could make the map difficult to read.

For this reason, Google Maps can group nearby locations into clusters. Zooming closer can reveal more individual places and markers.

Your current location is normally shown with a blue location dot. A light-blue area around that dot can indicate the estimated accuracy of your location. This area may become larger when your phone has difficulty determining your exact position.

Other circles may represent transit stations or selected map locations. Their appearance can vary based on the feature and map view.

If you are unsure about a circle, tap it. Google Maps will usually provide additional information about the selected feature.

Understanding Concentric Circles and Location Accuracy

A light-blue area surrounding your blue location dot generally represents the estimated accuracy of your current location. It shows the approximate area where Google Maps believes you are located.

A smaller area usually indicates greater location precision. A larger area means Google Maps has less confidence about your exact position. This does not necessarily mean that GPS is broken.

Several factors can affect location accuracy. Buildings, indoor environments, weak satellite signals, and electronic interference can make precise positioning more difficult.

Your phone can use several sources of information to improve location estimates. These may include GPS, Wi-Fi networks, and mobile network information.

If your location appears inaccurate, moving outdoors or into an area with a clearer view of the sky may help. Keeping location services enabled can also provide Maps with the information it needs.

The blue accuracy circle is different from a notification badge. It does not indicate an unread alert or pending message.

Instead, it provides visual information about how precisely Google Maps can determine your current location.

Understanding this difference can help you avoid confusing a location accuracy indicator with the 1 in a circle symbol on Google Maps.

Conclusion

The 1 in a circle symbol on Google Maps does not always have the same meaning. Where you see the symbol is the most important clue. If it appears on the Google Maps app icon, it usually relates to an unread notification. If it appears directly on the map, it may identify a search result, route stop, or another map feature.

Google Maps also uses other circles to communicate location information. For example, the blue dot shows your current location, while the light-blue circle around it indicates the estimated accuracy of that location. Google explains that a smaller circle generally means Maps has greater confidence in your position.

If you want to manage Maps notifications, you can review the official Google Maps notification settings guide. For more information about location accuracy and the blue location circle, see Google’s official Google Maps location accuracy guide.

So, when you notice a 1 in a circle symbol on Google Maps, check its location before assuming it is an error. Identifying whether it is an app badge or map marker will usually tell you exactly what it means. If you are considering another navigation option, comparing Apple Maps and Google Maps can also help you decide which service better fits your needs.

Why You Should Avoid Using a Screen Protector on Your MacBook

Why You Should Avoid Using a Screen Protector on Your MacBook

Buying a new MacBook is an exciting investment, and protecting its Retina display is a natural priority. You might consider adding a tempered glass protector or plastic film, just as you would on an iPhone. However, a screen protector on your MacBook can introduce risks that are worth understanding before installation.

According to Apple Support, placing certain accessories over the display, keyboard, or palm rest can interfere with the laptop’s design when closed. MacBooks have very limited clearance between the screen and keyboard. Even a thin accessory may affect how these surfaces fit together.

A screen protector does not automatically destroy a display, but it can create avoidable problems. Depending on its thickness, adhesive, and removal method, it may contribute to pressure damage or affect the display’s surface coating. This guide explains Apple’s recommendations, the risks of aftermarket protectors, and whether the MacBook Air M4 needs one. You will also learn safer ways to keep your screen clean and protected without compromising your laptop.

Does Apple Recommend Screen Protectors for MacBook Pro?

Apple advises users to avoid accessories that interfere with the space between a MacBook’s display and keyboard. This guidance matters for MacBook Pro owners because the laptop’s slim design leaves little room for additional material when the lid closes. A screen protector may seem harmless, but its thickness and fit can affect the way the display and keyboard meet.

The exact risk depends on the accessory. A thick tempered glass protector creates a different clearance concern from a thin film. Adhesive products may also leave residue or complicate removal. Apple does not recommend adding material that prevents the notebook from closing as designed.

Before installing a screen protector on your MacBook Pro, check Apple’s guidance for your model. Avoid accessories that press against the screen when the lid is closed. Keeping the original display unobstructed is the safer approach and helps preserve the laptop’s intended fit and finish.

Tight Engineering Tolerances Leave No Clearance

MacBook Pro models use a carefully engineered enclosure designed to keep the display and keyboard close together when closed. That compact construction helps the laptop remain thin and portable. However, it also means that additional material inside the closed notebook may create unwanted contact or pressure.

A screen protector adds another layer to the display surface. Although a thin film may appear insignificant, compatibility depends on its thickness, fit, and the specific MacBook model. Tempered glass protectors can introduce a greater clearance concern because they are generally thicker than films.

Do not assume that an accessory is safe simply because it is marketed for MacBooks. Check the manufacturer’s compatibility information and Apple’s recommendations before using it. If the accessory interferes with closing the lid normally, remove it rather than applying extra force.

Protecting the screen starts with respecting the laptop’s original design. Keeping the display free of unnecessary layers avoids introducing a potential source of pressure or contact.

Can I Put a Screen Protector on a Mac?

Technically, you can apply a screen protector to a MacBook, but that does not mean you should. Some aftermarket products are designed specifically for laptop displays. Understanding the differences between tempered glass and plastic screen protectors can help you compare their thickness and material properties. However, compatibility, adhesive, and removal requirements vary, so an accessory that fits one model may not be suitable for another.

One concern is the space between the screen and keyboard when the laptop closes. An unsuitable protector can interfere with that clearance or increase contact pressure. Adhesive films also require careful removal, particularly if they have been installed for a long time or have started to deteriorate.

Apple’s display guidance should take priority over an accessory seller’s marketing claims. Before buying a protector, check whether Apple recommends using that type of accessory with your particular MacBook. If the product’s safety or compatibility is unclear, leaving the display uncovered is the more cautious choice.

Possible Damage to Anti-Reflective Display Coatings

MacBook displays use surface treatments designed to improve viewing comfort and reduce unwanted reflections. Some models have delicate anti-reflective coatings that require careful cleaning and handling. Applying an aftermarket protector may introduce adhesive residue or create complications when the film is removed.

The risk depends on the display, the protector’s adhesive, and the removal method. Damage is not inevitable, but forceful removal or an unsuitable adhesive can affect the screen surface. Existing coating wear may also make removal more complicated.

Before applying an adhesive film, check Apple’s instructions for your specific display. Do not use sharp tools, harsh chemicals, or excessive force to remove residue. If the coating already appears damaged, seek advice from Apple or an authorized service provider before applying another product.

Avoiding unnecessary adhesive products is a practical way to reduce the risk of cosmetic damage. Gentle cleaning and careful handling remain preferable to experimenting with materials that may not suit the display.

Should I Put a Screen Protector on My MacBook Air M4?

A screen protector is generally unnecessary on the MacBook Air M4, and you should avoid installing one without confirming its compatibility. Like other MacBooks, the Air uses a slim clamshell design with limited space between the display and keyboard. Adding material to the screen may affect that carefully designed clearance.

The M4 chip itself does not make a screen protector safer or more dangerous. The main considerations are the laptop’s physical design, the accessory’s thickness, its adhesive, and Apple’s guidance for the model. Claims that the MacBook Air M4 is especially vulnerable because it lacks a cooling fan do not establish that its display is more likely to crack.

For everyday protection, focus on keeping the screen clean and transporting the laptop carefully. A padded sleeve can help protect the closed computer from bumps and scratches during travel. If you are considering an aftermarket protector, verify its suitability first rather than assuming that any product advertised for MacBooks will fit safely.

Thin Enclosures Require Careful Handling

The MacBook Air M4 combines a lightweight enclosure with a slim display assembly. Like other laptops, it can be damaged by excessive pressure, twisting, or impact. Carrying it in an overfilled bag may expose the closed computer to unnecessary stress, particularly if hard objects press against its lid.

A screen protector does not prevent every type of display damage. Depending on its construction, it may also introduce extra material between the display and keyboard. This makes the accessory’s fit and thickness important considerations.

For safer transport, use a well-fitting padded sleeve and avoid placing heavy objects on top of the laptop. Keep chargers, pens, and other hard items away from the screen when packing your bag. Open and close the lid gently, and avoid lifting the laptop by its display.

These habits reduce avoidable physical stress without adding another layer to the screen. They are more practical than relying on a protector to prevent damage caused by pressure or poor handling.

Is a Screen Guard Good for a MacBook?

A screen guard offers limited benefits for many MacBook users, while introducing potential compatibility and maintenance concerns. Some protectors may reduce direct contact with certain contaminants or scratches. However, a laptop screen does not face the same everyday hazards as a smartphone carried in a pocket alongside keys and coins.

An added layer may also affect reflections, image clarity, or the viewing experience. The extent varies by product, so it is not accurate to say that every screen guard noticeably reduces brightness or color quality. More importantly, an unsuitable accessory may interfere with the closed laptop’s clearance or complicate cleaning and removal.

Before buying a MacBook screen guard, consider the actual environment in which you use your laptop. If you mainly work at a desk and transport it in a protective sleeve, careful handling may provide sufficient protection. Avoid adding accessories simply because they are common for phones. Choose products only when their benefits justify the potential drawbacks.

Optical Changes Can Affect the Viewing Experience

MacBook displays are designed to deliver sharp text, accurate colors, and comfortable viewing. Depending on the model, they may support features such as wide color and advanced display technologies. An additional film can change how light passes through the screen, particularly if it has a matte or privacy-focused finish.

Some protectors introduce extra reflections, visible texture, or slight changes in perceived sharpness. Others are designed to reduce glare or limit side viewing angles. If you are considering a matte finish, understanding how a matte screen protector may affect display quality can help you evaluate these trade-offs. Results depend on the product’s materials and construction, so the effect is not identical across all screen guards.

If display quality is important to your work, consider these trade-offs before installing a protector. A film designed for privacy, for example, may be useful in certain public environments but can change the viewing experience. It should still be compatible with your MacBook and should not interfere with closing the lid.

For most everyday users, preserving the original display and following Apple’s care instructions is a sensible starting point.

Is a MacBook Screen Protector Necessary?

A MacBook screen protector is not necessary for most users. Unlike a smartphone, a MacBook closes around its display, providing some protection during storage and transport. The screen can still be damaged by impacts, excessive pressure, abrasive particles, or improper cleaning, but an added protector is not automatically the best solution.

Dust and fingerprints usually require routine cleaning rather than a permanent film. Use a clean, soft microfiber cloth and follow Apple’s instructions for your display. Avoid spraying liquid directly onto the screen or using cleaning products that Apple does not recommend.

For protection during travel, a padded laptop sleeve helps reduce the risk of scratches and minor impacts. Keep the keyboard and display free of debris before closing the lid. These simple habits address common sources of damage without introducing an accessory that may affect screen clearance.

If your work environment presents unusual risks, review the available protective options carefully. Confirm compatibility before buying anything that attaches to the display. For everyday use, careful handling is usually the most straightforward way to protect your MacBook screen.

Proper Clamshell Care Replaces Aftermarket Protective Films

Good MacBook care depends more on consistent habits than on adding a layer to the display. Before closing the lid, check that the keyboard and palm rest are free from debris. Small objects trapped between the screen and keyboard can cause marks or pressure damage, even when the laptop appears to close normally.

When cleaning the display, follow Apple’s instructions for your specific model. A clean, soft microfiber cloth is generally suitable for routine dust and fingerprint removal. Avoid abrasive materials, excessive pressure, and cleaning liquids applied directly to the screen.

During travel, place your MacBook in a padded sleeve that fits properly. Avoid stacking heavy items on the laptop or packing hard objects where they can press against the lid. Handle the screen gently when opening and closing the computer.

These steps help reduce everyday risks while preserving the original display. Instead of installing an unnecessary screen guard, focus on clean surfaces, careful transport, and accessories that do not interfere with the laptop’s design.

Conclusion

Using a screen protector on your MacBook may seem like a good way to prevent scratches, but it can introduce unnecessary risks. MacBooks have a slim design with very little space between the display and keyboard. Adding an extra layer may affect this clearance and potentially cause display damage when you close the lid.
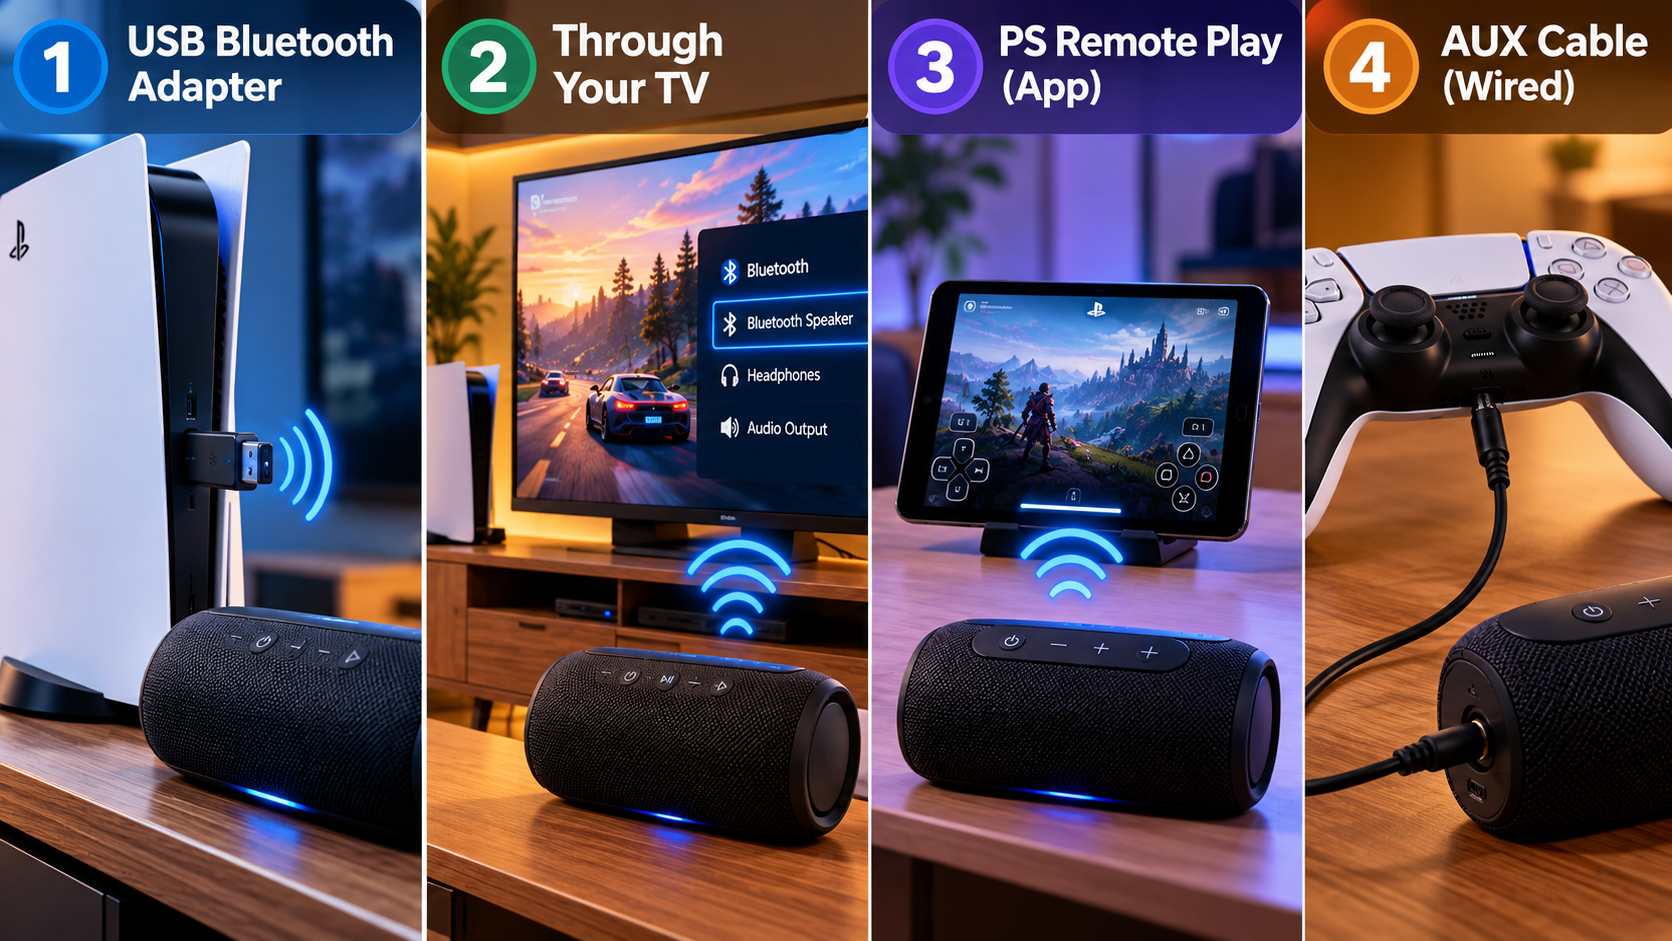
Another concern is the adhesive used in some screen protectors. Removing an unsuitable protector may leave residue or damage the display’s delicate anti-reflective coating. Some protectors can also affect screen clarity, brightness, and viewing comfort.
Instead of using a screen protector, follow Apple’s recommended cleaning instructions and wipe the display gently with a soft microfiber cloth. Use a padded laptop sleeve during travel, keep the keyboard free of debris, and avoid placing heavy objects on your MacBook. These simple habits can help protect your screen without adding unnecessary accessories.