
Icing a cake is an art form that can transform a simple dessert into a masterpiece. Whether you’re a novice baker or an experienced one, knowing how to properly ice a cake is a valuable skill that can elevate your baking game. In this comprehensive guide, we will walk you through the step-by-step process of how to properly ice a cake to perfection.
-
Why Proper Icing Matters
The way you ice a cake can significantly impact its taste, texture, and appearance. Proper icing serves several important purposes:
- Flavour Enhancement: Icing adds sweetness and flavour to the cake, complementing the taste of the cake layers.
- Texture Improvement: A good icing can provide a contrast in texture, making each bite more interesting and enjoyable.
- Moisture Retention: Icing helps lock in the cake’s moisture, keeping it fresh and delicious for longer.
- Aesthetic Appeal: The presentation of a cake can be just as important as its taste. A well-iced cake can be a showstopper at any event.
-
Essential Tools and Ingredients
Before we dive into the icing process, let’s gather the necessary tools and ingredients:
Tools:
- Cake stand or turntable: This makes it easier to rotate the cake for even icing.
- Cake boards or cardboard rounds: These provide a sturdy base for your cake.
- Offset spatula: An offset spatula is the go-to tool for smoothing and spreading icing.
- Bench scraper: This tool helps achieve smooth, straight sides and sharp edges.
- Piping bags and tips (optional): Useful for creating decorative designs or borders.
- Cake leveller or serrated knife: For levelling the cake layers if needed.
Ingredients:
- Cake layers: Baked and cooled cake layers of your choice.
- Icing: Select the type of icing you prefer – buttercream, cream cheese, ganache, or fondant.
- Flavourings and colourings (if desired): Vanilla extract, food coloring, or other flavourings to customize your icing.
Now that you have everything you need, let’s get started on the icing process.
-
Step 1: Prepare Your Cake
 (Photo from iStock)
Before you begin icing, make sure your cake layers are completely cooled. Warm cakes can cause the icing to melt or become uneven.
If your cake layers have domed tops, level them using a cake leveller or a serrated knife. The goal is to create flat, even surfaces to work with.
-
Step 2: Secure the Cake
 (Photo from iStock)
Place a small amount of icing on a cake board or cardboard round to act as glue. Then, center your first cake layer on top. This will prevent the cake from sliding during the icing process.
-
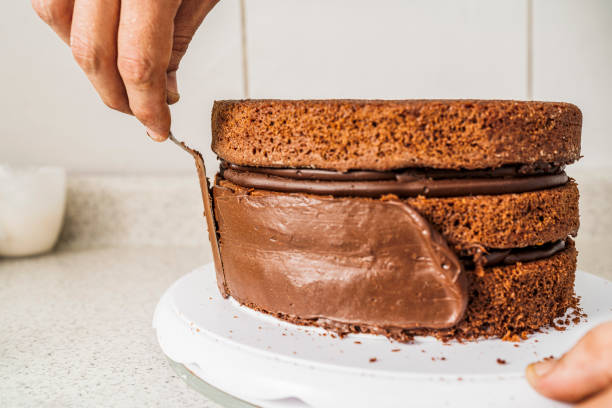
Step 3: Crumb Coat
 (Photo from iStock)
The crumb coat is a thin layer of icing that seals in the cake crumbs, providing a smooth base for the final coat. To apply the crumb coat:
- Apply a thin layer of icing: Use your offset spatula to spread a thin layer of icing evenly over the top and sides of the cake. Don’t worry about making it perfect at this stage; the goal is to lock in the crumbs.
- Chill the cake: Place the cake in the refrigerator for about 15-30 minutes to set the crumb coat. This will make it easier to apply the final coat.
-
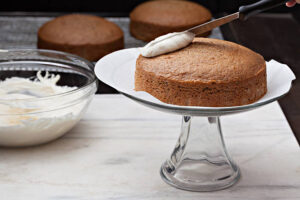
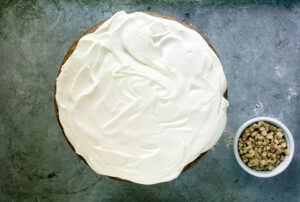
Step 4: Apply the Final Coat
 (Photo from iStock)
Now it’s time to add the final layer of icing for a smooth finish:
- Start with the top: Begin by adding a generous amount of icing to the top of the cake. Use your offset spatula to spread it evenly, working from the center outward.
- Ice the sides: Apply a layer of icing to the sides of the cake. Start at the top and work your way down, turning the cake as you go. Use the offset spatula to smooth the icing as you rotate the cake.
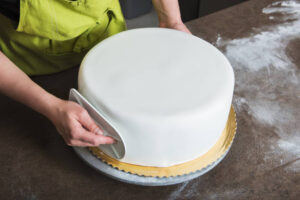
- Smooth the sides: To achieve smooth sides, use a bench scraper. Hold it against the side of the cake, gently rotating the turntable as you scrape off excess icing.
- Smooth the top: After the sides are smooth, use your offset spatula to create a flat, level top surface.
-
Step 5: Decorate and Customize
 (Photo from iStock)
Once your cake is beautifully iced, you can take it to the next level by adding decorative touches. Here are some ideas:
- Piping: Use piping bags and tips to create borders, flowers, or other designs with additional icing. Practice on parchment paper before piping directly onto the cake.
- Texture: Experiment with different textures, such as swirls, rosettes, or ruffles, using your offset spatula or a decorating comb.
- Colors: Add food coloring to your icing to create custom colors for your cake. Gel food coloring is preferable as it doesn’t affect the consistency of the icing.
- Edible Decorations: Consider adding edible decorations like sprinkles, edible flowers, or edible glitter for extra flair.
-
Step 6: Clean Up
 (Photo from iStock)
After you’ve finished decorating, it’s time to tidy up your cake’s presentation:
- Clean the cake board: Use a clean, damp cloth or paper towel to wipe any excess icing or crumbs from the cake board or cardboard round.
- Refrigerate: If you’ve used perishable fillings or icings (e.g., cream cheese icing), store the cake in the refrigerator until serving to keep it fresh.
-
Tips for Success
Icing a cake can be challenging, especially if you’re new to baking.
- Practice: Like any skill, cake decorating improves with practice.
- Room temperature icing: Ensure your icing is at room temperature for easy spreading. If it’s too stiff, you can briefly microwave it in short intervals to soften it.
- Consistency matters: The consistency of your icing is crucial. It should be firm enough to hold its shape but not so stiff that it’s difficult to spread. Adjust the consistency by adding small amounts of milk or powdered sugar as needed.
- Patience: Take your time, especially when applying the final coat of icing.
- Use a cake turntable: If you have one, a cake turntable makes it much easier to achieve a smooth finish and sharp edges.
- Keep it clean: Frequently clean your spatula, bench scraper, and any other tools you’re using to ensure a neat and polished look.
-
Conclusion
To ice a cake is a delightful and rewarding endeavour that allows you to showcase your creativity and baking skills. With the right tools, ingredients, and techniques, you can turn a plain cake into a work of art that tastes as good as it looks. Remember, practice makes perfect, so don’t be afraid to experiment with different designs and flavors to create the perfect cake for any occasion. Happy baking!
Reference:
Food Network
Want to do a meal prep, what are you waiting, go check some amazing ideas for meal prepping, click on the link below:
How to do your meal prepping routine