All posts by Anish

Ways to brighten your garden

It’s not necessary to spend a lot of money or time gardening. There are numerous inexpensive solutions to brighten up your outside area. Many inventive and affordable garden ideas can help you accomplish your objectives, whether you want to add a splash of colour or some light to your backyard.

We’ll reveal our top recommendations for the most inexpensive garden design ideas in this post. We’ll go over everything, from simple DIY projects to inexpensive garden additions that will liven up your outside environment. Let’s get started if you’re prepared to use your imagination to spruce up your outdoor space.
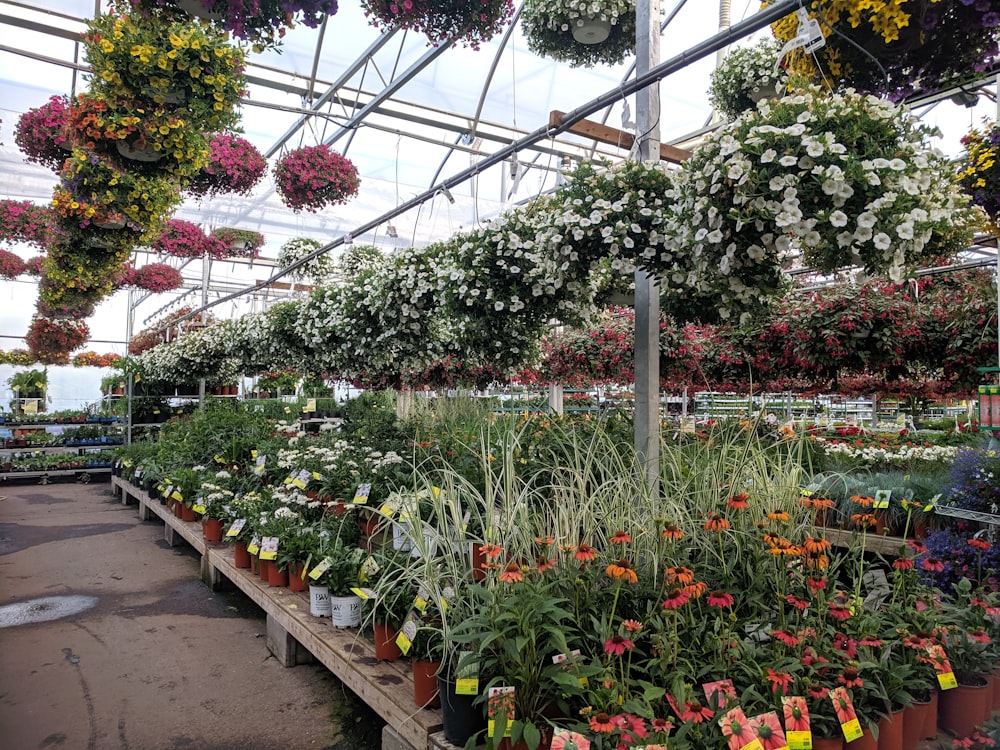
Decorative planters

(Photo from istock)

Using colourful planters is one of the simplest ways to make your outdoor space more cheerful. They come in a variety of hues and designs, from the traditional to the contemporary. You can use them to display tiny trees, herbs, or flowers. For a special touch, think about upcycling or DIYing antique containers like teapots, tin cans, or even worn-out shoes into planters. Old pallets can also be used to make a tiered planter that will add vertical interest to your landscape.

Lightening your garden

Solar lanterns are a fantastic choice for creating atmosphere in your garden at night. They come in a variety of sizes and forms. Energy-efficient and without requiring any wiring, solar lights are a low-maintenance and environmentally beneficial solution. To create a cosy and welcoming ambiance, you can also add string lights, outdoor candles, or fairy lights.

Install wind chimes

(Photo from istock)

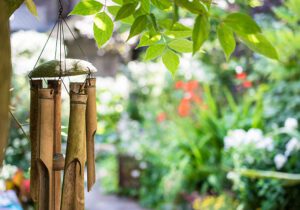
The wonderful sound that wind chimes produce might help you unwind and relax. They come in a variety of materials, including bamboo and metal. You can hear their tranquil songs if you hang them somewhere where they can catch the breeze. Recycled materials like beads, discarded keys, or shells can also be used to make wind chimes.

Suncatchers

Suncatchers are a lovely and affordable way to spruce up your outdoor area with colour. They can be hung from trees, hooks, or even be fashioned into a sun catcher mobile using twine or wire. The are often made of glass or acrylic and available in a variety of forms and styles. They will reflect the sun and produce a stunning array of colours in your garden.

Garden statue

(Photo from istock)

Your outdoor environment can become more opulent and sophisticated by adding garden statuary. There are several statues to pick from, such as animals, angels, and even abstract shapes.

Colourful urn water

A water feature is a brilliant method to give your yard colour and mood. It’s easy to find a few vibrant urns to put up a wonderful display, and bubbling water can be so soothing. Just be sure to surround them with a few river rocks to help with drainage.

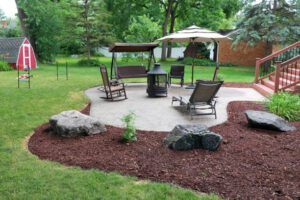
Decorative sitting area

(Photo from istock)

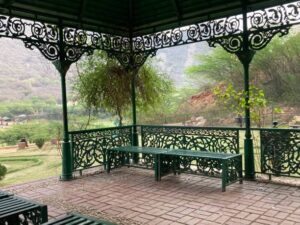
If you have room, consider including a vibrant outside sitting option. Each plant that surrounds the seating area adds colour to the highlights.

Garden craft

Make one of these lovely rock caterpillars if you have kids or even if you just want to embrace your inner child. You can make it whatever long or short you like!

Decorative stepping stones

(Photo from istock)

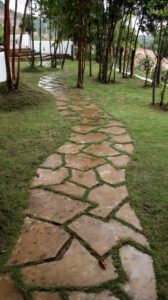
Adding a few beautiful stepping stones to the garden will help your various displays feel more cohesive. Consider creating your own out of shattered crockery or customising a concrete stepping stone.

Grow scented flowers

Many gorgeous flowering plants, including viburnums, chimonanthus, Daphne’s, mahonia’s, and sarcococcas, emit a heady smell. If they are hidden behind barriers, they will go unnoticed and be undervalued. Instead, place them where you can easily enjoy their mouth-watering aromas, like at the front entrance, in the front garden, or beside to a route that is frequently travelled. Since many of these shrubs thrive in pots, they can be placed front and centre for the winter and then moved to a less noticeable spot for the summer.

Add seasonal pots

(Photo from istock)

The greatest method to add a seasonal pop of colour right where you need it is in pots. Choose plants like cyclamen, heathers, hellebores, pansies, and variegated ivy that work well together. Add a shrubby evergreen plant, like sarcococcas or rosemary, to a huge pot to give it some backbone. All of these plants are readily available in tiny pots at this time of year in garden centres, making it simple to mix and match.

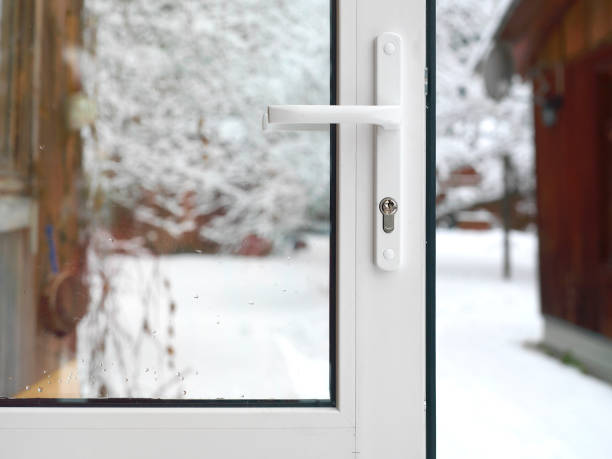
Change window outlook

Winter is a period when most of us spend more time indoors, so having beautiful views out your windows is very beneficial. Think about what you may change to enhance the composition of your garden without completely redesigning it. What a little seasonal moving can accomplish. Consider moving any eye-catching items that are easily transportable, such planter displays and garden décor, so they can be clearly viewed from the windows. Or trim back a couple of a tree’s lowest branches to provide an eye-catching view of what lies beyond.

Bug hotels

(Photo from istock)

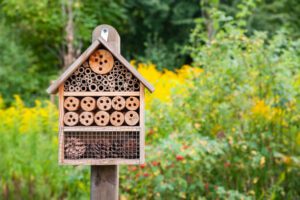
Nothing beats a project that both improves the garden’s aesthetics and aids animals. Any size and any type of bug hotel is acceptable. Consider the nooks and crannies. Bamboo canes should be trimmed into short lengths and left with their hollow ends exposed so that ladybirds and lacewings have the perfect places to hibernate. Put them in an old wooden box, or just tie them together into a little bundle without the frame. Eventually, to accomplish the same task, leftover pieces of wood can be drilled with holes, and if laid out on the ground, beetle larvae will eat the rotting, dead wood.

Painting your garden

It might be challenging to provide lasting colour to a landscape solely by planting, but painting or staining will instantly bring colour exactly where you need it to accent plantings or serve as a backdrop.

Reference:

Gardeners’ World
Making your home fireproof is important, searching for some effective tips?, your wait is over click on the link below:
Tips to make your home fireproof

Durable building materials for commercial construction

Any substance used to construct a structure is referred to as a building material. The construction business uses a variety of materials for construction. Depending on their structural capacity, we employ various materials. Building materials used in construction are governed by regional and national standards. On the other hand, architects select building materials based on cost and beauty. By selecting the best material for your project, you may improve and extend its lifespan. Below is a list of some of the most typical building supplies.

Concrete

(Photo from iStock)

A very popular building material is concrete. It is made of a composite substance that combines cement and water with fine and coarse aggregate as a binder. Then allowed to cure and set for a while. In general, concrete needs 28 days to reach its optimum strength after seven days of curing. Concrete that has steel inserted in it to boost the structural tensile strength is known as reinforced concrete and is most frequently used in construction.

Concrete is available in a variety of forms, including waterproof and light-weight varieties. The kind of concrete used is determined by the kind of project. The ability to pour concrete into any form and have it cure into a material resembling stone is one of the material’s greatest benefits.

Concrete is a widely used material in construction due to its low cost and adaptability. Concrete is utilized for
  • Foundations
  • building residential structures
  • development of commercial structures
  • construction of bridges
  • sewers and culverts.

Steel for building

(Photo from iStock)

As a result of our discovery of steel as a reinforcement material, the building of skyscrapers exploded. Steel is highly functional and strong.  In comparison to other building materials, it is also less expensive to freight, lightweight, and simple to deal with. Steel does not easily deform unless we apply a lot of weight to it, and even when bent, it maintains its structural integrity.

Steel stands out thanks to its great strength to weight ratio. Compared to concrete, it takes less time to install, and we can do it anywhere. However, corrosion might occur if steel is not fitted properly. Steel’s propensity to degrade at high temperatures is one of the material’s major disadvantages for use in building. The type of steel determines how fire resistant it is.

The following are some common uses of steel in construction:
  • To boost the tensile strength of structural parts, we employ steel as reinforcing bars.
  • We utilise it to create interior fixtures like railings and stairs.

Wood

(Photo from iStock)

It is readily available, economical, powerful, long-lasting, and flexible in every way.  You shape them according to your own choices and enjoy that process.

In addition to being durable, wood is an environmentally friendly material.  Steel, stone, and aluminium all operate well with it. Wood is relatively lightweight and straightforward to standardize in size when compared to other building materials. It is effective in insulating and soundproofing, and it has a high tensile strength.

In the following sectors of building, we employ wood:
  • Building of the ceiling, floors and walls
  • building interior features including door and window frames
  • structures’ frames in buildings and bridges
  • Thermal defence
  • acoustical protection

Stone used for building

(Photo from iStock)

The most durable building material is stone. It is available in a wide range of colours and finishes, from smooth to rough.  Although common stone is inexpensive, expensive finishes are available. Quality and colour affect the price and length of manufacture for marble countertops.

Stone has some shortcomings. Because of its weight and the impact of its density, moving it is challenging. Stone is a poor insulator as well, making it useless for insulation in cold climates.

In the following ways, stone is used in construction:
  • as a construction-related rough aggregate
  • For walls, dams, and bridge piers in masonry
  • as railway ballast
  • To prevent dampness on exterior walls
  • Marble and other stones make superb polish finishes.

Bricks

(Photo from iStock)

Despite having a great compression resistance, they are easily breakable.  Durable and fire-resistant is masonry. We utilise it to build load-bearing walls due of its strong compressive strength. Masonry can support multi-story structures when reinforced with concrete, making it a cost-effective material for construction.

Masonry is used in a variety of building materials, including:
  • applied to walls
  • used to construct masonry foundations
  • In places that are prone to flooding, gabion building also uses masonry.

Construction foam for building

(Photo from iStock)

Unique and having a high strength-to-weight ratio is bamboo.  Furthermore, Its strong tensile strength and compressive strength are comparable to those of concrete, brick, and wood. This is a tough alternative that one should adhere to.

To prevent air intrusion and offer thermal insulation, buildings use this plastic foam material.

Glass

(Photo from iStock)

Glass is more aesthetically pleasing and lighter than brick and masonry. Durable building materials are a fundamental requirement for commercial construction projects. First and foremost, concrete stands as a stalwart option, offering unrivalled strength and longevity. Additionally, steel reinforcement bolsters concrete’s resilience, ensuring stability in high-stress areas. Moreover, the use of steel-framed structures provides excellent load-bearing capacity, which is imperative in commercial construction.

Conclusion

Transitioning to exterior materials, brick and stone offer timeless durability while adding an aesthetic touch. Furthermore, the use of high-quality glass for windows not only contributes to a building’s energy efficiency but also guarantees long-term clarity and resistance to environmental factors. When discussing roofing materials, durable options such as metal or synthetic slate prove essential for protection against the elements. Likewise, composite materials, like fibre cement, make for exceptional siding choices due to their resistance to rot and insect damage. In conclusion, in the world of commercial construction, the selection of durable building materials is paramount, and the careful transition from foundation to façade ensures that structures can withstand the test of time while meeting safety and aesthetic standards.

Reference:

Proest
Making your home fireproof is important, searching for some effective tips?, your wait is over click on the link below:
Tips to make your home fireproof

Tips on making a kitchen renovation

Although remodelling a kitchen is a significant undertaking, it should not be intimidating. Establishing a budget and developing a plan with a designer or contractor are necessary steps to achieving the place of your dreams. You’ll also need to decide where you’ll stay while the renovation is being done if you want to endure it. You will have a place to show off to everyone in the neighbourhood once you have installed each component of the kitchen one at a time.

Finalizing the features of your kitchen

(Photo from iStock)

Spend some time considering how you want to enhance your current cooking area. If you have enough room is one of the most crucial queries. Your kitchen might need to be expanded. Choose the new elements you want after deciding on the available space.

For instance, your ideal kitchen might not include a conventional stove but rather an island hob. Keep a copy of any kitchen images you like. Use them to decide what characteristics your perfect kitchen should have.

  • Your budget

Set a limit on the amount of money you’re willing to spend on the renovation. Investigate how your designs fit within your budget when you design your kitchen. Online furniture estimate searches, trips to furniture stores, and consultations with designers and contractors are all effective ways to accomplish this.

  • Costs for the designer and contractor should also be included.

(Photo from iStock)

You’ll typically need to adjust your plans or budget because remodelling generally costs more than you’d anticipate. The layout and utilities need to be perfected as a top priority. The following section includes cabinets and countertops. The majority of your largest costs will be made up of them.

Planning floor space for kitchen

Spend some time planning out your kitchen. The location of your refrigerator and other equipment should be decided. Include the cabinets and counters. You can see how much room you have to work with in a complete sketch. To keep adequate open space in the kitchen, you might have to choose smaller appliances, countertops, and cupboards.

Remember where your future utility lines will be. The configuration is impacted by plumbing, gas lines, and electrical outlets. Ask the contractor to leave them in their current location to save money.

Your kitchen’s style

(Photo from iStock)

Most likely, you already have a vision for the kitchen’s design. Perhaps you prefer a modern appearance for your kitchen than one that is classic. It might be made entirely of wood or have a colour scheme. Choosing a design entail concentrating on the kitchen’s overall appearance rather than individual components.

For instance, a modern kitchen might feature marble walls, a lot of reflective surfaces, and a colour scheme of black, grey, or white. Appliances may be made of metal, and furniture may have a very clean, modern appearance.

A cottage kitchen could contain vintage or white appliances, wood floors, checked light blue or yellow patterns, and colourful accents. Wooden furniture and floors go well in a country kitchen. Red, yellow, blue, or white are all acceptable colour choices. Appliances made of stone and brick can also give off a rustic vibe.

Construction plan

Even if you want to construct the kitchen yourself, consulting a designer is a smart move. You may finalize your remodelling plans while staying within your budget with the aid of kitchen designers and architects. Utility and structural work is outlined by construction firms.

To submit a building permit application, you must have these plans.

  • Estimate from the contractor

(Photo from iStock)

Electrical wiring and furniture installation are only two of the many components that go into major renovations. Typically, you may hire just one contractor to take care of all your needs. Obtain quotes from at least three businesses.

You should discuss your design plans with each contractor and receive an estimate. Determine whether you need to alter your plans to stay inside your budget using the estimate. To locate feedback from previous clients, use a web search for the contractor’s name.

  • Construction permits

To determine which permits you require, speak with your local government. The majority of jobs won’t require a permit.

You’ll probably require a permit if your remodelling design calls for installing or removing walls, window openings, or utility lines. This can be handled by designers, architects, and contractors.

Arranging living plans

(Photo from iStock)

It can be frustrating and take weeks to remodel. While the building is taking place, you will need to make plans for where you will live and eat. Put your refrigerator and cooker in a different room. Spend the day away from home on the noisiest and dustiest days, such as when walls and flooring are being torn down. The summer months are ideal for building. You may spend time outside and cook outside while it’s warm out.

De-clutter your kitchen

Your kitchen’s majority of items can be uninstalled without a contractor’s assistance. Pull up the cabinetry and floors if you’re handy around the house. Take out any furniture and light fixtures that won’t fit in your new space.

Doing this on your own can save you money if you haven’t already engaged a professional. If you don’t, you might be without a refrigerator or cooker for weeks. You might want to keep some of the appliances until the new ones arrive.

New kitchen accessories

  (Photo from iStock)

It can take weeks for these kitchen accessories to arrive. Ordering everything you need in advance will prevent you from becoming trapped in the middle of a remodel.

The cost of purchasing these features can be high.

Inspect the work

Rough-in work refers to the installation of your utilities but not their connection. They’ll check to see that your house complies with all regulations. Before they worsen, you or your contractor can take care of the violations. Inspect your work this way.

Reference:

wikiHow
Making your home fireproof is important, searching for some effective tips?, your wait is over click on the link below:
Tips to make your home fireproof

Tips to consider when moving to your new house

One of the most gratifying experiences is moving into a new home and having your own private area. However, there are a few obstacles to overcome before you get there. For example, looking for a property can be stressful if you don’t have an agent’s contact information, the phone numbers you are obtaining online are scammers, or you don’t know where to start.

When relocating to a new home, there are many things to take into account, many of which are influenced by your preferences and situation. So, before moving into a new home, be sure to verify the following:

Location of the new house

(Photo from istock)

When seeking to move into a new home, this is typically the most important factor to take into account. The location should comfortably accommodate your needs; ideally, you want the majority of the locations you frequently visit—from your workplace to the children’s schools—to be close to your home. This reduces transit costs while also avoiding lengthy commutes and/or pointless traffic.

Think of additional amenities including medical centers, grocery stores, and entertainment venues. Most importantly, great locations bring people of a particular class closer together, allowing for networking opportunities.

Choose a place that suits your needs and achieves your objectives. Keep in mind that location is crucial because rent varies greatly depending on where you are. Therefore, you might wish to look into a location that fits inside your spending limit, which takes us to the following point.

Cost

Rent shouldn’t be more than 20% of your total income, as a general rule of thumb. By doing this, you may pay your rent and still have money left over for other expenses without putting an excessive amount of strain on your finances. A financial audit is crucial for homeowners to assess how much they can truly afford to spend and whether they can get financing to cover the expense.

Financial restraint is essential in this situation; look for a nice home that fits your needs without breaking the bank. People frequently uproot themselves to bigger houses or swankier neighborhoods just for the bragging rights at the expense of their budgets.

Security in the new home

(Photo from istock)

Everyone wants to live in an area that is safe and secure, where they can rest easy knowing their family is safe. A place where, even if you worked late, you could still safely return home. If you can’t find peace of mind, investing in a new home might as well be for nothing.

For instance, gated communities and places within the UN Blue Zone typically have strict security standards, and the presence of a police station or other government or diplomatic activity typically increases an area’s security. Tight security manifests itself in other ways as well. CCTV cameras and the presence of security guards are two key elements that encourage tight security in apartment complexes. The other thing you can do is talk to locals about the security of the neighborhood; this will give you a first-hand account from someone who lives there.

Water supply

Life is water. Before opting to reside somewhere, be aware of the water supply there. Is the municipal water system trustworthy? Does water rationing take place there? Do you need to dig a borehole or purchase a tank? How is the water supply affected during the dry season? You may plan yourself and prevent unpleasant surprises by asking yourself these questions.

Electricity

(Photo from istock)

You’ll be excused if you don’t give electricity much thought because it appears obvious in the modern world. But not everywhere is like that.

Does the home and the neighborhood where you’re relocating frequently experience blackouts? If the answer is yes, you should think twice. If this is a compromise, you’re willing to make, you might want to think about switching to a backup power source. An unstable electrical supply may be fatal in a world where many people work from home and the fridge is loaded down with tonnes of food.

Repair and maintenance of new place

You are curious about the climate in the general vicinity of the new home. Is it too chilly? Do you need to buy a heater? Does the area flood when it rains? You don’t want to reside in a flood-prone or riparian environment. Investigate how various weather patterns may impact the neighborhood of the house you want to move into.

When searching for homes to move into, keep these points in mind generally. From there, there are some further details for repair and maintenance to focus on.

Repairs and maintenance

(Photo from istock)

This is a crucial consideration when relocating to older homes. They could necessitate more meticulous upkeep of the home’s original fixtures or features, which is typically more expensive. Before considering purchasing a new home, find out what the servicing fees would be.

Another crucial factor is the standard and condition of a home’s finishes. There are certain things that may be ignored, and there are some that you might be prepared to modify, but there are some homes where the finishing is so subpar that the cost of renovation is out of reach.

Leaks and fixtures

Look for any plumbing or water leaks. You don’t want to go to sleep at night and discover your home is flooded. Make sure you are familiar with where the gas and water shutoff valves are before moving in. Check the locations of the circuit breakers and the fuse boxes for all the lighting fixtures. In order to make sure everything is in working order and that you are aware of them in case of an emergency, do this.

Surroundings and environment

(Photo from istock)

We have relocated folks to a new place that was really beautiful, yet they had to leave after only a few months for the reasons listed below:

Evenings are not quiet on the street. There is too much activity in the vicinity, such as a busy nightclub close by, which prevents any sense of tranquilly. The home is on property that is in dispute (with the government, NEMA, etc.) and is occasionally slated for demolition.

There is a persistent sewage line leak in the vicinity that fills the house with a foul smell. During the wet season, the compound is vulnerable to floods.

Reference:

LinkedIn
Making your home fireproof is important, searching for some effective tips?, your wait is over click on the link below:
Tips to make your home fireproof

Famous Architect Styles of All Time

These well-known builders have left their imprint on the world for millennia. Their distinct architect styles can be seen in everything. From Mies Van der Rohe’s minimalist design to Antoni Gaud’s elaborate works to Frank Gehry’s glossy, undulating forms. By reflecting the fashions of the moment, architecture can characterize an era.

These are the most well-known architects, whether or not you appreciate their styles. Use our guide to learn more about these industry heavyweights. And if you get the chance, pay a visit to any of these landmark buildings in person. Even if these structures look incredible in pictures, nothing compares to actually viewing the creations of renowned architects.

Antoni Gaudi

(Photo from iStock)

There, over the course of his whole career, Gaud erected the most well-known of his creations, the 1883 cathedral known as La Sagrada Familia. Which is still under construction today. His ornate design, which combined aspects of Baroque, Gothic, Moorish, and Victorian architecture. Typically featured beautiful tile work and took its cues from organic shapes. Both the undulating facade of another of his well-known works. The apartment building known as the Casa Milla (influenced by the multi-peaked mountain just outside of Barcelona called Montserrat). And the tree-like columns that support the large interior of his church can be recognized as examples of these influences. Later modernist generations would be significantly influenced by Gaud’s work.

Frank Lloyd Wright

Wright, a native of Wisconsin, revolutionized 20th-century architecture, and his upbringing in the Midwest significantly influenced the way he perceived the world. Wright developed the Prairie House style in opposition to the dominant Victorian aesthetic. This emphasized dark décor and ornate ornamentation both inside. And out and was inspired by the low-lying buildings that dot the American plains. Wright replaced it with simple geometries that put a focus on horizontal planes. His most well-known structure, Falling Water, a mansion in Bear Run, Pennsylvania. That he constructed in 1935 for Pittsburgh department store tycoon Edgar Kaufmann, has stacked rectangular balconies that appear to hover over the natural waterfall integrated into the house. Wright would adopt curvilinear aspects later in his career.

Mies Van der Rohe

(Photo from iStock)

Known for believing that “less is more,” German architect Mies Van der Rohe reduced building to its most basic geometric forms, paving the path for minimalism. In order to define the appearance of his buildings. He eliminated all signs of embellishment and instead relied on the inherent properties of materials like steel and plate glass. This strategy evolved from another tenet—form equals function—promoted at the Dessau Bauhaus. Where he served as the final director until the Nazis shut it down. His plans prioritized efficiency and rationalism as the path to beauty. An approach epitomized by The Barcelona Pavilion, created to host Germany’s exhibit for the 1929 International Exposition in Barcelona.

Philip Johnson a famous architect

Johnson had a significant influence on the industry as the department’s first director, serving as a gatekeeper who helped to mould architectural trends from 1935 onward. He was a designer in his own right. However, it’s fair to argue that he improved on rather than created anything entirely new. But in a few instances, most notably in the house he constructed for himself in 1949. His creations became famous. Mies Van der Rohe’s philosophy is distilled in the home, and Johnson himself said it was “more Mies than Mies.” The Glass House blurs the lines between inside and out.

Eero Saarinen

(Photo from iStock)

The International Style, which has become the standard aesthetic for new corporate headquarters. And governmental office buildings worldwide, was born out of the Bauhaus’s emphasis on straight lines throughout the post-war period. In this context, Eero Saarinen’s mid-century designs acted as a welcome corrective to the modernist ideal of simplicity Which had essentially turned into a sort of corporate conformity. Saarinen used swooping curves instead of the uniform box used by the International Style. Giving his architecture a sense of lofty transcendence—particularly in his 1962 JFK terminal for the now-defunct TWA airlines. Its gull-wing roof and exhilarating interior are still thrilling, but Saarinen’s signature sensation of architecture taking flight permeates the entire structure.

Richard Rogers a well known architect

Leading advocates of the look included British architect Richard Rogers. With its heating and plumbing systems exposed as the façade and an external escalator with a glass enclosure scaling the height of the building. This building, intended to serve as Paris’s primary institution for Modern and Contemporary Art. Like a structure turning inside out. When designing the headquarters for Lloyd’s of London, another of Rogers’ famous structures, he followed a similar strategy.

Norman Foster

(Photo from iStock)

British architect Norman Foster began his career as a co-worker of Buckminster Fuller, the famed futurist and inventor of the geodesic dome. Foster later supported Frank Lloyd Wright, Ludwig Mies van der Rohe, and Le Corbusier. Foster’s most famous skyscrapers share comparable façade surface treatments, suggesting that the latter’s tessellated pattern of triangle forms served as inspiration. A prime example is the commercial skyscraper called The Gerkin, which was built in 2004 and opened in the financial district of London at 30 St Mary Axe. Hence,  in the same way that the Eiffel tower is linked with Paris, its pickle-like shape that tapers to a point has made it an iconic landmark.

Santiago Calatrava a dignified architect

If such things existed, his constructions frequently resemble the rib-cages of robotic ancient dinosaurs. He certainly drew international notice for his projects, which also earned him a reputation for astronomical cost overruns. But there’s no doubting that Calatrava is one of the most distinctive architects now at work, as seen by his best-known design, the Transit Hub for the World Trade Centre.

Reference:

Time Out
Making your home fireproof is important, searching for some effective tips?, your wait is over click on the link below:
Tips to make your home fireproof

Tips on designing your backyard

If your backyard is thoughtfully planned, you’ll always have a spot to unwind, host guests, and take in the outdoors. Whether your backyard is a sizable suburban lot or a huge acre, you may design a getaway that you’ll enjoy for many years. Simply consider the features you want or need the most, such as a grilling space or a garden shed, and then construct around those.

Native plants and grass

(Photo from iStock)

You can reduce the amount of time you need to spend caring for a plant by selecting native species to your region. Because native plants are usually the most suitable for your soil and climate, you won’t typically need to worry about modifying the soil or applying fertilizer on a regular basis.

If you’re reseeding your lawn, native grass is another alternative that requires less upkeep.

Use planters to add greenery

You don’t have to forgo gardening because your backyard is small. You may utilise your small space by using planters, and the planters themselves frequently give a pleasant decorative touch.

The best method to utilise vertical space is with tiered planters. To make a small patio appear unified, try adding identical pots on either side.

Include plenty of seating

(Photo from iStock)

The seating will be one of the most crucial elements of your comfort, whether you intend to entertain frequently or just want a cozy place to hide away. Your choice of seating will depend on how you want to use the area. Consider folding chairs that you can hang from pegs while they aren’t in use if you expect to have a large number of guests over. If you don’t have much room, you might choose an outdoor bench or couch that hides a storage area.

Install dining table in backyard

You’ll need a durable outdoor table if you enjoy the thought of enjoying a freshly grilled burger on your back patio. Choose a table that can accommodate an extra person or two so that you will always have space for visitors!

For instance, if you have a family of 4, an outside table that seats roughly 6 people would be ideal.

Even if you prefer not to eat outside, you might still want some little accent tables for your room so you have somewhere to sit your drink, book, or whatever else you bring outside.

Add a fire pit

(Photo from iStock)

Consider installing a fire pit to your backyard so you can enjoy your outdoor space even in chilly weather. Instead of having a fire in the open, these offer a safer option to put it out. You can either purchase pre-made fire pits or construct your own out of materials like brick or field stone that are fire-safe.

Of course, put fire safety first! Keep children and dogs a safe distance from the fire pit and avoid lighting a fire on days with strong winds. Don’t ever put anything combustible in the fire pit, either.

Building a patio in backyard

When you’re relaxing, you’ll have to contend with dirt, muck, and mosquitoes if you set up your lawn chairs right in your backyard. To avoid that, you can construct a wooden deck or create a concrete patio next to your house, then utilise that area for entertaining, grilling, and other activities.

If you’d like, you could even create a patio with stone pavers.

Grilling area

(Photo from iStock)

Since you’ll need to store your grill when it’s not in use, it’s preferable to have a special place set aside for it. If you cook on your grill frequently, you could even want to create a built-in grilling area where you can keep your cooking utensils and any other items you might need.

To shield your grill from the elements, you could wish to erect a small awning above this area.

Lightning

A porch light can be sufficient if your gathering place is close to your home. If not, you’ll need outdoor lights so that you may use your backyard when the sun sets. To light your path at night in an environmentally friendly manner, install solar-powered lights along the sidewalk.

For a festive touch, drape string lights across a patio. Or encircle the base of a tree with them. Use motion-activated floodlights in your backyard to increase safety.

Building a pool in backyard

(Photo from iStock)

You should make an early decision about whether you want a pool because it will take up a lot of room. Choose a sunny location for your pool that is free of any trees or bushes. You won’t have as many leaves to remove from your pool each day as a result.

If you would rather to have a warm, soothing dip, you may also include a hot tub. Compared to a pool, these often occupy less space. Do not feel obligated to incorporate a pool in your backyard because they require a lot of maintenance and are a costly investment.

Playing area for the kids

No matter your financial situation, you can make an enjoyable outdoor play area for your children. For example, you could construct a sandbox for next to nothing. Or dangle a rope swing from a strong tree branch! You may construct a playhouse or a tree-house for your children if you have more money.

Children enjoy playing outside, which is a terrific method for them to exercise. You’ll encourage children to be active. And healthy by designing a unique area for them. Build or create a cover to go over your sandbox once the kids are done playing to keep animals out.

Space for outdoor games in backyard

(Photo from iStock)

Leaving a large section of your yard open when designing your outdoor space is sometimes the best option. It will be less likely that you will inadvertently hurt yourself or damage your property. And you won’t risk crushing your flower bed if you need space to throw a ball around, perform sprints, or design an obstacle course.

You may even construct a ball court if you have enough room and love sports a lot!

Reference:

WikiHow
Making your home fireproof is important, searching for some effective tips?, your wait is over click on the link below:
Tips to make your home fireproof


Planning a stylish and affordable house

When they first start producing money, one of the key goals many Indians have is to one day acquire a house. In homes, families grow and memories are made. Many families are hesitant to build their own self-contained home because they fear it would be costly. While this may be true in some cases, it is still possible to build a single-story home in India on a limited price. All you require is a plot of your choice, keeping in mind the fundamental design structure.

These homes are also known as single-story house plans. With the proper blueprint arrangement, you may develop a comfortable structure even with home plans for 10 lakhs. You may utilise our straightforward, affordable single-floor house plans to create a custom one-story home. Additionally, India is home to a variety of architectural styles, so you can pick what you like.

Open low-budget single floor design

(Photo from iStock)

The open structure is among the greatest low-cost single-floor home designs ever created. A larger space is created by combining two or more spaces in an open floor design. Using floor-to-roof glass windows and doors, an open floor plan creates the illusion that the room is larger than it actually is. The main advantage of the house is that it receives a lot of sunlight and fresh air. Furthermore, everything may be viewed from a single area.

Single floor with multiple sections

If you have the luxury of a large plot, it makes sense to build the house in portions throughout the plot rather than using numerous storeys. The main house is single-story in style. By doing this, you can have extra carpet without having to pay to build a new floor.

Single floor with open deck

(Photo from iStock)

Most people don’t have enough room in their homes for a full-fledged outdoor garden. In such circumstances, you can design a floor plan that has an open deck that will function as a miniature garden area. Consider the layout shown here. In order to provide much-needed seclusion, the open terrace is tucked away at the back of the house. The open layout allows for plenty of sunlight and fresh air in any season. Your low-cost single-floor house design with an open deck can accommodate informal gatherings and parties.

L-shaped house design

Most popular among the list of cost-effective house designs are the 10 lakh budget house plans. This list begins with a simple, plain L-shaped house. The plan below makes the best use of the rectangular land by designing an L-shaped, one-story house at one end and a garden area in front. You can do this if you want an open garden but don’t have enough room.

Elevated single floor house

Assume your plot is located in a flood-prone area during the rainy season. In that case, it is critical to elevate your residence. The water will flow this way rather than that from the house to the road. Another advantage of being higher is having a better view of the surroundings. Take a look at this charming compact low-cost single-floor home design on an elevated place.

House plan with attic space

A house’s attic is the area located between the ceiling and the roof. Some homeowners cleverly transform the typically wasted space between the roof and ceiling into a storage area or even an extra bedroom. The only thing left to do is reinforce the ceiling and install a window. You may now use it as a hidden storage room or even a little bed when you have visitors. Attics are common in Western countries.

Single floor house with patios

You might not have enough room for open gardens. However, don’t forget to include open patios in your low-cost single-story house design. An open patio can be used for a variety of purposes. Place some furniture there to enjoy the evenings outside. During inclement weather, the area can also be utilized to store bicycles, set up shoe racks, and dry belongings.

Box and strip budgeted house

Say you don’t have the resources to devote to a complex framework and conventional house building.

If this is the case, you should definitely check the box and remove any home plans that cost less than 10 lakh. In a box and strip construction, an ordinary-sized wooden block is utilized instead of frames, cement, and other standard materials.

The framework is constructed by nailing the wood blocks together, and the roof is quickly installed on top. A benefit of such homes is that they may be taken down and rebuilt somewhere in a couple of days.

House with exposed bricks

Exposed bricks are popular among families and are often used while building homes. In an exposed brick design, the bricks are left unpainted or unplaster and are left visible. Check out the modest, pleasant house below that has exposed brick on the exterior. The benefit is that you may save money on materials and labour costs by using these bricks because they never go out of style. A single level home with such a low cost can be built rapidly, allowing you to move in sooner.

Attached single floor design

(Photo from iStock)

Consider a scenario in which you currently own a multi-story home and wish to construct a more compact, low-cost single-story home to rent out or use as a guesthouse. You can use one of your existing walls as a foundation for the smaller house. Money will be saved greatly as a result. Simply expand the three walls and add roofing is all that is required. If you need to build a whole home but are on a very tight budget, give this a try.

Simple single floor design

A straightforward, low-cost single-story home design is a fantastic option. Easy access is guaranteed by the unusual single-floor dwelling design. Additionally, it allows for a tonne of outside space, as seen in the picture above. The external colours of the Indian single-story home are a timeless combination of white, brown, and a dash of orange.

Reference:

magic bricks
Making your home fireproof is important, searching for some effective tips?, your wait is over click on the link below:
Tips to make your home fireproof


List of important tools for an architect

A career like architecture cannot be fulfilled inside the confines of a single room. Due to the fact that an architect must make timely site visits in order to accomplish the assignment in the required manner, this imaginative and fascinating industry is much more than that. In this extremely creative field, going beyond books and drawings is a crucial step. A designer cannot enter the premises unarmed. To examine the ongoing site work, one needs to carry a variety of tools.

Laser distance measurer

This instrument is essential for ongoing indoor and outdoor measurements as well as for recording finished work. Because of its stylish and durable design, it is very simple to carry in a pocket. The battery has a long lifespan and speeds up work. Area and volume calculations may be completed quickly thanks to the ability to alter measuring units as needed.

Sketch book

(Photo from iStock)

The ideal tool for providing clear and understandable site information for workers. It consists of premium sheets inside that are suitable for a variety of media.

It is Impressive and top-notch quality complements artists with enthusiasm. The lightweight and weatherproof, making it a sturdy product.

Pencil is a basic architect tool

The ideal tool for professionals who need to create artwork right away. These extra-fine pencils enable seamless shading and doodling without any restrictions, adding dimension to the work.

Used perfectly for hatching, detailing, and many mixed techniques works in addition to sketching. These pencils have an ergonomic grip that is comfortable for lengthy working hours.

Messenger bag

(Photo from iStock)

Perfect for transporting numerous portable tools needed on-site, like drafting pencils, notepads, sketchbooks, measuring tapes, small cameras, etc.

A smaller pocket for stationery, a secure pocket for a camera, a square or rectangular pocket for A4 or A3 notepads, etc., are just a few of the many items it may carry.

Both strong and water-resistant, this bag. Above all, this bag has a beautiful appearance. It exudes an architect’s grace and elegance.

Camera

The greatest tool for taking images from the site in a manner that is professional and aids in maintaining the record.

This camera has good photo quality and a respectable battery life. Most efficient and svelte in size, and readily transportable. Additionally, it boasts an easy-to-use UI and takes excellent photographs even in dim lighting.

Measuring tape is important architect tool

(Photo from iStock)

For measurements at small scales, fairly accurate. The tape does not budge up to 5 to 6 feet without support, allowing for quiet work alone.

The design of this high-quality tape is strong and long-lasting. Recoil is incredibly convenient to use and works like magic.

Coloured pencils

With this tool, you can quickly distinguish between distinct aspects when sketching and give your work more vitality. Sharp, distinct strokes are produced by these pens. These colours are all sufficiently pigmented to result in precise work.

Value for money and works best on smooth, textured paper.

An i-pad

When it comes to instantly providing the client with references, technology can never be incorrect. It has a strong, elegant design with a flawless display screen.

The split-screen capability is excellent and expedites work. A superb battery life, flawless touch functionality, and sophisticated security are all crucial for an architect’s work.

Calculator is significant architect tool

(Photo from iStock)

Time saver for addition and subtraction calculations performed on-site with clients and laborers. It has body with curved sides and a beautiful display that is sleek and fashionable.

It has a robust product with buttons printed with wear-resistant ink. That is portable and lightweight, with excellent battery life.

Square graph notebook

The best approach to produce sketches quickly and on a large scale. With its time-saving quality binding feature, it is simple to use. Both high-quality and low-quality pencil strokes adhere perfectly to all types of paper. Since it is acid- and chlorine-free, the product is both budget- and environment-friendly.

Compass as an architect tool

(Photo from iStock)

A pair of compasses or a compass is a technical drafting instrument used by architects to engrave arcs and circles. On occasion, they might use a compass to create lines on a map that represent distances. A compass helps architects create drawings and blueprints with a high degree of accuracy.

Cutting board

Architects prepare the different parts they need for 3D model creation using cutting boards and cutting mats. These mats are useful for a variety of cutting tasks, including paper, cardboard, foil, and even thin plastic. If you’re about to make a cutting board purchase, think about opting for a self-healing mat instead because it might last longer. Prepare a variety of cutting boards in different sizes so you may use them to work on both small- and large-scale models.

Desk lamp

You can appropriately illuminate your work area with a desk lamp. When looking for one, think about selecting a lamp with a movable arm that you can fasten to your desk. When working on substantial undertakings, a lamp of this kind enables you to alter the light’s direction. You can select a warm or cool light bulb depending on your preferences or the requirements of a project.

Drafting tape is necessary as a architect tool

You can use drafting tape as an architect to attach model components to the cutting board. When you are adding information to your projects, it also enables you to block entire sections of them. You can use drafting tape when painting to keep the paper in place even while you’re using big paintbrushes or other tools to add texture or shadows.

Scale ruler

(Photo from iStock)

Using a scale ruler, architects can measure their work and transfer measurements at a specific length ratio. A scale ruler typically has two to six or eight sides, with each side denoting a different scale. It can be used to measure a wall’s length and establish how long it actually is. For instance, a wall that appears to be 10 cm long on a 1:20 project is actually two meters long. You may automatically transfer the measurement using a scale ruler rather of making the calculations in your brain.

Reference:

indeed
Making your home fireproof is important, searching for some effective tips?, your wait is over click on the link below:
Tips to make your home fireproof


Benefits of a storm door

A storm door could be the ideal addition to your doorway if your home’s comfort and safety are among your top considerations. However, what exactly is a storm door and how can it help you and your family? Learn more about what a storm door does and the advantages of having one installed in your home before deciding which model is best for you.

What is a storm door?

(Photo from iStock)

What is a storm door, then? Most of us are certainly familiar with the fundamental concept: It adds an additional layer of security to your existing entry door. But it goes far deeper than that.

You can also inquire, “What is the function of a storm door?” Well, there are multiple goals. These are frequently built to provide a home with lighter and ventilation in addition to providing an additional layer of protection. They shield your pets from the elements and pests while also keeping them inside. These, however commonly confused with screen doors, have a glass panel and a set of latching or locking handles for added security.

Why do you need a storm door?

For families, storm doors may be used to listen to and monitor youngsters playing outdoors, which is impossible with a solid entry door. Your goal can be to boost ventilation and light levels while making a barrier against pests if you prefer being outside and in the sun.

Because they can aid in insulating against air leaks, storm doors typically have an energy-saving focus from a purely financial perspective. Additionally, they make a pocket of air that retains heat or cold between them and your front entrance, successfully preventing unfavourable temperatures from entering your house.

You probably also want to know some of the specific advantages of installing this door. In addition to the question of what a it is used for. The top benefit is improving the energy efficiency of your outer door, but many advantages are directly related to the function of storm doors.

Protects against elements

The prevention of damage to your front door from snow, ice, and rain is one of the key advantages of them. In the event of floods, storm doors can also prevent water damage inside your home.

Keeping bugs out

These are an excellent alternative if you want the sensation of an open door. Without letting in insects or mosquitoes. Without having to worry about undesirable animals, you can leave your front door open and let cool air through.

Extra security with a storm door

  (Photo from iStock)

Consider  them as an added layer of security against intruders. To make it more difficult for burglars to enter, each storm door has its own lock-set and glass.

Energy efficiency

Your home’s heating and cooling systems don’t have to work as hard to maintain the desired temperature. When the seals around your property are properly installed. These keeps your house energy-efficient. Helping you to reduce your long-term electricity costs. Consider this door as an added layer of security against intruders. To make it more difficult for burglars to enter, each has its own lock-set and glass.

Reduces noise

These form a barrier that lessens the amount of noise entering your home, including traffic, trash collection, and even construction, because they are made up of three solid layers.

Natural light pathway

Your hallway entrance can be instantly brightened by installing a storm door. Your children and animals are free to roam and enjoy the sunshine. Without having to worry about them running out the door.

Extra insulation with storm door

The materials used in doors deteriorate over time and start to let air through. Air is prevented from leaving. Or entering the house by the barrier created by storm doors. By shielding it from the harshness of the sun or the cold, they also increase the lifespan of your front door.

Adds beauty

These may give your room a little more character. Because they are available in a variety of styles and colours. For a distinctive and contemporary look, think about painting your storm door the same shade as your front door.

Better ventilation with storm door

The ones, which have retractable screen panels, are a great way to increase airflow. This may be the ideal answer for increasing the amount of airflow in a home with few windows.

Adds to the value

Their installation is one of the cheapest home improvement tasks that has numerous advantages for homeowners. It not only adds protection to your entrance but also increases curb appeal. These can occasionally come to mind as being plain or uninviting. They can, however, be so much more than that.

You can buy a door with a full view if you require a storm door that lets your front entrance shine. You can alter the door’s colour to make your entrance stand out. Or match the hues to the exterior of your house for a sleek, high-end appearance.

Saves money

(Photo from iStock)

When it comes to energy savings, a storm door produces multiple advantages. It makes an insulating pocket that shields the warm air inside your house where it belongs from the cold air that enters throughout the winter. These greatly cut down on energy loss! Enjoy the benefits of energy efficiency that come with installing a storm door. Your heater and air conditioner will work less hard and last longer if your home is properly sealed.

Keeps home comfortable

One of the main areas where air enters homes is through entry doors. Without a storm door, the chilly winter air that sneaks into your house. Might create an unfavourable indoor climate. Installing a new storm door can be the best remedy for a draughty entrance. They provide the continuous warm comfort you want in your house and work fantastically on side doors, back doors, and front doors.

Reference:

Thompson Creek
Making your home fireproof is important, searching for some effective tips?, your wait is over click on the link below:
Tips to make your home fireproof


Ideas of garage storage systems

What are the finest garage storage solutions to keep this most challenging of home areas organized when garages become catchalls for anything from garden supplies to seasonal decorations?

We spoke with professionals to find the best garage organization advice that will help you make the most of every square inch of the garage in order to resolve this conundrum and others. This involves thinking vertically and installing hooks to hang equipment from walls or figuring out how to fit ingenious items, like storage benches, that serve as organizational elements and reduce dust accumulation.

Make the most of your garage with the help of these suggestions for garage storage. Create a room for all of your household tools and materials using the shelving unit as a blank canvas. Or learn how to turn the bare floor of your garage into a chic showcase by finding space for all of your bicycle storage, motorcycles, and electric car accessories. The greatest garage storage solutions (including product recommendations) are included below, along with some organizing tips to help you get started on your garage makeover.

A tool racks in garage

(Photo from istock)

You don’t want to experience what was depicted in those old comedy sketches where characters stepped on rakes and hit themselves in the head. Get those tools off the ground with a garden storage rack by copying this design. To avoid digging into sharp tool drawers, you can also find smaller versions of screwdrivers, hammers, and chisels.

Using pegboard

One of the most adaptable garage storage options available is a pegboard. Which is ideal for the variety of items we need to keep in our garages. Use a hook-equipped one to hang your best paintbrushes, rollers, and cleaning supplies, and add pegs to hang brooms or garden tools. Small shelves can also be added to them with ease.

Multitask shelf brackets

(Photo from istock)

Choose hooked shelf brackets that can handle some of your more uncomfortable necessities to make the most of a set of shelves. The brackets can be used to hang hoses and power equipment. You can even thread garden tools through to support them at either end.

Fitted cabinets of garage

Consider making your garage more like your kitchen if you use it frequently. You will need cabinets for storage, counters, and, of course. A washbasin for washing your hands, used paintbrushes, and tools in order to set up an effective garage storage system. A professional garage storage firm will be able to do this for you if you have the money.

Strong racking shelves

(Photo from istock)

One of the most well-liked garage storage solutions is racking since it is versatile, durable, and reasonably priced. Racks can be installed on the whole rear wall of a single garage for a reasonable price. Small drawer units, toolboxes, and storage bins can then be added for a flexible and affordable solution to all your storage needs.

Overhead storage to save space

It may seem as though there isn’t much room for anything else because your automobile dominates the garage and cupboards occupy what little space is available. But folks, look up and reconsider. Another place to store items is on overhead racks that hang from the ceiling. Just watch out that they don’t block your up-and-over door.

To avoid the dangers of lifting anything large over your head or up a ladder, they are better suited to lightweight things. Additionally, you may use them to hold up longer objects that shouldn’t be placed on the ground, such wood planks, skis, or boat oars.

Horizontal yard storage

It’s important to keep your garage’s floor clear of anything so you don’t trip or run over anything when you drive your car in. The answer? To make the most of the available space and keep necessities out of the way, choose specialized horizontal garden tool racks.

Locking your tools in your garage

Whether you’re a skilled mechanic or just enjoy tinkering on the weekends. It’s important to keep your tools secure and organized. Choose storage solutions that meet this requirement because the greatest storage always combines shelves and drawers. Another helpful suggestion is to purchase anything lockable for security, just in case there are break-ins.

Motorized shelves

(Photo from istock)

Utilizing every square inch of space in your garage storage ideas is always worthwhile. But there are times when it seems impractical. Or, you have to take the danger of carrying a large package while climbing ladders, neither of which are safe or ideal. Undoubtedly, a motorized shelf might fix the issue. Simply place your boxes on the shelves, and the superior motor will elevate them for you using a remote control. So simple.

Custom built storage for garage

Supporting regional artisans is always a good idea. And a custom tool storage container will give you a special storage solution that will last for years. Here are some ideas to get you started. Though you should choose a method that works for you. This clever cordless drill organizer features compartments. Specifically designed for screws, drills, chargers, and batteries. That’s a lot of ingenuity, to be sure.

Neat cabinets

(Photo from istock)

Like inside your home, it’s important to have cabinets in your garage storage options. So you can close the doors on your belongings for a cleaner appearance. Items can be placed within closed boxes. Or left free on shelves inside. Look for features like adjustable feet so the cabinets may be leveled on an uneven floor when adding cabinets to the garage.

Make time to do the job

Even though it might seem obvious, occasionally people get so eager to start a DIY  storage project at home. That they do so without a strategy or adequate time set aside in their day (or days). Don’t start organizing your garage at 10 p.m. unless you have the coffee ready and no early alarm the next morning because it can take a long time.

As a best practice, allocate a weekend, a full day. Or at least five to six hours to allow for cleaning, organization, minor repairs, and trips to the hardware store.

Reference:

Pods
Making your home fireproof is important, searching for some effective tips?, your wait is over click on the link below:
Tips to make your home fireproof


Step by step guide to bungalow house planning

Designing your dream bungalow house is an exciting journey that requires careful planning and consideration. Bungalows are known for their single-story layout, functional design, and charming aesthetics. Whether you’re building a new bungalow or renovating an existing one, this step-by-step guide will walk you through the process of bungalow house planning. Hence, helping you create a space that reflects your vision, needs, and lifestyle.

Further, planning and designing a bungalow house is an exciting journey that involves turning your dreams into reality. Moreover, bungalows are known for their single-story design, offering convenience, accessibility, and a sense of charm. Whether you’re building a new bungalow or renovating an existing one, this step-by-step guide will help you navigate through the intricate process of bungalow house planning.

Step 1: Define Your Vision and Goals

(Photo from istock)


Before you start the planning process, it’s important to have a clear vision of what you want to achieve with your bungalow. Moreover, consider factors such as:

  • Aesthetic Preferences:

Determine the architectural style, interior design, and overall theme you want for your bungalow.

  • Functionality:

Identify how many bedrooms, bathrooms, living spaces, and other rooms you need. Hence, think about your lifestyle and how you want to use the space.

  • Outdoor Space:

Consider whether you want a garden, patio, or other outdoor features and how they’ll integrate with the design.

  • Budget:

Establish a realistic budget for your project. This will guide your decisions throughout the planning process.

Step 2: Research and Gather Ideas

Explore various sources of inspiration to gather ideas for your bungalow design:

  • Architectural Magazines and Websites:

Look for bungalow designs that resonate with your preferences.

  • Visit Model Bungalows:

Attend open houses or visit model bungalows to get a sense of different layouts and features.

  • Online Platforms:

Utilize online platforms like Pinterest and Houzz to collect images and ideas that inspire you.

Step 3: Choose a Design Professional

(Photo from istock)

Depending on your skills and the complexity of your project, you may need to hire an architect, designer, or both. Further, professionals can provide valuable insights, create detailed plans. And ensure that your vision aligns with structural and regulatory requirements.

Step 4: Site Selection and Assessment

If you’re building a new bungalow, the site selection is crucial. Factors to consider include:

  • Location:

Choose a location that suits your lifestyle, offers convenience, and aligns with your aesthetic preferences.

  • Topography:

Understand the land’s slope, soil quality, and drainage patterns to make informed design decisions.

  • Orientation:

Optimize your bungalow’s orientation for natural light, ventilation, and energy efficiency.

Step 5: Preliminary Design and Layout

Work with your chosen design professional to create a preliminary design and layout for your bungalow.  Hence, this stage involves:

(Photo from istock)

  • Floor Plan:

Develop a floor plan that includes room layouts, sizes, and spatial relationships.

  • Exterior Design:

Determine the bungalow’s facade, roof style, windows, doors, and other exterior elements.

  • Interior Spaces:

Define the flow between rooms, considering factors like privacy, circulation, and functionality.

Step 6: Detailed Design and Specifications

As you move forward, the design will become more detailed:

  • Materials and Finishes:

Choose materials for flooring, walls, countertops, and other surfaces. Further, consider both aesthetics and durability.

  • Color Palette:

Decide on a color scheme that reflects your design preferences and creates a cohesive look.

  • Fixtures and Fittings:

Select fixtures such as lighting, plumbing fixtures, and hardware that complement your design.

Step 7: Structural and Engineering Considerations

Ensure that your bungalow’s design adheres to structural and engineering requirements:

  • Foundation:

Choose the appropriate foundation type based on the soil conditions and structural needs.

  • Roof Structure:

Determine the roofing material and style that align with your design and provide adequate protection.

  • Utilities and Systems:

Plan for electrical, plumbing, heating, and cooling systems in accordance with local codes.

Step 8: Obtain Necessary Approvals

Before construction begins, you’ll need to obtain the necessary permits and approvals from local authorities. Moreover, this includes zoning, building permits, and any other regulatory requirements.

Step 9: Contractor Selection and Construction

  (Photo from istock)

Select a reputable contractor to bring your bungalow design to life:

  • Contractor Bids:

Moreover, obtain bids from multiple contractors, considering their experience, track record, and pricing.

  • Construction Oversight:

Throughout the construction process, maintain regular communication with your contractor and monitor progress.

Step 10: Interior Design and Furnishing

The interior design phase involves:

  • Furniture and Decor:

Select furniture, decor, and accessories that complement your design style and enhance the functionality of each room.

  • Lighting:

Plan for ambient, task, and accent lighting to create the desired ambiance and functionality.

  • Personalization:

Incorporate personal touches that make the space uniquely yours. Such as family photos or artwork.

Step 11: Landscaping and Outdoor Spaces

Complete your bungalow’s look by designing the outdoor areas:

  • Landscaping:

Create a landscaping plan that includes plants, pathways, and outdoor features that complement your bungalow’s style.

  • Outdoor Living:

Design outdoor living spaces like patios, decks, or porches that seamlessly connect with the interior.

Step 12: Final Inspections and Finishing Touches

Further, before moving in, conduct final inspections to ensure everything meets quality and safety standards:

Quality Control:

Review the construction and finishing work to ensure it aligns with the design and specifications.

Punch List:

Create a punch list of any minor adjustments. Or finishing touches that need to be addressed.

Conclusion

  (Photo from istock)

Designing a bungalow house is a rewarding endeavor that involves careful planning, creativity, and attention to detail. By following this step-by-step guide, you can navigate the complexities of bungalow house planning, from defining your vision to finalizing the finishing touches. Hence, remember that each step contributes to the overall success of your project, resulting in a bungalow that not only meets your needs but also reflects your unique style and personality.

Remember that the planning phase sets the foundation for a successful project, so invest time and effort in getting it right. Hence, with proper planning and execution, your bungalow house can become a haven of comfort and style for years to come.

Reference:

Nobroker

Searching for tips to recycle the construction waste, what are you waiting for, click on the link below:

How to recycle and reuse construction waste


How to stay in the market this pandemic

The outbreak of the COVID-19 pandemic in late 2019 sent shock-waves through the global economy, leading to unprecedented disruptions in various industries. As businesses faced lockdowns, supply chain interruptions, and shifts in consumer behavior, staying afloat in the market became a challenge of immense proportions. However, many companies managed to weather the storm and even thrive amid adversity. This article delves into essential strategies that businesses can adopt to stay in the market during a pandemic or any crisis.

The COVID-19 pandemic brought about unprecedented challenges for businesses worldwide, forcing them to adapt rapidly to an ever-changing landscape. Staying afloat during such times requires a combination of resilience, innovation, and strategic planning. In this article, we will delve into strategies that can help businesses not only survive but thrive in the midst of a pandemic.

Adaptation is a Key in pandemic

(Photo from istock)

The ability to adapt quickly is crucial during a pandemic. Businesses that survived and thrived did so by re-imagining their operations, services, and products to align with the new reality. This involved identifying emerging needs and shifting their focus to meet those demands. For example, restaurants that pivoted to offer takeout and delivery services managed to continue generating revenue. Retailers accelerated their online presence to cater to the growing demand for e-commerce.

Embrace Digital Transformation

The pandemic underscored the importance of technology in maintaining business continuity. Companies that already had robust digital infrastructure were better positioned to handle the transition to remote work and online operations. Investing in digital tools for communication, project management, and customer engagement helped streamline operations and maintain productivity. Moreover, businesses that embraced e-commerce, online marketing, and digital payment systems found new avenues for revenue generation.

Prioritize Employee Well-being in pandemic

(Photo from istock)

Employees are the backbone of any organization, and their well-being is crucial, especially during times of crisis. Implementing remote work arrangements, where possible, helped protect employees’ health while enabling them to continue contributing. Regular communication and check-ins helped alleviate feelings of isolation and maintained team cohesion. Flexible working hours, mental health support, and resources for managing remote work challenges also demonstrated a commitment to employee well-being.

Strengthen Supply Chain Resilience

The pandemic exposed vulnerabilities in global supply chains. Businesses heavily reliant on single suppliers or specific regions faced disruptions in sourcing essential materials. To stay in the market, companies should diversify their supplier base, explore local sourcing options, and establish contingency plans for supply chain interruptions. Building strategic stockpiles of critical inventory can provide a buffer against future disruptions.

Communication is Crucial in pandemic times

(Photo from istock)

Clear and transparent communication with stakeholders is paramount during a crisis. Businesses should keep customers informed about changes in operations, service availability, and safety measures. Social media, email updates, and the company website are effective channels for disseminating information. Honest communication fosters trust and loyalty among customers, employees, investors, and partners.

Financial Prudence

During a pandemic, financial stability is a top priority. Businesses should reassess their budgets, cut non-essential expenses, and explore opportunities for cost savings. Accessing government support programs, grants, and loans can provide much-needed financial relief. Additionally, evaluating pricing strategies and payment terms can help maintain cash flow while remaining sensitive to customers’ financial constraints.

Innovate and Diversify Revenue Streams

Relying on a single source of revenue can be risky during uncertain times. To stay resilient, businesses should explore new revenue streams and diversify their offerings. This could involve launching complementary products or services, entering new markets, or collaborating with other businesses for mutual benefit. Innovation not only drives growth but also positions the company as adaptable and forward-thinking.

Customer-Centric Approach

Prioritizing customer needs and preferences can set a business apart during a crisis. Gathering feedback and insights directly from customers helps tailor products and services to address their evolving requirements. Adapting policies, such as return and cancellation procedures, to accommodate changing circumstances demonstrates empathy and a commitment to customer satisfaction.

Scenario Planning

(Photo from istock)

Developing scenario-based strategies is a proactive way to stay prepared for various potential outcomes. By envisioning different scenarios – from a slow recovery to a rapid rebound – businesses can formulate strategies that are adaptable to any situation. This approach enables quicker decision-making and minimizes disruptions when unexpected developments occur.

Maintain a Long-Term Outlook

While navigating a pandemic requires immediate actions, businesses must also consider their long-term vision. Short-term decisions should align with the company’s overall goals and values. Investments in employee development, sustainable practices, and community engagement can contribute to long-term success and resilience.

Employee Well-Being amidst pandemic

(Photo from istock)

Your employees are the backbone of your business. Taking care of their well-being not only boosts morale but also enhances productivity.

  • Flexible Work Arrangements:

Offer flexible work hours or remote work options, where feasible. This helps employees balance work and personal responsibilities during uncertain times.

  • Health and Safety Measures:

Prioritize employee health and safety. Implement stringent hygiene protocols for those working on-site, and encourage remote work for roles that can be performed from home.

  • Emotional Support:

The pandemic has taken a toll on mental health. Provide resources such as counseling services or wellness programs to support your employees’ emotional well-being.

Conclusion

(Photo from istock)

Staying in the market during a pandemic demands resilience, adaptability, and a customer-centric mindset. Businesses that successfully weathered the storm leveraged digital transformation, prioritized employee well-being, and embraced innovation. Clear communication, prudent financial management, and supply chain resilience were also critical components of their strategies. By adopting these strategies and maintaining a long-term perspective, businesses can not only survive but also thrive in the face of adversity, ensuring a brighter future even in the darkest of times.

By embracing digital transformation, staying agile, prioritizing customers, managing finances wisely, adapting supply chains, and caring for employees, businesses can not only weather the storm but also emerge stronger and more prepared for future challenges. Remember, while these strategies may not eliminate all the difficulties posed by a pandemic, they can provide a solid foundation for staying in the market and thriving despite the odds.

Reference:

Forbes

Searching for tips to recycle the construction waste, what are you waiting for, click on the link below:

How to recycle and reuse construction waste


How to select the best construction materials

When embarking on a construction project, whether it’s a new home, a commercial building, or a renovation, selecting the right construction materials is paramount to the success and longevity of the structure. The materials chosen can impact everything from structural integrity and energy efficiency to aesthetics and overall cost. This guide aims to provide a comprehensive overview of the factors to consider when selecting the best construction materials for your project.

Understand the Project Requirements

Before delving into material selection, it’s crucial to have a deep understanding of the project’s requirements. Consider the purpose of the structure, its location, environmental factors, and the intended lifespan of the building. For instance, materials suitable for a residential home might differ from those used in a high-rise commercial building.

Evaluate Structural Performance

The structural integrity of any construction project is of utmost importance. The materials chosen must be capable of supporting the intended load and withstanding environmental pressures such as wind, earthquakes, and other potential hazards. It’s advisable to consult with structural engineers who can recommend materials that align with the project’s specifications.

Consider Durability and Longevity

Longevity is a key consideration when selecting construction materials. Durable materials can significantly reduce maintenance and repair costs over the lifespan of the building.

Evaluate Environmental Impact of construction

In an era of increasing environmental awareness, selecting eco-friendly construction materials is not only a responsible choice but can also contribute to cost savings over time.

Analyze Energy Efficiency

Energy-efficient materials can contribute to reduced utility bills and a smaller carbon footprint. Insulation materials, windows with proper glazing, and roofing materials with high reluctance can all play a role in optimizing energy efficiency. Look for materials with high R-values (thermal resistance) and low U-values (thermal transmittance) to ensure effective insulation.

Factor in Aesthetics and Design of construction

The visual appeal of a building often depends on the materials used. Different materials can give rise to varying architectural styles, from modern to traditional. Consider the desired aesthetics and how the chosen materials will contribute to achieving the desired design.

Assess Maintenance Requirements

Some materials require more maintenance than others to retain their appearance and functionality. Wood, for example, may need regular sealing or painting to prevent deterioration, while materials like steel might require anti-corrosion treatments. Assess the long-term maintenance requirements and associated costs before making a decision.

Budget Considerations

Construction budgets are a significant constraint for most projects. While it’s tempting to opt for the least expensive materials, it’s essential to find a balance between cost and quality. Cheaper materials may lead to higher maintenance and replacement costs in the long run. Obtain quotes from multiple suppliers and consider the total cost of ownership over the building’s life cycle.

Availability and Lead Times

The availability of construction materials can impact project timelines. Some unique or specialized materials might have longer lead times or be subject to delays due to manufacturing or shipping issues. It’s advisable to choose materials that are readily available to avoid project slowdowns.

Regulatory and Code Compliance

Building codes and regulations set forth by local authorities play a critical role in material selection. Different materials have varying fire resistance ratings, load-bearing capacities, and other factors that must align with legal requirements. Ensure that the chosen materials meet or exceed these regulations to avoid potential legal issues.

Consultation with Experts for construction

Collaborating with architects, engineers, and contractors is essential when selecting construction materials. These professionals bring their expertise to the table, helping you navigate the intricate decisions involved in material selection. Their insights can lead to informed choices that align with the project’s goals and requirements.

Material Options for construction

There is a wide array of construction materials available, each with its advantages and disadvantages. Here are some common materials used in construction:

1. Concrete

Concrete is a versatile material known for its strength and durability. It’s used in foundations, walls, and floors. There are various types of concrete mixes, each with specific properties suited for different applications.

2. Steel

Steel is prized for its high tensile strength and is commonly used in structural frameworks, beams, and columns. It’s also used in roofing, reinforcing bars, and other applications.

3. Wood

Wood is a traditional construction material valued for its aesthetic appeal. It’s commonly used in framing, flooring, and finishing elements. Different types of wood have varying degrees of strength and durability.

4. Brick and Masonry

Brick and masonry materials offer excellent durability and fire resistance. They’re often used in walls, facades, and architectural detailing.

5. Glass

It allows natural light to enter spaces and can contribute to energy efficiency when properly insulated.

6. Insulation Materials

Insulation materials like foam, fiberglass, and cellulose help regulate indoor temperature and improve energy efficiency.

7. Metals

Aside from steel, other metals like aluminum, copper, and titanium find use in roofing, cladding, and decorative elements due to their corrosion resistance and aesthetic qualities.

8. Composites

Composite materials, such as fiber-reinforced polymers (FRP), offer high strength-to-weight ratios and are used in applications where traditional materials might fall short.

9. Sustainable and Recycled Materials

Materials like bamboo, reclaimed wood, recycled steel, and recycled glass are gaining popularity due to their Eco-friendliness and unique aesthetic appeal.

Conclusion

Selecting the best construction materials for a project involves a careful consideration of numerous factors, ranging from structural performance and durability to aesthetics and budget. By understanding the project requirements, consulting with experts.

And thoroughly evaluating available materials, you can make informed decisions that lead to a successful and enduring construction endeavor. Remember, each material choice contributes not only to the physical attributes of the building but also to its environmental impact and long-term sustainability.

Reference:

Buildbinder

Searching for tips to recycle the construction waste, what are you waiting for, click on the link below:

How to recycle and reuse construction waste


How to select a sustainable roof system

In an era where environmental concerns are at the forefront of decision-making, the choice of a roof system holds significant weight in determining the sustainability of a building. A sustainable roof system not only reduces a building’s environmental impact but also enhances energy efficiency, indoor comfort, and overall longevity. This article aims to provide a comprehensive guide to selecting a sustainable roof system, covering essential considerations, available options, and the benefits of making an environmentally conscious choice.

Understanding Sustainable Roofing

Sustainable roofing goes beyond traditional considerations of aesthetics and functionality. Moreover, it encompasses a holistic approach that considers the entire lifecycle of the roof, from material sourcing and production to installation, maintenance, and eventual disposal. Key aspects of sustainable roofing include:

(Photo from istock)

  1. Energy Efficiency: A sustainable roof should have high thermal resistance (R-value) to minimize heat transfer between the interior and exterior, reducing the need for excessive heating and cooling.
  2. Durability and Longevity: Long-lasting roof systems minimize the need for frequent replacements, reducing resource consumption and waste generation over time.
  3. Material Selection: Sustainable roofing materials are often recycled, recyclable, or made from renewable resources. The use of locally sourced materials further reduces the environmental footprint.
  4. Reflectivity and Cool Roofs: Cool roofs with high solar reactance and thermal remittance reduce the urban heat island effect and lower cooling energy demand.
  5. Water Management: Proper drainage systems and rainwater harvesting features help manage water runoff effectively.
  6. Adaptability: A sustainable roof should be adaptable to future changes, such as the installation of solar panels or green roofing systems.

Factors to Consider When Selecting a Sustainable Roof System:

  1. Climate and Location: The local climate greatly influences the choice of roof system. For example, cool roofs are more beneficial in hot climates, while sloped roofs might be more appropriate for regions with heavy rainfall.
  2. Roof Slope and Design: Different roof slopes and designs require specific roofing materials. Some sustainable options are better suited for flat roofs, while others work best on steep slopes.
  3. Roofing Materials: Consider eco-friendly materials like metal, clay or concrete tiles, sustainable wood, recycled shingles, and synthetic membranes. Research the environmental impact of the chosen materials and their potential for recycling.
  4. Insulation: Adequate insulation improves energy efficiency and thermal comfort. Choose insulation materials with high R-values and minimal environmental impact.
  5. Cool Roof Options: Reflective and emissive materials can help reduce energy consumption by reflecting sunlight and heat away from the building.
  6. Green Roofing: In some cases, installing a living green roof with vegetation can provide natural insulation, reduce storm-water runoff, and contribute to local biodiversity.
  7. Solar Compatibility: If solar panels are a future consideration, ensure that the roof structure can support the additional weight and that the roofing material won’t hinder installation.
  8. Life Cycle Cost Analysis: Evaluate the long-term costs of the chosen roof system, factoring in installation, maintenance, energy savings, and potential replacements.
  9. Local Regulations and Incentives: Research local building codes, regulations, and potential incentives for installing sustainable roofing systems.
  • Installer Experience

Choose reputable contractors experienced in installing the chosen sustainable roof system to ensure proper installation and performance.

Types of Sustainable Roofing Systems:

  1. Metal Roofing: Metal roofs are durable, lightweight, and recyclable. They reflect sunlight, reducing heat absorption and cooling loads. Copper, aluminum, and steel are popular choices.
  2. Clay and Concrete Tiles: These tiles are made from natural materials, are long-lasting, and provide good thermal insulation. They are particularly suitable for warm climates.
  3. Slate Roofing: Slate is a natural stone that offers longevity and fire resistance. It’s durable and can be recycled, but it may have a higher upfront cost.
  4. Recycled Shingles: Made from materials like rubber, wood fiber, and plastic, recycled shingles are eco-friendly. And offer versatility in terms of style and color.
  5. Sustainable Wood Shingles and Shakes: Choose certified sustainably harvested wood to ensure responsible sourcing. Cedar and redwood are commonly used for their durability and natural appearance.
  6. Single-Ply Membranes: These synthetic materials, such as TPO (thermoplastic ole-fin) and PVC (polyvinyl chloride), are lightweight, reflective, and recyclable.
  7. Green Roofs: These living roofs are covered in vegetation, providing natural insulation, storm-water management, and improved air quality.
  8. Cool Roofs: Typically made from reflective materials, cool roofs reduce heat absorption, lower cooling costs, and extend the life of the roof.

Benefits of Selecting a Sustainable Roof System:

(Photo from istock)

  1. Energy Savings: A well-insulated and reflective roof can significantly reduce heating and cooling energy consumption, leading to lower utility bills.
  2. Environmental Impact: Sustainable roof systems minimize resource depletion. Waste generation, and carbon emissions associated with traditional roofing.
  3. Improved Indoor Comfort: Proper insulation and reduced heat transfer contribute to more consistent indoor temperatures. And enhanced occupant comfort.
  4. Longevity: Durable and high-quality sustainable roof systems have longer lifespans. Reducing the need for frequent replacements.
  5. Reduced Urban Heat Island Effect: Cool roofs reflect sunlight and heat away from buildings. Helping to mitigate the urban heat island effect and create more comfortable outdoor spaces.
  6. Local Biodiversity: Green roofs support local biodiversity by providing habitat for plants and insects, enhancing urban ecosystems.
  7. Property Value: Sustainable features, including roofing systems, can increase the resale value and marketability of a building.
  8. Regulatory Compliance: Choosing sustainable roofing materials can help meet or exceed building codes and regulations focused on energy efficiency and environmental impact.

Conclusion:

Selecting a sustainable roof system is a crucial decision that goes beyond mere aesthetics. Hence, it has a direct impact on a building’s energy efficiency, environmental footprint, and overall performance.

By considering factors such as climate, roofing materials, design, and long-term costs, building owners. And professionals can make informed choices that contribute to a more sustainable built environment. As the world continues to prioritize sustainable practices, opting for environmentally friendly roofing solutions is not only a responsible choice but also an investment in a greener and more resilient future.

Reference:

American Way Exteriors

Searching for tips to recycle the construction waste, what are you waiting for, click on the link below:

How to recycle and reuse construction waste


How to achieve air tightness in buildings

In an era where environmental concerns and energy efficiency are paramount, achieving air tightness in buildings has emerged as a crucial goal for architects, engineers, and builders. Air tightness not only contributes to energy savings but also enhances indoor comfort, indoor air quality, and overall building durability. This article delves into the importance of air tightness, the benefits it offers, and practical strategies for achieving it in both residential and commercial buildings.

Understanding Air tightness:

Air tightness, in the context of building construction, refers to the resistance of a building envelope to the infiltration of outdoor air and the infiltration of indoor air. It is the ability of a building to minimize uncontrolled air leakage through gaps, cracks, and openings in its structure. While some level of controlled ventilation is essential for maintaining indoor air quality, uncontrolled air leakage can lead to energy wastage, discomfort, and even moisture-related issues.

The Significance of Air tightness:

(Photo from istock)

Air tightness plays a pivotal role in the overall energy efficiency of a building. When a building envelope is not airtight, uncontrolled air infiltration and infiltration occur, leading to various issues. During cold seasons, uncontrolled air leakage can result in heat loss, causing higher energy consumption for heating systems to maintain desired indoor temperatures. Conversely, during hot seasons, unwanted air infiltration can lead to increased cooling loads, driving up energy consumption for air conditioning.

Furthermore, air tightness is closely linked to indoor air quality. Uncontrolled air infiltration can introduce outdoor pollutants, allergens, and moisture into indoor spaces, degrading indoor air quality and potentially causing health problems for occupants. By achieving air tightness, building owners can ensure better control over the indoor environment, allowing for proper ventilation and air purification systems to effectively operate.

Benefits of Air tightness:

  • Energy Efficiency

Airtight buildings significantly reduce the amount of heated or cooled air that escapes from the interior, thereby reducing the need for constant heating or cooling. This results in lower energy consumption and utility bills.

  • Indoor Comfort

Air tightness prevents drafts, cold spots, and temperature fluctuations, providing a more comfortable indoor environment. It also helps in maintaining consistent humidity levels, contributing to better occupant comfort.

  • Improved Indoor Air Quality

Air tightness allows for better control of indoor air quality. With controlled ventilation systems, fresh air can be introduced in a controlled manner, preventing the infiltration of pollutants, allergens, and outdoor contaminants.

  • Durability

Uncontrolled air leakage can lead to moisture accumulation within walls, which can cause mold growth, wood rot, and structural damage. Air tightness helps maintain the integrity of the building envelope and promotes its longevity.

  • Noise Reduction

Airtight buildings also tend to be quieter, as they limit the transmission of outdoor noise into indoor spaces.

Strategies for Achieving Air-tightness:

(Photo from istock)

Achieving a high level of air tightness requires a combination of thoughtful design, proper materials, and meticulous construction practices. Here are some strategies to consider:

  1. Design Phase:

    • Continuous Insulation: Utilize continuous insulation to minimize thermal bridging and create a continuous barrier against air infiltration.
    • Simplified Building Shapes: Complex building shapes with numerous corners and angles are more prone to air leakage. Designing simpler building shapes can help minimize the potential for leaks.
    • Plan for Air Barriers: Incorporate a well-defined air barrier system into the building design. This involves identifying and detailing the locations of the air barrier, such as the building wrap, sheathing, and membranes.
    • Minimize Penetrations: Design the building to have fewer openings, penetrations, and gaps. Minimize the number of doors, windows, and joints that can potentially contribute to air leakage.
  2. Material Selection:

    • High-Quality Sealants and Adhesives: Choose high-quality sealants and adhesives to seal joints, gaps, and openings. These materials should be compatible with the building materials being used.
    • Airtight Membranes: Consider using airtight membranes or tapes to create continuous air barriers at critical junctions such as wall-to-roof connections and window installations.
    • Weather stripping: Select effective weather-stripping materials for doors and windows to prevent air infiltration around these openings.
  3. Construction Phase:

    • Skilled Workmanship: Air tightness requires meticulous attention to detail during construction. Ensure that the construction crew is trained to implement air tightness strategies properly.
    • Sealing and Taping: Apply sealants, tapes, and membranes according to manufacturer guidelines. Pay special attention to joints, corners, and transitions where air leakage is likely to occur.
    • Blower Door Testing: Conduct blower door tests during and after construction to quantify the air tightness level of the building. This helps identify areas that require additional sealing.
  4. Ventilation Strategies:

    • Controlled Ventilation Systems: Implement mechanical ventilation systems that provide controlled, filtered, and conditioned outdoor air to maintain indoor air quality while minimizing uncontrolled air leakage.
    • Heat Recovery Ventilation (HRV) and Energy Recovery Ventilation (ERV): These systems recover heat or energy from outgoing stale air and transfer it to incoming fresh air, further improving energy efficiency.

Common Air-tightness Challenges and Solutions:

(Photo from istock)


  • Windows and Doors: Properly install and weather strip windows and doors to prevent air infiltration around their frames. Consider using European-style windows with multiple gaskets and advanced locking mechanisms for better air tightness.
  • Electrical and Plumbing Penetrations: Seal gaps around electrical outlets, switches, and plumbing penetrations with appropriate sealants or foam to prevent air leakage.
  • Wall-to-Roof Transitions: Use airtight membranes, tapes, or flashing to create a continuous air barrier at the junction between walls and roofs.
  • Duct-work and Vents: Seal duct joints and connections meticulously. Avoid placing vents in exterior walls, as they can compromise air tightness.

Conclusion:

Achieving air tightness in buildings is a multifaceted endeavor that requires collaboration among architects, engineers, contractors, and building occupants. The benefits of air tightness, including energy efficiency, improved indoor comfort, and enhanced durability; make it an essential consideration in modern building design and construction.

By incorporating thoughtful design, appropriate materials, and meticulous construction practices, it is possible to create buildings that not only meet high standards of air tightness but also contribute to a sustainable and comfortable built environment.

Reference:

green building store

Searching for tips to recycle the construction waste, what are you waiting for, click on the link below:

How to recycle and reuse construction waste


How to build a modern farmhouse plan

The allure of a modern farmhouse plan lies in its perfect blend of classic charm and contemporary elegance. This architectural style marries the cozy, rustic appeal of traditional farmhouses with the sleek lines and modern amenities of today’s homes. If you’re captivated by the idea of creating a space that exudes warmth, character, and functionality, building a modern farmhouse might be the perfect project for you. In this guide, we’ll take you through the essential steps of bringing your modern farmhouse dream to life.

  • Here area few tips to make the plan for your modern farmhouse:

Define Your Vision

Before you break ground, it’s crucial to define your vision for the modern farmhouse. Determine the size of the home, the number of bedrooms and bathrooms, the layout of the living spaces, and any specific architectural features you desire. Are you drawn to a more traditional farmland exterior with a gable roof and a wrap-around porch? Or do you lean towards a minimalist farmland aesthetic with clean lines and a simpler facade? Establishing a clear vision will guide your decisions throughout the building process.

Choose the Right Location

The location of your modern farmhouse is pivotal. Consider factors such as the landscape, views, proximity to amenities, and the orientation of the sun. The surrounding environment can greatly influence the overall feel of your home. A picturesque countryside setting or a spacious suburban lot can provide the perfect backdrop for your modern farmland.

Collaborate with Architects and Designers

Creating a modern farmhouse requires a skilled team of architects and designers who understand the intricacies of this style. Collaborate with professionals who can bring your vision to life while ensuring that modern features are seamlessly integrated with traditional elements. They will work with you to design a layout that maximizes functionality and optimizes space utilization.

Focus on Open Floor Plans

(Photo from istock)

Modern farmhouses are known for their open, airy layouts that facilitate seamless movement between spaces. A spacious kitchen that flows into a dining area and living room is a hallmark of this design style. Embrace the concept of open floor plans to create a sense of connection and shared living within your home.

Incorporate Rustic Elements

The rustic charm of a modern farmhouse is often defined by its use of natural materials and textures. Exposed wooden beams, reclaimed wood accents, and stone elements can infuse a sense of authenticity into your home. Consider incorporating these materials in both the interior and exterior to capture the essence of a farmland.

Choose the Right Color Palette

(Photo from istock)

A neutral and warm color palette is quintessential to the modern farmhouse style. Whites, creams, soft grays, and earthy tones create a cozy and inviting atmosphere. These colors also provide a clean backdrop for the natural materials and textures to shine.

Iconic Farmhouse Exteriors

The exterior of your modern farmhouse should be a captivating representation of the style. Traditional gable roofs, board-and-batten siding, and front porches contribute to the iconic farmland look. Additionally, large windows and glass doors can bring in abundant natural light and provide a seamless connection to the outdoors.

Embrace Minimalism

While traditional farmhouses can be adorned with decorative details, modern farmlands often lean towards a more minimalist approach. Clean lines, simple silhouettes, and uncluttered spaces define the modern aspect of the design. Consider the mantra of “less is more” when choosing your interior decor and furnishings.

Incorporate Modern Amenities

Though the exterior and many design elements pay homage to the past, a modern farmland should offer the convenience and amenities of contemporary living. High-end appliances, energy-efficient systems, and smart home technology can be seamlessly integrated while maintaining the farmhouse’s charm.

Prioritize Natural Light

(Photo from istock)

Ample natural light is a key factor in creating an inviting and airy atmosphere. Optimize window placement to capture the surrounding views and infuse your interiors with sunlight. Consider large windows, sliding glass doors, and strategically positioned skylights.

Focus on Functionality

A modern farmhouse should not only be aesthetically pleasing but also highly functional. Well-designed storage solutions, built-in cabinetry, and multi-functional furniture can help keep your space organized and clutter-free, contributing to the overall comfort of your home.

Sustainable Design

Modern farmlands have the opportunity to embrace sustainable design practices. Incorporate energy-efficient appliances, solar panels, and materials with low environmental impact. Creating an eco-friendly home aligns with the farmland ethos of practicality and resourcefulness.

Landscaping and Outdoor Living

Extend the modern farmhouse experience outdoors by creating captivating landscaping and outdoor living areas. Patios, decks, and outdoor kitchens can become extensions of your living space, providing a place to relax, entertain, and enjoy the natural surroundings.

Attention to Details

The beauty of a modern farmhouse lies in its attention to detail. Consider elements like farmland sinks, vintage-inspired fixtures, and unique door hardware. These small touches can contribute significantly to the overall charm and character of your home.

Regular Maintenance

Building your modern farmhouse is just the beginning. Regular maintenance and upkeep are essential to preserve its beauty and functionality. Set up a routine for cleaning, repairs, and updates to ensure that your farmhouse continues to be a cherished haven for years to come.

In conclusion, building a modern farmhouse is an exciting journey that combines the best of both worlds – timeless charm and contemporary comforts. By defining your vision, collaborating with professionals, embracing rustic elements, and prioritizing functionality, you can create a home that captures the essence of the modern farmhouse style while catering to your unique needs and preferences. With careful planning and attention to detail, your dream modern farmland can become a reality, offering a haven of warmth, comfort, and style.

Reference

Houseplans

Searching for tips to recycle the construction waste, what are you waiting for, click on the link below:

How to recycle and reuse construction waste

How to create an ultimate indoor living space

Your living space is a reflection of your personality, a sanctuary where you retreat to relax, recharge, and entertain. Designing the ultimate indoor living space goes beyond mere decoration – it’s about creating an environment that encapsulates your lifestyle, preferences, and comfort. Whether you have a spacious loft or a cozy apartment, here’s a comprehensive guide to help you craft an indoor oasis that’s both functional and stylish.

In an increasingly fast-paced world, our indoor living spaces have become more than just a shelter from the elements. They are our sanctuaries, our places of solace and rejuvenation. Designing an ultimate indoor living space goes beyond mere aesthetics – it’s about crafting an environment that seamlessly blends comfort, functionality, and personal style. Whether you’re starting from scratch or looking to revamp your current space, here’s a comprehensive guide to help you create an indoor oasis that truly resonates with your lifestyle.

  • Some important tips for creating a living room space:

Define Your Style and Purpose

(Photo from istock)

Before diving into the design process, take some time to define your style and the purpose of the space. Are you drawn to minimalist aesthetics, rustic charm, or contemporary elegance? Understanding your style preferences will guide your decisions on furniture, color schemes, and decorative elements. Additionally, consider how you intend to use the space – will it primarily serve as a relaxation zone, an entertainment hub, or a home office?

Optimize Layout and Flow in living space

Efficient space utilization is key to creating a comfortable indoor living area. Start by assessing the layout of the room and arranging furniture in a way that encourages easy movement and interaction. Consider the placement of windows and natural light sources when arranging seating areas to maximize daylight exposure.

Choose Comfortable and Functional Furniture

Invest in high-quality, comfortable furniture that complements your style. Sofas and chairs with plush cushions and ergonomic support enhance the comfort of your living space. Multi-functional furniture, such as storage ottomans and sofa beds, are excellent choices for optimizing space in smaller areas. Don’t forget to consider the scale of the furniture – oversized pieces can overwhelm a small room, while too-small furniture might look out of place in a spacious area.

Set the Mood with Lighting at your living space

(Photo from istock)

Lighting can dramatically influence the ambiance of your indoor living space. A combination of ambient, task, and accent lighting creates a well-balanced atmosphere. Incorporate overhead fixtures, such as chandeliers or pendant lights, for ambient lighting. Task lighting, like adjustable desk lamps, is essential for reading, working, or other focused activities. To add a touch of elegance, use accent lighting to highlight artwork, plants, or architectural features.

Play with Colors and Textures

Colors and textures play a significant role in setting the tone of your living space. Choose a color palette that resonates with your style and evokes the desired mood. Soft, neutral tones create a serene atmosphere, while vibrant colors inject energy and personality. Incorporating textures through textiles, such as plush rugs, cozy throws, and decorative pillows, adds depth and visual interest to the space.

Integrate Nature Indoors

Bringing nature indoors through plants not only enhances the aesthetics but also contributes to a healthier environment. Incorporate a variety of houseplants that thrive indoors and align with your maintenance preferences. Larger plants can serve as statement pieces, while smaller ones can be placed on shelves, window sills, or hanging planters. The presence of greenery creates a sense of tranquility and freshness.

Personalize with Art and Decor

(Photo from istock)

Artwork and decorative elements offer a glimpse into your personality and interests. Select pieces that resonate with you, whether they’re paintings, sculptures, or photographs. Arrange them thoughtfully on walls and shelves to create a visually pleasing display. Personal mementos, travel souvenirs, and unique finds add a personal touch that makes the space uniquely yours.

Create Functional Zones in living space

If your indoor living space serves multiple purposes, consider creating distinct functional zones. For instance, if you’re working from home, designate a corner as your home office with a functional desk and ergonomic chair. A reading nook can be established with a comfortable armchair and a bookshelf. By delineating different areas, you maintain organization and optimize the space for various activities.

Invest in Smart Technology

Integrating smart technology can elevate your indoor living experience. Smart thermostats, lighting systems, and voice-controlled assistants offer convenience and efficiency. You can adjust the ambiance with a simple voice command or control the temperature remotely through a smartphone app. However, ensure that the technology seamlessly blends with your overall design aesthetic.

 Maintain Clutter-Free Spaces

An ultimate indoor living space exudes a sense of tranquility, which can be disrupted by clutter. Implement storage solutions that keep your belongings organized and out of sight. Built-in shelves, hidden storage compartments, and furniture with storage options help maintain a clean and clutter-free environment.

Embrace Technology

Incorporate technology that enhances your comfort and entertainment. Consider smart home systems that allow you to control lighting, temperature, and entertainment systems with ease. Just ensure that these devices don’t dominate the space visually.

Mindful Maintenance of your living space

(Photo from istock)

Creating the ultimate indoor living space is not just about the initial design; it’s about ensuring that the space remains inviting and functional. Choose materials that are easy to clean and maintain, and establish routines for regular cleaning and organization.

In conclusion, designing the ultimate indoor living space is a creative journey that requires a balance of comfort, functionality, and style. By defining your style, optimizing the layout, choosing furniture thoughtfully, and incorporating elements of nature, art, and technology, you can transform any space into a haven that reflects your personality and enhances your quality of life. Remember, the key is to create an environment that not only looks beautiful but also resonates with your soul and promotes your well-being.

Reference:

bartleby

Searching for tips to recycle the construction waste, what are you waiting for, click on the link below:

How to recycle and reuse construction waste


How to build a house from scratch

Building your own house offers numerous advantages, including the ability to customize every aspect of your living space. From the layout to the colors, flooring, and more, every decision is in your hands. Additionally, a new home comes with the latest technology and energy-efficient features. However, it is essential to be aware of the potential challenges and costs that come with building a house from scratch.

Site Preparation for a  house

(Photo from istock)

Before construction can begin, proper site preparation is crucial. This involves several key steps to ensure a solid foundation for your new home.

  • Clearing the Land

The first step in site preparation is clearing the land of any vegetation or debris. This process involves removing trees, shrubs, and other plants, as well as clearing away any rocks or large objects that could interfere with construction.

  • Land Surveying

Once the land is clear, it’s important to have a professional land surveyor stake out the lot based on the original plot drawings.

  • Altering Topography

In some cases, it may be necessary to alter the topography of the site to ensure proper water flow and drainage. This can involve grading the land or creating slopes to redirect water away from the house.

  • Temporary Utilities

Before construction begins, it is essential to arrange for temporary utilities such as electricity and plumbing. This ensures that the construction site has the necessary power and water supply during the building process.

 Pouring Concrete Footings and Foundations for a house

This provides a solid base for the structure and ensures stability and durability.

  • Excavation and Inspection

The excavation contractor will dig trenches for the footings, ensuring they are deep enough to prevent frost heave. After excavation, an inspection is conducted to verify the dimensions of the footing trenches.

  • Forming and Pouring Footings

The next step is to form and pour the footings. Footings are typically made of concrete and provide support for the foundation walls. The concrete is poured into the forms and left to cure for a few days.

  • Curing and Stripping Footings

After the footings have cured, the forms are stripped, and the foundation specialist can begin forming and pouring the foundation walls. It is crucial to wait for the footings to cure properly to ensure their structural integrity.

  • Forming and Pouring Foundations

The foundation walls are formed and poured using concrete or other materials such as cinder blocks or insulated concrete forms (ICFs). These walls provide structural support and act as a barrier against moisture.

  • Waterproofing and Drainage

Once the foundation walls are complete, it is important to waterproof them to prevent moisture infiltration. This can be done by applying a waterproofing membrane or a drainage mat. Additionally, a weeping tile system is installed to direct water away from the foundation.

Installing Plumbing and Electrical in house

(Photo from istock)

With the footings and foundations in place, it’s time to install the plumbing and electrical systems.

  • Rough-in Plumbing

Plumbers will lay out the pipes for the plumbing system, including water supply lines, drainage pipes, and any other necessary fixtures. It is essential to have these rough-in pipes properly positioned before pouring the concrete slab.

  • Electrical Installation

Electricians will install the electrical wiring, outlets, switches, and lighting fixtures throughout the house.

Pouring the Concrete Slab

(Photo from istock)

The concrete slab serves as the foundation for the main floor or basement of the house. Depending on the climate and construction timeline, this step may occur after the framing and roofing stages.

  • Preparing for Slab Pour

Before pouring the concrete slab, it is crucial to ensure that all necessary plumbing and electrical work is in place. This includes rough-in pipes and electrical wiring for bathrooms, main services, and in-floor radiant heating, if applicable.

  • Installing Gravel and Vapor Barrier

This helps with drainage and provides stability. A plastic vapor barrier is then installed above the footing to prevent moisture from seeping into the concrete.

  • Ordering and Pouring Concrete

The concrete is poured and spread evenly across the area, ensuring a minimum thickness of 4 inches. It is important to give the slab ample time to cure before proceeding with further construction.

Framing, Siding, and Roofing

(Photo from istock)

With the foundation in place, it’s time to start framing the house. This process involves constructing the basic structure, including the floors, walls, and roof.

  • Framing the House

The framing carpenters will arrive to put up the lumber framework for the floors, walls, and ceilings. This is when the house starts to take shape, and you can see the layout and dimensions of each room.

  • Installing Windows and Doors

Alternatively, a manufacturer’s crew may come in to complete this task.

  • Sheathing and Siding

This involves covering the framework with plywood or oriented strand board (OSB) to provide structural support and a base for the siding.

  • Roof Installation

With the sheathing complete, the roofers can start installing the roof. This includes applying roof flashing, underlayment, and the final roofing material, such as shingles or metal panels. A properly installed roof is essential for protecting the house from the elements.

Interior Work

With the exterior structure complete, it’s time to focus on the interior of the house. This stage involves various tradespeople working together to bring your vision to life.

Masonry Work

If your home design includes a chimney, this is the stage where masons will build it. This typically involves applying brick or stone veneer over a concrete block base.

Rough-in of Electrical, Plumbing, and HVAC

Electricians and plumbers return to the site to complete the rough-in work for electrical circuits, plumbing pipes, and HVAC system duct-work. This work is easier to accomplish before the walls, flooring, and ceiling surfaces are in place.

  • Insulation Installation

This helps regulate temperature and improve energy efficiency.

  • Hanging Drywall and Trim

With insulation in place, drywall can be hung throughout the house. The seams are taped, muddied with joint compound, and finish sanded.

  • Finishing Touches

As the interior takes shape, it’s time to add the finishing touches that will make your house feel like a home. This stage involves finalizing various installations and adding aesthetic elements.

  • Painting Walls and Ceilings

With the drywall and trim in place, the painters can start painting the walls and ceilings. This is a task that homeowners can tackle themselves to save money, but it can be time-consuming for larger areas.

  • Installing Countertops and Cabinets

Specialty contractors will install countertops and cabinets in the kitchen, bathrooms, and other areas. These fixtures provide storage and functionality while enhancing the overall design of the space.

  • Finalizing Electrical and Plumbing Fixtures

Electricians and plumbers return to complete the final connections of electrical fixtures (such as light fixtures and outlets) and plumbing fixtures (such as sinks, toilets, and showers). It is crucial to ensure that all connections comply with local building codes.

  • Installing Flooring

The final step in the interior work is to install the flooring. There is various options available, including carpeting, hardwood, laminate, tile, luxury vinyl plank, and engineered wood.

Exterior Landscaping

With the interior nearing completion, it’s time to turn your attention to the exterior landscaping. Evidently, this stage involves designing and implementing the landscape around your new home.

  • Designing the Landscape

(Photo from istock)

Before starting any landscaping work, it is essential to have a clear plan in place. This includes deciding on the layout, selecting plants and materials, and considering factors such as drainage, irrigation, and landscaping elements like patios and walkways.

Final Inspections and Completion

As the construction process comes to an end, it’s time to arrange for final inspections and complete any remaining tasks to ensure the house is ready for occupancy.

  • Final Walk-through

If you have hired a general contractor, it is customary to schedule a final walk-through of the house. Moreover, this allows you to check for any remaining issues or concerns before accepting the completed project.

  • Completing Exterior Landscaping

Once the inspections are complete, you can finalize the exterior landscaping. This involves planting trees and shrubs, installing irrigation systems, building patios and walkways, and adding any other finishing touches to the outdoor spaces.

Reference:

the spruce

Searching for tips to recycle the construction waste, what are you waiting for, click on the link below:

How to recycle and reuse construction waste


How to read a floor plan

Are you in the process of building your dream home? As you embark on this exciting journey, one important document that you’ll encounter is the floor plan. However, deciphering the language of floor plans can be a daunting task.

Fear not! In this comprehensive guide, we will walk you through the essential elements of a floor plan, equipping you with the knowledge to understand and visualize your future home. Whether you’re working with home builders in Edmonton or anywhere else, this guide will provide you with the tools you need to make informed decisions and bring your dream home to life.

Understanding the Basics: What is a Floor Plan?

(Photo from istock)

Before we dive into the intricacies of reading a floor plan, let’s start with the basics. A floor plan is a visual representation of a home’s layout, showcasing the arrangement of rooms, walls, windows, and other architectural elements.

Think of it as a blueprint for your dream home. Traditionally, floor plans were presented as physical blueprints, but nowadays, they are more commonly delivered as digital files that can be viewed on a screen or printed out for review.

A floor plan is typically part of a larger set of documents known as a plan set, which includes a site plan, building notes, floor plans for each level of the house, framing and roofing plans, electrical plans, plans for mechanical systems, and construction details. For the purpose of this guide, we will focus primarily on design drawings, which are floor plans that communicate the overall layout and flow of the home.

Walls, Windows, and Doors: Symbols and Features for floor plan

(Photo from istock)

When you first look at a floor plan, the walls will be the most prominent visual elements. They are represented by parallel lines and can be solid or filled with a pattern. Breaks in walls indicate the presence of doors, windows, and openings between rooms.

Doors are typically depicted as thin rectangles, sometimes with an arc to indicate the swing direction. If the door slides into the wall (known as a pocket door) or opens partially alongside a wall (like a barn door), it will be represented accordingly. Windows are shown as breaks in the walls with thin lines representing the glass and frame. Swinging windows may have a line or an arc to indicate the direction in which they open.

Stairs: Ascending and Descending

Stairs are an integral part of multi-level homes. On a floor plan, stairs are typically represented as a series of rectangles, with a direction arrow indicating whether they travel up or down. If the stairs rise more than three feet above the floor, they will be cut with a diagonal line. Stairs above this “cut line” will be shown with dashed lines. Pay attention to the placement of stairs, as they can greatly impact the flow and accessibility of your home.

Room Sizes: Dimensions that Matter

(Photo from istock)

When reviewing a floor plan, it’s important to understand the dimensions of each room. Room dimensions are typically presented in feet and inches, with width and length measurements. For example, a room with dimensions of 12′ x 16′ means it is 12 feet wide and 16 feet long. Keep in mind that rooms are not always square, so take the time to visualize the space and compare it to rooms in your current home. This will help you gauge the size and functionality of each room in your future home.

Kitchen and Bathroom Details: The Heart of the Home floor plan

The kitchen and bathrooms are vital spaces in any home. When examining a floor plan, pay close attention to the details provided for these areas. Kitchen details will include the location of appliances such as the range, oven, fridge, microwave, sink, and dishwasher. Look for labeled upper cabinet locations, flush eating bars, and cabinet voids. The goal is to envision how you will utilize the space and ensure that it aligns with your lifestyle and preferences.

Similarly, in the bathrooms, review the location and length of vanities, the presence of one or two sinks, the type of tub (built-in or freestanding), and the inclusion of a separate water closet. Take note of the shower details, such as whether it is an acrylic drop-in, tiled walls, or fully tiled with additional features like a bench, shampoo niche, or rain head. Understanding these details will help you visualize the functionality and design of these essential spaces.

Feature Details: Showcasing Your Style

(Photo from istock)

To add personal touches and enhance the aesthetics of your home, floor plans may include feature niches, shelving, or specific detailing.

These areas provide opportunities to display cherished items or create focal points in your home. During the planning stages, consider how you can utilize these features to showcase your unique style and create a space that truly feels like yours.

Ceiling Heights: Creating Impactful Spaces

Ceiling heights play a significant role in the overall ambiance and perception of space within a home. Taller ceilings tend to create an airy and more spacious feel. While lower ceilings can evoke a sense of coziness. With dashed lines representing specific ceiling features such as raised or stepped ceilings. Tray ceilings, vaulted ceilings, or areas that are open to below. Understanding the ceiling heights and features of your future home will help you visualize how each room will look and feel.

Bringing It All Together: Experiencing the Plan

As you review floor plans, it’s essential to envision yourself and your daily activities within the space. Consider how you will experience the home on a day-to-day basis, from walking in the front door for the first time to engaging in everyday tasks like cooking. Relaxing with family, or entertaining guests. Pay attention to the flow and functionality of the layout, and ensure that it aligns with your lifestyle and needs. A successful home is one that feels great every day, so take the time to evaluate the design from both practical and emotional perspectives.

Conclusion: Your Dream Home Awaits

(Photo from istock)

Deciphering a floor plan may initially seem overwhelming, but with a little practice and the knowledge gained from this guide. You’ll be able to read a floor plan like a pro. Remember to consider the size and layout of each room. Pay attention to kitchen and bathroom details, envision how feature details will align with your style. And understand the impact of ceiling heights. By visualizing yourself in the plan and evaluating it from various perspectives.

Reference:

Houseplans

Searching for tips to recycle the construction waste, what are you waiting for, click on the link below:

How to recycle and reuse construction waste


How to preserve and maintain ancient structures

Preserving and maintaining ancient structures is not an easy task, but it is a crucial one. These buildings hold historical, cultural, and architectural significance, and they provide a link to our past. In this comprehensive guide, we will explore the steps and considerations involved in saving and protecting these precious structures. From determining their significance to securing funding and finding partners, we will cover it all. Let’s embark on this journey to preserve and maintain our heritage for future generations.

Understanding the Significance of Ancient Structures

(Photo from istock)

Before starting any preservation project, it is important to determine the significance of the ancient structure. Consider its historical, cultural, and architectural importance. Was the building witness to significant events? Does it hold unique architectural features? Understanding the significance will help raise awareness, apply for grants, and meet preservation guidelines. Collaborate with local historians, community leaders, and past owners to gather information and consider getting the building listed on local, state, and federal historic registers.

 Finding the Purpose of the Ancient Structure

To save an ancient structure, it is essential to identify its future purpose. Without a clear vision, the building may fall into disrepair and lose its value. Explore various options such as residential, commercial, museum, or nonprofit use. The new purpose should preserve the historic characteristics while adapting the building for modern needs. Once you have identified the purpose, you can proceed with the physical preservation steps.

Building Partnerships for Preservation

Preserving an ancient structure is not a solo endeavor. Seek partners who share your passion and can contribute to the project’s success. Historical groups, community organizations, local government, state historic preservation officers, and developers can all play vital roles. Historical societies and preservation groups can provide expertise and connections, while local government can offer support in navigating regulations and provide financial assistance. Building a strong coalition will increase your chances of success.

 Securing Funding for Preservation of Ancient Structures

(Photo from istock)

Funding is often the biggest challenge in preserving ancient structures. Restoration and maintenance can be costly, so explore different sources of financing. State grants specifically allocated for historic preservation are available in many states. Tax credits and exemptions can also help reduce costs, especially for nonprofit organizations and developers involved in adaptive reuse projects. Private foundations, philanthropic trusts, individual donors, and community donations are additional sources of funding. Plan and execute fundraising campaigns to generate awareness and support for your project.

Learning from Success Stories

Gaining inspiration from successful preservation projects can provide valuable insights and guidance. Reach out to historical societies and preservation groups that have completed similar projects. Their experiences and advice can help you navigate challenges and learn from their achievements. By studying success stories, you can gain practical knowledge and apply proven strategies to your own preservation project.

Identifying Threats to Ancient Structures

Understanding the threats faced by ancient structures is crucial for effective preservation. Common threats include disrepair, abandonment, developers’ plans, community growth, and weather damage. Neglect and lack of maintenance can lead to gradual deterioration and eventual condemnation. When a building remains unused or abandoned, it becomes vulnerable to damage from the elements and intruders. Developers often prioritize modernization over preservation, putting historic structures at risk. Additionally, changes in community planning and severe weather events can pose significant challenges to the preservation of ancient structures.

Preservation Methods: Exploring Different Approaches

Preservation methods vary depending on the unique circumstances of each ancient structure. Here are six common approaches to consider:

  • Preservation

Preservation focuses on protecting and conserving the historical significance of the building. Original materials are prioritized, which can add to the cost and limit future uses.

  • Restoration

(Photo from istock)

Restoration aims to return a historic building to its original state during a specific time period. Historic documents and original building materials and techniques are utilized to recreate the building’s original appearance.

  • Rehabilitation

Rehabilitation involves making necessary repairs and alterations to keep the building functional and useful. Upgrades and additions are allowed, while retaining portions of historical or cultural value.

  • Adaptive Reuse

(Photo from istock)

Adaptive reuse modifies the building’s original purpose to accommodate new uses while preserving its historic characteristics.

  • Mothballing

Mothballing is a temporary solution when restoration is not immediately feasible. The building is closed and protected to prevent further damage until resources or a clear vision for its future become available.

  • Building Relocation

In cases where preservation in the original location is not possible, physically moving the building to a new location may be the only option. While this can be costly and pose challenges, it saves the structure from destruction.

 Moving Ancient Structures: Considerations and Tips

Moving an ancient structure requires careful planning and consideration. Here are some important factors to keep in mind:

  • Feasibility: Ensure there is enough space to transport the building, considering obstacles like utility lines and railroad crossings.
  • Structural Soundness: Assess the building’s structural integrity and make necessary repairs before the move.
  • Finding a New Location: Secure a suitable location near the original site, preferably less than a mile away.
  • Historical Value: Understand that moving a building may affect its historical value, potentially impacting its status on historic registers.
  • Partnering with an Experienced Contractor: Work with a reputable building moving company that specializes in historic structures to ensure a successful move.

Contacting Preservation Experts for ancient structures

When undertaking a preservation project, it is beneficial to consult preservation experts . With years of experience, they offer expertise in lifting and moving historic structures. Their team can provide guidance, estimates, and support throughout the preservation process.

Additional Resources for Historic Preservation

(Photo from istock)

For further information and resources on historic preservation, refer to the following organizations and online references:

  • State Historic Preservation Offices: Contact your state’s preservation office for guidance and funding opportunities.
  • Fundraising and Grant Resources: Seek assistance from nonprofit organizations and professional fundraising consultants.
  • Community Engagement: Build relationships with community leaders, media, and local organizations to generate support and awareness for your preservation project.

Conclusion

Preserving and maintaining ancient structures is a challenging but rewarding endeavor. By understanding the significance of these buildings, identifying their purpose, building partnerships, securing funding, and implementing appropriate preservation methods, we can ensure that our heritage remains intact for future generations. With careful planning, collaboration, and the support of preservation experts, we can save these historical, cultural, and architectural treasures. Let us embark on this journey to preserve our past and shape a brighter future.

Reference:

Wolfe

Searching for tips to recycle the construction waste, what are you waiting for, click on the link below:

How to recycle and reuse construction waste


Traveling With Pets: What You Need to Take Care Of

Traveling With Pets: What You Need to Take Care Of

Some pets enjoy vehicle rides, so it’s enjoyable to bring them along when you travel. However, not all pets behave in this way. Here are some safety advice you should consider before driving with your beloved pet, regardless of whether they enjoy the trip.

Finding a way to restrain your pets

Image via Unsplash.com

Allowing a dog to run loose inside of a car is neither safe nor recommended. If your dog is an anxious passenger or you are driving a long distance, think about putting your dog in a pet cage. The best approach to keep a dog calm and under control while driving is to use this technique.

Caging a dog will make it easier for you to concentrate on driving rather than the dog, which is crucial because distracted drivers are more likely to be in accidents. Additionally, if you have to make a sudden stop or have an accident, it will keep your dog safe.

If you don’t want to put your dog in a cage, at least figure out a means to keep him safe. Consider keeping your dog in the back of your estate car, for instance, if you have one.

If your window boot is large, install a wire grid to prevent your dog from jumping over the backs of the seats. To ensure that the dog can sleep peacefully during the travel, encircle its space with dog blankets or put its bed in a corner. Make sure you don’t have any heavy or loose goods around because they could become harmful projectiles in the event of an accident. Most dogs find that napping helps them feel better when they are motion sick.

Think of cage as an option

Image via Unsplash.com

Positively introduce the cage to your dog. Before getting inside the car, let the dog inspect the cage. Lock your dog inside the cage after it has been put in the vehicle. Maintaining a good outlook while away from the dog in the cage for a while will help. Do not force the dog into the cage; instead, let it to enter on its own by tempting it in with food.

Carry proper supplies for your pets

By setting down its bed or blankets for padding, make the dog’s space comfy. Bring along some of your dog’s favorite chew toys, water, treats, the collar and leash, and plastic bags for waste.

Chew toys

Image via Unsplash.com

It is best to refrain from giving the dog a bone or food treats because they will trigger the dog to vomit again.

Additionally, avoid squeaky toys because they will drive you insane.

Consult a vet for your pets

Never administer Dramamine or any other medication to your dog without your veterinarian’s advice. Your veterinarian may have some alternative recommendations.

Taking care of hyperactivity

Image via Unsplash.com

Before the trip, speak with your veterinarian if your dog has issues with hyperactivity. Check to see if a mild sedative is available and suitable for your dog, particularly if the trip is lengthy. Carefully adhere to the dose recommendations.

Let pets get used to riding

Start by letting your dog explore your automobile when the engine is off. Start off with short trips until both you and your dog are comfortable taking a vehicle ride together.

Making few trips

Image via Unsplash.com

Just get your dog accustomed to the area before travelling large distances. Take your dog to a park or a field so they won’t only link car journeys with trips to the vet but also with nice things.

Carrying pets collar

No matter how well-behaved your dog is, there’s always a danger that he’ll get out of the car and try to flee from you. In the event that your dog escapes while you are travelling, make sure it can be located.

Taking breaks

Allow your dog to exercise and become exhausted. While you’re taking a break, you should also give your dog a little snack and some water. Make sure to take a little stroll, even if it’s only on the grass near a fast-food restaurant at a service station by the highway, every hour or so.

This provides you plenty of time to offer your dog some water and allows them to use the restroom. It’s crucial to take your dog on brief walks so that it can stretch its legs and avoid becoming bored.

This is especially crucial if you have a lengthy journey ahead of you. The normal dog can only drive for a maximum of four hours before needing a longer break, but it is advised that drivers take breaks every two hours.

As soon as you stop, lock your car, give your dog some food and water, and take him for a walk so he can burn off some of his excess energy. Make sure the area is grassy, peaceful, and away from the traffic.

Don’t leave pets in parked car

Image via Unsplash.com

Be mindful of how quickly a dog might suffer from heatstroke in a parked car and pass away. Always keep an eye on your dog when leaving it in the car during warm weather.

When stopping for a lunch, park your car in the shade and let down each window by about an inch to allow in some cool air. If your dog is riding in a dog seat, place a dish of cold water in the car for them both, and unbuckle them. Order takeaway and lock the doors to your vehicle.

If it’s a hot day, try to keep your dog in the car for no longer than five minutes at a time to prevent overheating. If you anticipate that your stop will take longer than expected—for instance, if you are in a long queue for food—tie your dog to a post either inside the front door or slightly outside in an area where you can see it.

He or she will at least be cool while you wait. Make sure the dog is tied securely to prevent escape. Additionally, if the knots are tight, your dog will be less likely to be stolen.

USEFUL LINKS:

Click here to know more about travelling with your pet
Know how to make most of your pet training sessions 

How to Grow Your Own Herbs: A Beginner’s Guide

How to Grow Your Own Herbs: A Beginner’s Guide

Growing your own herbs is a low-cost and satisfying choice if you enjoy seasoning your food with them. Herbs are easy-to-grow plants that may be grown in pots or in the ground, indoors or out. All you need is a warm, sunny location and a few simple ingredients. assemble your materials, begin some seedlings, plant your fresh herbs, and tend to them.

Choosing what to grow

Image via Unsplash.com

Which herbs do you enjoy including into your dishes? Start by considering your personal tastes when deciding which herbs to plant. You might want to try your hand at growing one or two herbs that you wouldn’t typically buy at the grocery store since they are simple and enjoyable to grow. Purchase seed packets from your nearby nursery or online once you have a few in mind.

Wonderful herbs that are used in many different dishes include mint, dill, sage, rosemary, thyme, and basil. These would be a fantastic starting point for a herb garden if you wanted to grow a variety of herbs. An herbal tea garden is another option.

Deciding where to grow?

Image via Unsplash.com

Herbs are simple to grow both inside and outside. Additionally, you can decide whether to plant them in a growing container or straight in the ground. Although some just require some sunshine, most herbs require a lot of direct sunlight. Before planting, it’s wise to research which herbs work best in certain environments.

If you’re planting herbs alongside veggies in your garden, place them 6–12 inches (15.2–30.5 cm) apart from the vegetables.

Herbs can be grown in different pots, or you can get a big pot and plant a variety of herbs in it.

Get potting soil to grow herbs

Successful herb planting depends on the makeup of the soil. Herbs do best in soil that has a pH between 6.5 and 7, but it is not necessary for the soil to be very fertile. In fact, if it’s excessively rich, the flavor will be diluted and growth will be out of control. Drainage is more significant than fertility. For proper drainage, the soil should be a loose, crumbly consistency.

Since seeds already have the nutrition needed for plants to sprout and take root, if you’re beginning your herbs from seed, search for a seed starter potting soil that hasn’t been enhanced with extra nutrients.

Starting in early spring

Image via Unsplash.com

When it’s still cool outside and the growth season hasn’t started, it’s ideal to plant seeds. As a result, the seeds have more time to germinate and grow, and they will be prepared for planting once the temperature starts to climb.

Wait till after the last frost if you can.

Preparing seed containers

Any little container, such as a used egg carton, yogurt cups, or ones you may buy at the nursery, can be used to start herb seeds. So that you’ll know which seeds to place in which container, label the containers. Each one should be filled with potting soil, which should then be slightly wetted. Put the containers somewhere sunny with a constant temperature of about 70 degrees. The seeds shouldn’t be exposed to hours of direct sunshine at this early stage since they risk overheating.

It’s simpler to start the seeds indoors, where you have control over the water and temperature, even if you intend to cultivate your herbs outdoors.

Soak the seeds to grow herbs

Image via Unsplash.com

This procedure assists in preparing the seeds for germination. The seeds should be spread evenly between two wet paper towels. On the day you plan to plant them, give them a 4-hour soak.

Planting the seeds

For instructions on how to plant each variety of herb, consult the seed packets. While some only need to be uniformly distributed across the soil’s surface, others won’t grow unless they are buried deep within the soil. The seeds will sprout over the coming weeks and start to produce leaves. Make sure the soil is never allowed to dry out while maintaining a constant temperature and amount of sunlight.

Thin seedlings

You must take some of the seedlings out of the pots once they have developed leaves so that the stronger ones have room to develop. Remove the seedlings that are less developed, and then space the remaining plants apart by approximately an inch.

Preparing the bed to grow herbs

Image via Unsplash.com

Garden soil for the herbs should be raked in to a depth of roughly 6 inches (15.2 cm) after loosening the soil with a garden rake. Water the soil by sprinkling it with it. Create holes that are spaced a few inches apart before planting the herbs.

Determine how many herbs will fit in each container if you are planting the herbs there. You might not want to plant more than 2 or 3 seedlings in each pot because many herbs grow rather large.

Plant the seedlings

When the herbs are established and have produced a number of adult leaves, they are ready to be planted. When there is no longer a chance of frost and the outside temperature is above 50 degrees, plant them. Plant the seedlings in the ground after carefully removing them from their containers and loosening their roots. After lightly moistening the area with water, pat soil around the stems’ bases.

If you’re planting the herbs outside, it’s a good idea to “harden off” (expose them to outdoor conditions) them for a few days in a garage or another covered outdoor area before putting them in the ground.

Caring for the herbs

Image via Unsplash.com

Now that the herbs are established, all you need to do to take care of them is make sure they receive adequate sunlight and water on a regular basis. Pay attention to the soil’s moisture content and make sure it never dries out. It won’t be long before it’s time to harvest your herbs because they will grow robust and healthily.

USEFUL LINKS:

Click here to explore some more tips 
Beneficial bugs for your veggie garden 


Live off Your Garden for Healthy Lifestyle

Live off Your Garden for Healthy Lifestyle

If you’ve been gardening for a while, you already know how much better your own produce is than what you can buy at the store. It’s possible that you grow enough veggies in your garden to feed your entire family or yourself throughout the growing season.

You now want to enhance it in order to supply your family with all the vegetables they’ll require for the remainder of the year. Before you can truly rely entirely on your garden throughout the year, there are a number of issues you need to address in reality.

How much land do you need for starting garden

Image via Unsplash.com

This won’t be a problem for you if you have land. The quantity of garden area you have access to on an urban lot may be a constraining element. Step outside of the box. In your window boxes, sow your organic herb seeds. Plant peppers, Swiss chard or rhubarb in the flowerbeds in place of flowers.

Consider planting cucumbers or squash vertically in a small side yard close to the garage. Any plant you find outside the main garden provides your main crops extra room.

Starting garden is a time-consuming procedure

Be sensible! Keep in mind that you will need to take care of a much bigger garden. Additionally, it means that it will take longer to harvest all of the crops. All the food must also be dried, frozen, or canned in order to store it for the winter. That requires a large amount of time. Do you have enough time on your own, or are your loved ones eager to help out?

Space and resources to store produce

Image via Unsplash.com

A stand-alone freezer is necessary if you intend to freeze the majority of the vegetables. The size depends on how big your family is. You will need plenty of shelves for your food jars if you intend to can your veggies. Additionally, a pressure canner is required.

Invest in all the canning jars and lids so that they are available when needed. Do you have a cool place to keep pumpkins, potatoes, squash, and onions? Cool but not freezing is required. Before the growth season begins, get everything ready.

Make a plan for your garden

You must create a garden plan if you still have the desire of growing all the food you need for the entire year. If you have done small-scale gardening, you presumably already know what your growing zone is. Find out here if you don’t already.

This knowledge is essential. It outlines the length of your average growing season and the ideal time to start gardening with vegetable seeds and seedlings. Additionally, it provides an estimate of the first frost date, which indicates when the garden will begin to slumber.

These times are only estimates; they are not set in stone. Numerous factors, such as weather and climate change, can affect when you can really plant in your garden.

Planting according your family’s taste

Image via Unsplash.com

If no one wants beets, don’t waste space growing them. However, gardening should be enjoyable, so give yourself some room to experiment. Grow it to the point where everyone in the family can give it a shot before adding it to your list of plants to grow the next season—or your “never again” list.

Starting your own plants in garden

Start with the seeds if you’re going to make a commitment to growing your own food. Pick organic, non-GMO veggie seeds. For plants that cannot be immediately sown in the garden soil, set up your indoor nursery. By buying the best seed available and raising your own plants, you can maintain control over what you provide for your family.

Intensive gardening for limited space

Image via Unsplash.com

Grow in 4-foot-wide beds rather than a lengthy row of solitary plants. You will be able to weed and harvest in the middle of the bed if you keep the size to four feet.  Give each plant enough room to expand. This approach to gardening has a lot of benefits.

Less land is taken up by walkways, leaving more room for plants. Because the plants are so close together, fewer weeds may develop, which means less work for you. These beds won’t be compacted by foot traffic, so the soil will be looser, which is ideal for strong root systems.

Dealing with pests in your garden

Avoiding pesticides is one benefit of growing your own food, so you’ll want to deal with slugs and snails naturally.

Keep the area free of weeds and debris, and create a route made of concrete or soil between the beds so you or the birds can readily notice pests.

Preparation of soil

Image via Unsplash.com

Turn the soil over and get rid of weeds, roots, and stones before you start planting. This enhances drainage and helps keep weeds from coming back. Some gardens will be plagued by persistent weeds; in this instance, cover the soil with newspaper and apply a 5 cm-deep layer of compost.

Making most of garden

When starting off with vegetable growing, pay great attention to the instructions on the seed packets. Gather your lawn clippings, organic kitchen waste, and any garden pruning because compost can be quite helpful to your plants.

In a small area, it may not be possible to leave your ground fallow for an extended period of time, as with crop rotation in farming. What you can do, though, is plant several crops in a bed in consecutive years.

Choosing wisely to begin

Image via Unsplash.com

As a novice, you should pick crops that are simple to grow and offer a variety of nutrients.

  • Vegetables: Because courgettis and runner beans are so simple to grow, many people start off with them. Excellent nutritional alternatives include broccoli, kale, spinach, and various beans, which can also be satiating and high in protein.
  • Root vegetables: Potatoes are versatile in the kitchen and convenient to preserve. Onions, carrots, and beets are also healthy options.
  • Salad: Although salad ingredients like veggies and herbs are pricy, most families eat a lot of them throughout the summer. Fast-growing and abundant vegetables include tomatoes, peppers, radishes, cucumbers, and spring onions. In the winter, herbs can be grown indoors and provide flavor to any cuisine.
  • Fruit: Don’t overlook fruit because the season will be long and harvests will be high. They make simple jams and are simple to freeze. The best fruits for novices are apples, pears, cherries, strawberries, blackberries, and raspberries.

USEFUL LINKS:

Visit this site to know more about gardening on your own 
How to make your garden greener 


Become a Vegan With Well-Thought and Nutritious Tips

Become a Vegan With Well-Thought and Nutritious Tips

The majority of carnivores believe that going vegan is impossible and are unable to even begin to fathom how they might manage to enjoy life without the familiar flavors they have become accustomed to. Simply said, they lack creativity. It is possible to discover a whole new world (maybe a better one) and reap a myriad of physical, mental, and emotional benefits (not to mention financial savings!) with a positive attitude, a willingness to make a change in a healthy direction, and some diligence in the supermarket aisles.

Planning your vegan diet

Image via Unsplash.com

A vegan diet is absolutely devoid of cholesterol, but that doesn’t mean it’s healthy just because it’s low in calories and fat. Most vegan foods will be healthier for you than non-vegan options.

A vegan diet is only healthy when it is well-rounded and well-planned, according to the Academy of Nutrition and Dietetics. You might want to think about buying organic if you’re thinking about going vegan for health reasons. If it’s not, your body isn’t getting the vitamins and nutrients it needs to function. Do things correctly in order to serve oneself.

Do your research. What foods should you start including in your diet that you enjoy and that are suitable for vegans? Nuts? Quinoa? Beans? Think carefully about if you believe it is crucial to avoid honey, gelatin, etc.

Additionally, consider whether you want to follow a vegan diet or be a “full vegan”. Animal fats can be found in soaps, and your shoes, clothes, and other items may be made of leather or a similar material. Does the use of animals upset you? Avoiding some meals and items that have been tested on animals is another option.

Your physical examination

Image via Unsplash.com

Verify that you are in good physical condition by seeing your doctor. Inform your doctor of your intentions to go to a vegan diet and inquire as to whether there are any factors to take into account given your medical background.

For instance, it is very important for vegans with anemia to ensure they consume adequate iron. Some medical professionals lack a thorough understanding of veganism and assume that it is unhealthy or that vegans cannot consume enough protein or calcium.

If you’re a woman, you only need about 50 grammes (2 oz) of protein, whereas men need about 60 grammes. Depending on your age, you require between 1000 and 1200 milligrams of calcium daily. Dairy products can be easily replaced with calcium-fortified plant milks and orange juice.

Answer your whys to become vegan

Image via Unsplash.com

This is a significant shift in your way of life and should not be dismissed as a fad. Knowing why you’re doing something can help you stick with it and prevent you from wasting time and effort on things you’re not truly enthusiastic about. And respond to inquiries from others who might be curious about your dining preferences!

Print it out and put it somewhere you’ll see it frequently, like your refrigerator, if there’s a particular article, image, or quote that makes you want to become a vegan even more.

Know the science behind nutrition

Understanding the history of healthy living doesn’t require you to be a nutritionist or doctor. It will be beneficial for you to learn as much as you can about diet, nutrition, and health. When it comes to plant-based substitutes, you’ll become an authority in no time.

If you know what to look for, you’ll still receive your protein. Tofu, beans, nuts, seeds, quinoa, and whole grains are just a few of the plants that are rich in protein.

Make sure the rice, almond, or soy milk you purchase has calcium added. Orange juice is the same way!

Asking other about vegan diet

Image via Unsplash.com

You can get assistance on your new trip from real vegans (or a friend with similar interests). Search for communities online or locate a nearby club or group. Finding a new favorite vegan restaurant and favorite table is the simplest way to get started.

The Vegan Society offers a fantastic website that is packed with information, news, and even shopping tips. Talk about a fun, addictive pastime.

Getting used to it

Plan to give up one non-vegan food type each week. This will not only make changing your lifestyle easier, but it will also facilitate a smooth transition for your body. Any abrupt, severe shift in your diet would probably have a negative impact on your body, particularly if you switch from an omnivore to a vegan one.

Be kind to yourself and pay attention to your body. Avoid forcing yourself to make sweeping changes all at once without support. Before assuming that a head of lettuce would enough for the rest of your life, you need be aware of how to adequately substitute for specific components, such as protein and lipids.

Know the food difference to become vegan

Image via Unsplash.com

For vegans, it’s far more difficult than for vegetarians. You already know that you can’t consume cheese because it comes from milk that was obtained via the exploitation of animals, but did you realize that the majority of cheese substitutes also include casein, a milk protein? Read ingredient labels and do your research to avoid accidentally eating non-vegan cuisine.

You’ll soon discover that websites supporting veganism will recommend specific name-brand goods. Shopping for food won’t become a tiresome process if you know what to look for in the aisles.

Learn about soy products

There are several ways to prepare it, and it’s a rich source of calcium and protein. Give it a chance even if it takes some getting used to, especially if you haven’t eaten much tofu previously.

In the vegan world, tofu, soy or rice milk, and other meatless options can be your best friends. Anything you can think of has a tofu variant. It also doesn’t taste horrible!

Cooking your own food

Image via Unsplash.com

It can be prepared in a variety of ways and is a good source of calcium and protein. If you haven’t eaten much tofu in the past, give it a try even if it takes some getting used to.

Tofu, soy or rice milk, and other meatless choices can be your greatest friends if you’re a vegan. There is a tofu version of anything you can imagine. It doesn’t taste awful either!

USEFUL LINKS:

Click here to keep hovering on the topic 
Vegan recipes to try at home 


Cleaning Out Your Clutter With Simple Tips 

Cleaning Out Your Clutter With Simple Tips

It takes time to clear the clutter. Sorting, streamlining, and organising everything you own may be incredibly pleasurable for many people. Others, though, find the process to be generally tiresome and unpleasant.

Of course, you want to maintain your home tidy and get rid of as many useless possessions as possible. (Or maybe you don’t care, but you live with someone who does. However, you don’t necessarily want to spend the whole weekend cleaning out your wardrobe or stacking your items.

Fortunately, contrary to what many books and blogs imply, you don’t actually need to adhere to a strict method to clear your clutter. Use the five quick and easy decluttering ideas listed below anytime you like and in any order.

Even just a few of these fast fixes will improve the appearance of your living space and give you a head start on long-term clutter reduction.

Worst spot first: cleaning clutter

Image via Unsplash.com

Even a little, disorganized area, like a kitchen counter, can make a much bigger space appear and feel disorganized when it is visible to the public. It has a significant impact on the appearance and ambiance of the room . It sets the tone for your entire day, which is why everyone advises making your bed as soon as you get up every morning.

Throw away any rubbish first, focusing on this one area. Any items that “live” elsewhere should then be brought back to their original location. Clean up what’s left, finally. Consider the idea that some of the items on the counter might not actually be necessary if it still appears cluttered.

Sweep garbage bag

Image via Unsplash.com

Just as it sounds, go about your room or home with a sizable garbage bag (or box, whatever works) in hand and put anything you come across into it. You don’t need to worry with sorting this now unless it makes your life simpler to do so later when it can be divided into garbage, recycling, and donations.

Junk might include things you simply don’t need in your life, such as old towels that you’d be embarrassed to let anybody else use, as well as blatant trash, such as expired supplies. Get rid of anything you have been saving “for later” but aren’t actively using, as well as anything you just don’t like any longer.

Don’t give any of this a lot of thought. Put your faith in the fact that a portion of your brain has been so occupied by this clutter for such a long time that you are already aware of what needs to go.

Scanning the unwanted stuff: cleaning clutter

Imagine you have to pack everything up because you’re moving in a few weeks as you look at your closet—and anywhere else you keep apparel and accessories. You don’t want to move many boxes full of items you never wear because it’s a new beginning.

This need not be a protracted process of trying everything on or contemplating outfit combinations. Simply scan your belongings, being very honest, and remove anything that:

  • doesn’t fit your lifestyle or your body
  • is broken and unable to be repaired (or you just won’t have it fixed)
  • Your dislike
  • Despite liking, you never wear

Arrange your home: cleaning clutter

Image via Unsplash.com

If you knew someone you wanted to impress was coming over in an hour, what would you change about your house? Alternatively, what if a TV crew showed up to interview you for the evening news?

You wouldn’t do anything radical like wash the windows, but you would move right away to clear the clutter by wiping down surfaces and putting everything back where it belongs.

A fast clean-up like this one is a fantastic method to find things that don’t have a home. If you find one, it’s a hint that you should either get rid of it safely if you don’t need it. If it’s something important like your car keys, that you should immediately designate a proper location for it.

Organizing with similar items

Image via Unsplash.com

You know how some grocery stores have all the chips in one aisle, making it simple to choose the sort you prefer. But other grocery stores have the chips at the ends of five different aisles, making it necessary for you to walk around the store looking at each one in turn?

This option is also available to you at home, and the former makes things much simpler.

If you have small heaps of coins or pens on every surface after emptying your pockets, walk through each room and collect these items. So that you can always find a pen when you need one, you now put all of your pennies in a jar in the kitchen and all of your pens in a desk drawer.

Simplifying your home: cleaning clutter

In a congested space, removing just one large item—such as a chair nobody uses or a dingy treadmill nobody uses—can make a significant difference.

This kind of dead weight will take up a surprising lot of room. And getting rid of it will usually make you think more in minimalistic terms. It will help you make better informed decisions about decluttering in the future.

Let go the unwanted stuff

Image via Unsplash.com

Whether or not it was done on purpose, most people have a few duplicate objects lying around. And only one of these things is often used on a regular basis. It’s simple to get rid of extra items in your home by getting rid of the duplicate that gets less use.

This doesn’t imply that you have to use up all of your toothpaste. Or limit yourself to just one pair of black socks. Or perhaps you have two cooking tools that perform quite comparable tasks. But, you always choose the lighter one to wear.

USEFUL LINKS:

Click here to explore on decluttering
Home renovation tips which suits your budget 


Learning How to Swim: Things You Should Take Care Of

Learning How to Swim: Things You Should Take Care Of

When you don’t know what you’re doing, learning how to swim might be frightening. But don’t panic, there are steps you can take to make learning to swim less intimidating. It won’t take you long to master swimming once you do.

Dealing with your fear: learning to swim

Image via Unsplash.com

Due of their fear of drowning, many people put off learning to swim. While drownings do happen, the majority of them might have been avoided with a few basic safety precautions. When swimming, abide by these rules to significantly reduce your risk of drowning:

  • Swim with a partner. Always have a strong swimmer with you when you go swimming, if not more than one. The ideal spot to swim is usually somewhere that has lifeguards on duty.
  • Never learn to swim in a moving body of water. You will need to pay closer attention to the movement of the water if you’re learning to swim in a river or ocean. If you must learn to swim this manner, make every effort to be alongside an experienced swimmer.
  • Until you have enough water experience and are sufficiently at ease in the water, wear the appropriate safety equipment.
  • Keep your depth to a level you can manage. Don’t go into water that is too deep for you to stand in while you are initially beginning to swim.

Get used to floating: learning to swim

Image via Unsplash.com

When you’re in the water, grab on to a dock or the side of a pool and allow your legs to float out behind you; if you let them, they should lift with ease. Some people prefer to float to the top as your upper body sinks. Simply retry the strategy without getting anxious. Practice doing this on your stomach and back once you feel comfortable letting half of your body float.

As soon as you’re prepared, try floating on your back or your stomach. Keep your depth shallow so you can easily stand up if it doesn’t work out. You’ll become used to having water around your ears while having your nose and mouth in the air, even if it can seem strange at first. Put your arms out straight so that your body forms a “T” shape for more support. You can try inhaling deeply before floating if this is your first time floating. Your body will undoubtedly float if your lungs are full of air. Perform this up till you gain additional expertise.

Do not panic

Image via Unsplash.com

Always bear in mind that if you find yourself in an intolerable depth or otherwise unable to move your limbs, you have a backup plan: float on your back. If you are unable to swim, simply lie back as flat as you can and allow the water to take you as you collect your thoughts. Don’t thrash about or breathe fast.

Holding your breath and having your lungs full of air are helpful tips for floating on your back. Another helpful suggestion is to expose your stomach.

Underwater exhaling: learning to swim

While you are still at a shallow depth, breathe more deeply and bury your face. Once you run out of oxygen, carefully inhale through your nose and stand back up. Bubbles ought to release. You can also exhale through your mouth, however this frequently results in a torrent of large bubbles.

You can use a nose plug or hold your nose shut if you find it painful to exhale through your nose, or you can exhale through your mouth.

Wearing googles

Image via Unsplash.com

You might be able to see more clearly and feel more at ease opening your eyes underwater if you’re wearing goggles. Choose a pair with puffy eye circles and dip them in water to make them attach to your skin. To ensure that the goggles are securely in place, tighten the strap around your head.

Learning how to kick legs: learning to swim

You can practice kicking whether you’re floating on your back or still clinging to the pool’s edge. Practice using a kickboard to see how far each kick can carry you. As a result, you are free to concentrate on your kicking technique without having to worry about staying afloat.

Consider a flutter kick. Keep your legs mostly straight, point your toes out like a ballerina, and kick lightly with alternate legs. Your ankles ought to have the greatest range of motion.

Test out a whip kick. From the hips to the knees and the knees to the ankles, keep your legs firmly clasped together. Then, quickly draw your shins apart and move them in a circular manner, keeping your thighs together the entire time. Begin by bending your knees so that your shins form a roughly 90-degree angle. Move your right leg to the right and your left leg to the left to form a half-circle. At the bottom of the circle, reunite your shins and raise them once more to recommence the kick.

Learn how to crawl

Image via Unsplash.com

Crawls are excellent beginner strokes because they allow you to move fast. Here’s how to carry them out:

First, try the backstroke. Lay flat on your back while floating, then flutter kick your legs. Do the “crawl” action with your arms, rising one arm straight into the air and maintaining its straightness as it returns to the water next to your head. After submerging it, bend it to return it to a straight position next to your side, then repeat. Swim with alternate arms and make sure to maintain your hands flat and your fingers as close together as you can.

A front stroke, often called a freestyle or American crawl, could be useful. Float on your stomach, flutter kick with your legs, and “crawl” forward with your arms. When you are ready to “push” the water behind you, raise one arm out of the water so that it is “reaching” forward. Then, lower it back down. Exchange the arms. Your head must be turned to one side and lifted high enough to allow you to take a breath under the crawling arm. So that you breathe once every two strokes, take a breath under the same arm each time.

USEFUL LINKS:

For a wonderful guide on swimming, check this out 
Tips for modernizing your home 


Living in a RV: Travel and lifestyle

Living in a RV: Travel and lifestyle

If you’re ready for the adjustment, living in an RV might be a dream come true, but if you’re not, it can quickly turn into a complete nightmare. Before you really leave, thoroughly consider your choice and get ready for your new way of life.

Know your reasons: living in a RV

Image via Unsplash.com

Living in an RV might be very different from living in a traditional home, so you need to have a compelling reason to stick with it if you want the experience to be successful. Though there are no unambiguous “right” or “wrong” explanations, a justification that sounds compelling to you will typically enough.

Those who opt to live full-time in an RV typically include retirees and those who move about a lot owing to their jobs. However, if you yearn to travel across the country or want to live a simpler life, this can also be a fantastic life choice for you.

Consult your family and friends

Even while living in an RV gives off a feeling of freedom, the reality is that you’ll be living in tight quarters and spending a lot of time with your family. Any opposition to the way of living will inevitably and unwelcomely lead to conflict in your daily existence.

Make sure your children, your spouse, and any minor children you may have agree to the plan if you have any. The challenge of homeschooling should be anticipated by the whole family.

Practice before you actually commit: living in a RV

Image via Unsplash.com

It’s a good idea to try an RV out before you buy if you’ve never stayed in one for an extended amount of time. Try taking a weeklong or monthlong vacation in an RV you may rent or borrow. You’ll have a better understanding of what living in an RV permanently may be like after doing this.

You need to have lived in an RV before you can drive one, even if you have experience towing large trailers. Get a good sense of how the car feels to drive, plan and schedule your trips, create a budget for life on the road, and live simply every day.

Know licensing laws: living in a RV

Most of the time, driving or towing an RV won’t require a special driving license, but there are some exceptions. Before you begin any additional preparations, find out about the licensing regulations in the state where your permanent address is located and adhere to them.

To learn what the rules are, contact the state DMV. You might need a different license for a different vehicle class if your motorhome is particularly large, but since an RV is a personal vehicle, you shouldn’t require a commercial driver’s license.

Have a backup plan: living in a RV

Image via Unsplash.com

The unpredictability of life means that a lot of things could go wrong and keep you from living in an RV for an extended period of time. Prepare a backup plan for your way of life in case something unexpected happens. You’ll need to plan your accommodations and financial arrangements if your RV breaks down or if you experience health issues that prevent you from travelling.

Make sure you have enough insurance for both your health and the insurance of the RV.

Try to keep enough money in savings to last you for a full year without your RV.

Work out arrangements with family or friends if you can so that you can stay with them for a month or two.

Choosing the best RV

Image via Unsplash.com

In general, motorhomes, fifth wheels, and travel trailers are the three main RV styles utilized for full-time habitation. Your preferences and financial capabilities will determine which option is best for you.

Campers that are pulled by a bumper called travel trailers. The least expensive but smallest option is them.

A truck bed can be used to tow fifth wheels, which are larger RVs. You’ll still need a different truck to tow it, even if they are bigger than travel trailers and less expensive than motorhomes.

The most costly and practical choice are motorhomes. When compared to attaching a motorhome to another vehicle, they provide more storage capacity and allow for direct driving.

Lessen your possession: living in a RV

Image via Unsplash.com

In an RV, you won’t be able to store as many items as you could in a typical house, to put it simply. If there is anything you don’t need, make a plan to throw it away or store it.

Instead, then sticking to what you want, go through your possessions and take only what you need. This probably isn’t the lifestyle for you if you can’t part with your unneeded possessions.

The best course of action is usually to get rid of your surplus belongings. Sell as much as you can to make the extra cash, then give or toss the rest.

Consider gifting heirlooms, mementos, and photographs that have sentimental value to other family members or storing them. However, if you rent space, you’ll need to account for storage costs in your monthly spending plan.

You can always store the extra items in your fixed house or flat if you intend to stay there. The most expensive choice, but one that you should consider if you have any doubts about whether you’ll stay in an RV permanently.

Have a permanent address

Image via Unsplash.com

You don’t have to keep up a fixed flat or house, but for the sake of taxes and other legal requirements, you do need to have some sort of permanent address.

Before you can obtain and retain a driver’s license from that state, all states demand proof of residency. An address is also required to create a bank account and keep up utility accounts. Having a post office box is frequently insufficient; you may also require a real, permanent address.

Use your adult children’s or other family members’ addresses instead of maintaining a fixed flat or home if you can’t afford to (of course with their consent). You can get the required street address from several mail forwarding providers as well.

USEFUL LINKS:

Want to know more? Click here and explore 
Travel to North: The India’s Top 

How to stay fit and healthy: Guide for the bones and soul

How to stay fit and healthy: Guide for the bones and soul

The advantages of maintaining physical fitness are numerous. You’ll look beautiful, have more energy, and see healthy body. Unfortunately, staying healthy is not always simple. However, if you focus on your food and exercise, you may make a lot of great physical changes. Keep in mind that your attitude plays a big part in how well you look and feel.

Finding time for exercising: how to stay healthy

Image via Unsplash.com

Exercise is one of the most important elements of preserving (or obtaining) fitness and health. Experts recommend that you try to exercise for at least 30 minutes each day. Think about scheduling your workout the same way you schedule other commitments and meetings. If something is booked in your calendar, you’ll be more likely to follow through with it.

You may need to exercise for longer than 30 minutes each day if you’re attempting to tone up or reduce weight. If you use a gym, request a consultation with a personal trainer for suggestions. They can help you build a schedule that fits your unique goals.

Regular exercise: how to stay healthy

Image via Unsplash.com

Regular exercise will help you reap its fullest rewards. Choosing an enjoyable sort of exercise is a great strategy to help a habit stay. If you like swimming, make a schedule to swim laps twice a week, for example.

Make it simple to follow your routine. Consider organizing your bags and workout gear the night before. If you do this, you’ll be ready to leave the house in the morning.

Make use of technology. Use a device to track your movements, such a Fitbit. Even free phone apps can be programmed to remind you to stand up and move around once every hour.

Do not stay indoors for too long

Image via Unsplash.com

Air conditioning and televisions are just a couple of the benefits of working out in a gym. Nevertheless, according to scientists, working out outside at least occasionally has several advantages. A treadmill or elliptical machine’s monotony can’t compare to the various topography of a road, sidewalk, or trail in terms of challenging your body.

The benefits of outdoor exercise for your mental health are also possible. People who walked both indoors and outside in tests said they preferred walking outdoors.

Be socially interactive: how to stay healthy

You’ll get better benefits from your fitness regimen if you include others in it. Having a workout partner can increase accountability. You are less likely to cancel on a friend than on yourself if you organize an activity together.

Classes for group exercise have advantages as well. In the classroom, teachers can provide supportive remarks. To ensure that you are performing each motion safely and effectively, they can also encourage you and correct your form.

Meeting new individuals is made easier by working out. Try signing up for a tennis league or a running club. You’ll meet people who share your hobbies and maintain excellent health.

Vary your exercising routine

Image via Unsplash.com

Finding an exercise that you enjoy is fantastic. Additionally, there is no excuse for giving up something you enjoy, like yoga or swimming. It might be advantageous to switch up your fitness regimen, though. When you change things up, your body will respond favorably to new challenges and you’ll get better outcomes.

Your body will gradually start to use less energy while you work out as a result of being accustomed to a program. As a result, your calorie burn may decrease and you might experience a fitness plateau.

Try combining aerobic and strength training. Try sprinting for two minutes and then stopping to perform crunches or a plank as an example of a core exercise. You can alter the sequence in which you perform your exercises and include brand-new ones.

Try using cardio equipment like a treadmill if you want to exercise inside. You can buy your own equipment or go to a gym. You could even be able to buy used equipment.

To start noticing some speedier improvements, try switching up your program every two to four weeks.

Cooking your own food: how to stay healthy

Image via Unsplash.com

A healthy diet offers several advantages. Your skin will look better, you’ll have more energy, and it will assist you in maintaining a healthy weight. Making your own food is one of the finest methods to consume a healthy diet. According to reports, persons who prepare their own meals eat less sugar and fat. Cooking with fresh ingredients also encourages you to consume fewer manufactured foods, which can contain a lot of sodium.

Funnel out cooking. To make it feel less like a hassle, invite family members to join. Each family member should be given a day of the week to request a certain dish and look for a new recipe to try.

Proper nutrients intake

When you cook for yourself, you have complete control over the ingredients you use. With the help of this, you can make sure that your body is getting the nutrients it needs. You can control your weight and have the energy you need to exercise frequently by eating healthfully.

Make an effort to include several servings of fresh fruits and vegetables each day in your diet. These are loaded with fiber and vitamins.

Eat fish and lean meat. These will give you healthy fats and protein for your body.

Reading labels before consuming food

Image via Unsplash.com

Pay close attention to the dietary details listed on food labels. You may choose what you put in your body wisely with the help of the information provided here. Pay close attention to the indicated levels of sugar, fat, and calories when reading labels. You can check the daily suggested sugar intake, for instance, to determine how much of it you should strive for.

Be mindful of serving size. If you want to eat a bag of chips, for instance, check the package to see if the information includes the total number of calories. Sometimes, one serving equals one-third of the bag.

USEFUL LINKS:

Click here to continue reading more on health and fitness 
The best workouts to do at home 


Raising Baby Chicks: Know DO’s and DON’TS 

Raising Baby Chicks: Know DO’s and DON’TS

Watching young chicks develop from chirping balls of fluff to egg-laying, fully feathered hens is a really satisfying experience. Although they make wonderful companions, chickens can often be difficult. Here are some things to think about before raising your own flock, as well as the right ways to raising young chicks.

Have adequate resources for raising baby chicks

Image via Unsplash.com

Although raising young chickens can be gratifying, you shouldn’t get started on it right away. Consider your reasons for wanting to keep chickens and if you have the time, resources, and space to care for them before you start raising baby hens.

In comparison to other animals, maintaining chickens is quite inexpensive. However, if one or more of your chickens become ill, you will need to pay for chicken feed on a regular basis, and vet fees can quickly mount. If you are raising hens for the first time, you might also need to spend money on a brooder and/or coop.

Although keeping chickens does not take a lot of effort, you will need to feed and water them every day, clean their coop (which requires shoveling excrement), and gather their eggs once or twice a day.

You will need to find a chicken sitter, which can be difficult, if you are expecting to be gone for longer than a few days. In the event that you try to collect the eggs while the hens are broody, which might happen if you allow eggs build up in the nest boxes, they may peck or cluck at you. Take a peek into a broody box to deter this.

The legal aspect

Image via Unsplash.com

It’s crucial to research neighborhood laws and HOA guidelines before buying birds or making plans for a coop. Many local governments limit the number of hens that can be kept by a family or forbid roosters because of the noise they produce.

The size and location of outbuildings are regulated by local legislation in some places, while others require permits, signed agreements from neighbors, or a zoning board appearance.

Raising three to six baby chicks

You should prepare to keep at least three to six chickens because they make excellent companions. In the event that one or more of your chickens succumb to disease or predators, having an additional one or two is not a bad idea either.

Four chickens will provide you about two dozen eggs every week because hens normally lay 5–6 eggs per week. More hens produce more eggs!

Choosing breed

Image via Unsplash.com

Depending on your preferences, the traits you look for in a breed of chicken include temperament, egg-laying capacity, egg size and color, climate compatibility, aesthetic value, and meat quality.

Choose “layer” breeds that were bred to lay eggs consistently, such as Black Australorps, for consistent egg output. Additionally, leghorns lay about 325 eggs annually.

Breeds used primarily as “broilers” (Cornish Cross or White Rock Cross), which are breeds used mostly for meat, are bigger than layers but produce better eggs than dual-purpose breeds (which give eggs and meat), such as Buff Orpingtons and Laced Wyandottes and Plymouth rocks.

Sourcing baby chicks for raising

In the spring, you can purchase day-old baby chickens from a mail-order catalogue or at your neighborhood farm store. You should be aware that mail orders typically have a minimum order requirement of 25 chicks or more. This is due to the fact that keeping a higher number of chicks warm during transportation results in fewer losses. To make up for any losses, open the package in front of the mailman.

Make your purchase in the spring. Avoid placing your order in the midst of winter or autumn. It can be more difficult to care for your chickens and can slow you down in colder weather. It will be simpler for you and the chicks if you place your order at the beginning of spring.

Proper space and equipment for the baby chicks

Image via Unsplash.com

The hens will initially require a brooder, which is a small enclosure similar to a cardboard box or rabbit cage that can be housed indoors or in a garage. Once they are outside, they will require a chicken coop so that they can lay eggs safely and away from predators. Feather picking is a behavior that young chicks may engage in. The blood-filled shafts of the feathers are where the chicks pick at the fresh feathers of other chicks. The chicks will pick all the feathers since they are drawn to the color red, which could leave them paralyzed or even kill them. Purchase a red brooder light to deter.

Chicken brooder or lamp

A “brooder” is the name for the chicks’ first residence. A cardboard box or plastic storage box will do just fine for one-time or sporadic use. Another nice alternative that is equally simple to clean is a cage made for a rabbit or guinea pig. You can either make your own brooder or buy one at a farm supply store.

Brooder placement should be indoors or in a garage, away from any draughts. It’s crucial to keep the chicks warm.

As long as the chicks are not crammed together and there is adequate room for a feeding and water, the size of the brooder is not very significant. In order to keep them from jumping out, the walls must also be high enough.

Use proper flooring for the baby chicks while raising

Image via Unsplash.com

Clean litter consisting of pine shavings or equivalent material should be spread out on the brooder’s floor. Although a newspaper can be used, it is not recommended because it is slick and the ink from the printer can get on the chicks. Every couple of days, this litter should be replaced, and it should never be allowed to become damp. Use cedar shavings never! This creates deadly brooder pneumonia, which is harmful for their little lungs. To prevent allergies, I suggest using double-screened pine shavings.

At this stage of the chicks’ growth, cleanliness is crucial since young chicks are susceptible to a number of infections.

USEFUL LINKS:

Ways of raising baby chicks you should know 
Your Pet’s health: How to make smarter choice


Best Bacon Clubs You Must Try for a Savory Meal

Best Bacon Clubs You Must Try for a Savory Meal

It must be noted that bacon is fantastic. Introducing the best bacon of the month clubs!

It’s frequently regarded as the best kind of meat, in part because to how wonderful it smells while cooking. Some vegans may even find the aroma and flavor to be too much to bear, which is why they are always attempting to create fake bacon from tofu.

You may easily find bacon by going to any grocery shop or butcher. Well, quality bacon is another matter. Small-batch producers, who frequently concentrate on sales in their local area, are responsible for some of the tastiest bacon. Because the producers lack the resources, a lot of the best bacon isn’t disseminated widely.

The curated boxes offered by bacon of the month clubs provide a wide variety of bacon. Searching far and wide for uncommon flavors and the tastiest bacon is frequently part of the process. These cartons contain incredible bacon that you can’t get anywhere else.

Amazing clubs for best bacon

Image via Unsplash.com

Amazing Clubs appears to provide every kind of club imaginable, including a membership for bacon of the month. You receive 2 different types of bacon per month, 1 pound of each, when you subscribe. You can clearly know what to expect because the site provides the options for each of the past months.

Amazing Clubs doesn’t specialize on bacon, but it’s evident that they are experts in their field. The majority of the club’s reviews are favorable. Many claim to like the variety and various flavors of bacon.

Monthly dues for club membership are $59.95. If you place an order for 6 or 12 months at a time, you can make a small monthly savings.

Bacon freak: Best Bacon clubs of the month

With a company named Bacon Freak, how can you go wrong? As you might have guessed, Bacon Freak sells anything and anything linked to bacon, including apparel, trinkets, meals, seasonings, and bacon itself.

There are numerous options for the Bacon of the Month Clubs as well. A subscription to Bacon is Meat Candy is their major product. Bacon comes in a variety of varieties, including standard, nitrate-free, no-pepper, gluten-free, and even a wedding version. Additionally, each club includes a t-shirt that reads, “Bacon is Meat Candy.”

Depending on the club, your selections will vary, but you can typically sign up for 3, 6, or 12 months. $50 a month on average is the cost.

Goldbelly: Best Bacon clubs of the month

Image via Unsplash.com

How about this Goldbelly Monthly Bacon Subscription for a different bacon club? Goldbelly doesn’t concentrate only on one kind of bacon. The company adds alternatives like seasoned, thick stripped, or double smoked to keep things new. There are no specifics regarding the quantity or dimensions of the bacon packages. However, there will be enough bacon in each box to feed 6 people.

The cost of the bacon subscription is $65 per month for 3 and 6 months. You might receive bacon from the renowned NYC butcher Schaller & Weber, the Kurobuta Thick Cut Bacon from Snake River Farm, the Extra Thick Cut Bacon from Brooklyn’s illustrious Peter Luger, and the Iconic Loveless Café Southern Bacon Sampler from Nashville, among others.

Zingerman’s bacon club: Bacon clubs of the month

Another intriguing option is the Zingerman’s Bacon Club. It costs on average $38 per month and is available for orders of 3, 6, or 12 months. The amount of bacon in each monthly supply ranges from 12 to 16 ounces. You receive more than just bacon. Recipes, histories, and tales about bacon are all featured. Even a magnet of a pig and a keepsake primer are included in the first month.

There is one more thing to talk about. The majority of clubs choose the products you receive right before shipment, so you always get a surprise. Different subscriptions are available from Zingerman’s. The website provides a list of the monthly deliveries. For instance, you will always receive Arkansas Peppered Bacon and Kentucky Dry Cured Bacon in the first and second order respectively.

Pig of the Month Club

Image via Unsplash.com

This Pig of the Month Club membership is for you if you enjoy bacon with different flavors. 1 pound of each flavor is included in the 2 pounds of bacon that are delivered each month. You can always trust that the bacon is top-notch because it is produced by the business itself. Compared to receiving bacon from several producers each month, this is more enticing in many respects.

A guide to flavors is also available on the website. The flavors that are scheduled for each month are described in detail here. It uses dishes like Chipotle Spiced Bacon, Chile Margarita Bacon, and Lavender Honey Bacon as examples.

For the base plan, a monthly subscription fee of $43 is required. If you select a membership for 3, 6, or 9, the monthly cost changes somewhat.

iGourmet: Best Bacon clubs of the month

Because there are so many subscriptions and gifts to chose from on the website, iGourmet can be a fantastic option. One example is their Bacon of the Month Club. Two packets of bacon are delivered to you each month as part of the subscription. These are always between 12 and 16 ounces in size and are made by artisan makers.

The information is particularly interesting. The club sends you a thorough newsletter. This provides a wealth of information about the bacon that was selected for the month, including the manufacturer and the processes they employ.

Choose from monthly, three months, six months, or twelve months for the length of your subscription.

The Heritage Foods Bacon

Image via Unsplash.com

The Heritage Foods Bacon Subscription is an intriguing option if you’re searching for a little bit more bacon each month. Only monthly memberships are available for the club, which costs $59 a month. It is a simple subscription to start and stop as needed because you have the option to cancel at any moment.

You get three packets of bacon per month, or about three pounds, when you join this club. That amounts to 3 pounds of delectable bacon per month. How can you possibly err?

The bacon is picked carefully from a variety of American artists. Some of these are brand-new to the industry, while others have been around for a long. Due to the fact that each producer has their unique methods and distinct products, this style is quite effective.

USEFUL LINKS:

Best bacon clubs of the month, know more
Fast food you can easily make at home